Tag Archives: Science

Livestreaming Is The New Taping – Here Are Some Helpful Hints For The Audio

An article for Schwilly Family Musicians.

Please Remember:

The opinions expressed are mine only. These opinions do not necessarily reflect anybody else’s opinions. I do not own, operate, manage, or represent any band, venue, or company that I talk about, unless explicitly noted.

Want to use this image for something else? Great! Click it for the link to a high-res or resolution-independent version.

“The thing with taping or livestreaming is that the physics and logistics have not really changed. Sure, the delivery endpoints are different, especially with livestreaming being a whole bunch of intangible data being fired over the Internet, but how you get usable material is still the same. As such, here are some hints from the production-staff side for maximum effectiveness, at least as far as the sound is concerned…”


The rest is here. You can read it for free!


Hitting The Far Seats

A few solutions to the “even coverage” problem, as it relates to distance.

Please Remember:

The opinions expressed are mine only. These opinions do not necessarily reflect anybody else’s opinions. I do not own, operate, manage, or represent any band, venue, or company that I talk about, unless explicitly noted.

Want to use this image for something else? Great! Click it for the link to a high-res or resolution-independent version.

This article, like the one before it, isn’t really “small venue” in nature. However, I think it’s good to spend time on audio concepts which small-venue folk might still run across. I’m certainly not “big-time,” but I still do the occasional show that involves more people and space. I (like you) really don’t need to get engaged with a detailed discussion regarding an enormous system that I probably won’t ever get my hands on, but the fundamentals of covering the people sitting in the back are still valuable tools.

This article is also very much a follow up to the piece linked above. Via that lens, you can view it as a discussion of what the viable options are for solving the difficulties I ran into.

So…

The way that you get “throw” to the farthest audience members is dependent upon the overall PA deployment strategy you’re using. Deployment strategies are dependent upon the gear in question being appropriate for that strategy, of course; You can’t choose to deploy a bunch of point-source boxes as a line-array and have it work out very well. (Some have tried. Some have thought it was okay. I don’t feel comfortable recommending it.)

Option 1: Single Arrival, “Point Source” Flavor

You can build a tall stack or hang an array with built-in, non-changeable angles, but both cases use the same idea: Any given audience member should really only hear one box (per side) at a time. Getting the kind of directivity necessary for that to be strictly true is quite a challenge at lower frequencies, so the ideal tends to not be reached. Nevertheless, this method remains viable.

I’ve termed this deployment flavor as “single arrival” because all sound essentially originates at the same distance from any given audience member. In other words, all the PA loudspeakers for each “side” are clustered as closely as is practical. The boxes meant to be heard up close are run at a significantly lower level than the boxes meant to cover the far-field. A person standing 50 feet from the stage might be hearing a loudspeaker making 120 dB SPL at 3 feet, whereas the patrons sitting 150 feet away would be hearing a different box – possibly stacked atop the first speaker – making 130 dB SPL at 3 feet. As such, the close-range listener is getting about 96 dB SPL, and the far-field audience member also hears a show at roughly 96 dB SPL.

This solution is relatively simple in some respects, though it requires the capability of “zone” tuning, as well as loudspeakers capable of high-output and high directivity. (You don’t want the up-close audience to get cooked by the loudspeaker that’s making a ton of noise for the long-distance people.)

Option 2: Single Arrival, Line-Array Flavor

As in the point source flavor, you have one array deployed “per side,” with each individual box as close to the other boxes as is achievable. The difference is that an honest-to-goodness line-array is meant to work by the audible combination of multiple loudspeakers. At very close distances, it may be possible to only truly hear a small part of the line, and this does help in keeping the nearby listeners from having their faces ripped off. However, the overall idea is to create a radiation pattern that resembles a section of a cylinder. (Perfect achievement of such a pattern isn’t really feasible.) This is in contrast to point-source systems, where the pattern tends towards a section of a sphere.

As is the case in many areas of life, everything comes down to surface area. A sphere’s surface area is 4*pi*radius^2, whereas the lateral surface area of a cylinder is 2*pi*radius*height. The perceived intensity of sound is the audible radiation spread across the surface area of the radiation geometry. More surface area means less intensity.

To keep the calculations manageable, I’ll have to simplify from sections of shapes to entire shapes. Even so, some comparisons can be made: At a distance of 150 feet, the sound power radiating in a spherical pattern is spread over a surface area of 282,743 square feet. For a 10-foot high cylinder, the surface area is 9424 square feet.

For the sphere, 4 watts of sound power (NOT electrical power!) means that a listener at the 150 foot radius gets a show that’s about 71 dB. For the cylinder, the listener at 100 feet should be getting about 86 dB. At the close-range distance of 50 feet, the cylindrical radiation pattern results in a sound level of 91 dB, whereas a spherical pattern gets 81 dB.

Putting aside for the moment that I’m assuming ideal and mathematically easy conditions, the line-array has a clear advantage in terms of consistency (level difference in the near and far fields) without a lot of work at tuning individual boxes. At the same time, it might not be quite as easily customizable as some point-source configurations, and a real line-source capable of rock-n-roll volume involves a good number of relatively expensive elements. Plus, a real line has to be flown, and with generous trim height as well.

Option 3: Multiple Arrival, Any Flavor

This is otherwise known as “delays.” At some convenient point away from the main PA system, a supplementary PA is set. The signal to that supplementary PA is made to be late, such that the far system aligns pleasingly with the sound from the main system. The hope is that most people will overwhelmingly hear one system over the other.

The point with this solution is to run everything more quietly and more evenly by making sure that no audience member is truly in the deep distance. If each PA only has to cover a distance of 75 feet, then an SPL of 90 dB at that distance requires 118 dB at 3 feet.

The upside to this approach is that the systems don’t have to individually be as powerful, nor do they strictly need to have high-directivity (although it’s quite helpful in keeping the two PA systems separate for the listeners behind the delays). The downside is that it requires more space and more rigging – whether actual rigging or just loudspeakers raised on poles, stacks, or platforms. Additionally, you have to deal with more signal and/ or power runs, possibly in difficult or high-traffic areas. It also requires careful tuning of the delay time to work properly, and even then, being behind or to the side of the delays causes the solution to be invalid. In such a condition where both systems are quite audible, the coherence of the reproduced audio suffers tremendously.


If I end up trying the Gallivan show again, I think I’ll go with delays. I don’t have the logistical resources to handle big, high-output point-source boxes or a real array. I can, on the other hand, find a way to boxes up on sticks with delay applied. I can’t say that I’m happy about the potential coherence issues, but everything in audio is a compromise in some way.


What Went Wrong At The Big Gig

Sometimes a show will really kick your butt.

Please Remember:

The opinions expressed are mine only. These opinions do not necessarily reflect anybody else’s opinions. I do not own, operate, manage, or represent any band, venue, or company that I talk about, unless explicitly noted.

Want to use this image for something else? Great! Click it for the link to a high-res or resolution-independent version.

Do this type of work long enough, and there will come a certain day. On that day, you will think, “If just about half of this audience goes home being totally pissed at me, I’ll call that a win.”

For me, that day came last weekend.

I was handling a show out at the Gallivan Center, a large, outdoor event space in the heart of Salt Lake. The day started well (I didn’t have to fight for parking, and I had both a volunteer crew and my ultra-smart assistant to help me out), and actually ended on a pretty okay note (dancing and cheering), but I would like to have skipped over the middle part.

It all basically boils down to disappointing a large portion of an audience.

I’ve come to terms with the reality that I’m always going to disappoint someone. There will always be “THAT guy” in the crowd who wants the show to have one kind of sound, a sound that you’ve never prioritized (or a sound that you simply don’t want). That person is just going to have to deal – and interestingly, they are often NOT the person writing the checks, so there’s a certain safety in being unruffled by their kerfuffle. However, when a good number of people are in agreement that things just aren’t right, well, that can turn a gig into “40 miles of bad road.”

Disappointment is a case of mismatched expectations. The thing with a show is that a mismatch can happen very early…and then proceed to snowball.

For instance, someone might say to me: “You didn’t seriously expect to do The Gallivan with your mini-concert rig, did you?”

No, I did not expect that, and therein lies a major contributing factor. “Doing The Gallivan” means covering a spread-out crowd of 1500+ people with rock-n-roll volume. I am under no illusions as to my capability in that space (which is no capability at all). What I thought I was going to do was to hit a couple hundred merry-makers with acoustic folk, Bluegrass, and “Newgrass” tunes. I thought they’d be packed pretty closely together near the stage, with maybe the far end of the crowd being up on the second tier of lawn.

I suppose you can guess that’s not what happened.

For most of the night, the area in front of the stage was barely populated at all. I remembered that particular piece of the venue as being turf (back in the day), but now it’s a dancefloor. That meant that the patrons who wanted to sit – and that was the vast majority – basically started where I was at FOH. Effectively, this created a condition like what you would see at a larger festival, where the barricade might be 40 – 50 feet from the stage.

Now add to this that we had a pretty ample crowd, and that they ended about 150 feet away from the deck.

Also add in that a lot of what we were doing was “traditional,” or in other words, acoustic instruments that were miced. Folk and Bluegrass really are not that loud in the final analysis, which means that making them unnaturally loud in order to get “throw” from a single source is a difficult proposition.

Fifty feet out, there were points where I was lucky to make about 85 dB SPL C-weighted. After that, gain-before-feedback started to become a real conundrum. Now, imagine that you’re three times that distance, at where the lawn ends. That meant that all you got was about 75 dB C, which isn’t much to compete against traffic noise and conversations.

Things got louder later. The closing acts were acoustic-electric “Newgrass,” which meant I could make as much noise as the rig would give me. That would have gotten us music lovers to about 94 – 97 dB C at FOH (by my guess). The folks in the back, then, were just starting to hear home-stereo level noise.

In any case, I was complained at quite a bit (by my standards). I think I spent at least 50% of the show wanting to crawl into a hole and hide. That we had some feedback issues didn’t help…when you’re riding the ragged edge trying to make more volume, you sometimes fall off the surfboard. We also had some connectivity problems with the middle act that put us behind, and further aggravated my sense of not delivering a standout performance.

Like I said, there was some good news by the time we shut the power off. Even before then, too. The people who were getting the volume they wanted appeared to be enjoying themselves. Most of the bands seemed happy with how the sound worked out on the stage itself, and the audience as a whole was joyous enough at the end that I no longer felt the oppressive weight of imagining the crowd as a disgruntled gestalt entity. Still, I wasn’t going to win any awards for how everything turned out. I was smarting pretty badly during the strike and van pack.

But, you know, some of the most effective learning in life happens when you fall over and tear up your knees. I can certainly tell you what I think could be done to make the next go-around a bit more comfortable.

That will have to wait for the next installment, though.


The Great, Quantitative, Live-Mic Shootout

A tool to help figure out what (inexpensive) mic to buy.

Please Remember:

The opinions expressed are mine only. These opinions do not necessarily reflect anybody else’s opinions. I do not own, operate, manage, or represent any band, venue, or company that I talk about, unless explicitly noted.

Want to use this image for something else? Great! Click it for the link to a high-res or resolution-independent version.

See that link up there in the header?

It takes you to The Great, Quantitative, Live-Mic Shootout, just like this link does. (Courtesy of the Department of Redundancy Department.)

And that’s a big deal, because I’ve been thinking and dreaming about doing that very research project for the past four years. Yup! The Small Venue Survivalist is four years old now. Thanks to my Patreon supporters, past and present, for helping to make this idea a reality.

I invite you to go over and take a look.


The Unterminated Line

If nothing’s connected and there’s still a lot of noise, you might want to call the repair shop.

Please Remember:

The opinions expressed are mine only. These opinions do not necessarily reflect anybody else’s opinions. I do not own, operate, manage, or represent any band, venue, or company that I talk about, unless explicitly noted.

Want to use this image for something else? Great! Click it for the link to a high-res or resolution-independent version.

“I thought we fixed the noise on the drum-brain inputs?” I mused aloud, as one of the channels in question hummed like hymenoptera in flight. I had come in to help with another rehearsal for the band called SALT, and I was perplexed. We had previously chased down a bit of noise that was due to a ground loop; Getting everything connected to a common earthing conductor seemed to have helped.

Yet here we were, channel two stubbornly buzzing away.

Another change to the power distribution scheme didn’t help.

Then, I disconnected the cables from the drum-brain. Suddenly – the noise continued, unchanged. Curious. I pulled the connections at the mixer side. Abruptly, nothing happened. Or rather, the noise continued to happen. Oh, dear.


When chasing unwanted noise, disconnecting things is one of your most powerful tools. As you move along a signal chain, you can break the connection at successive places. When you open the circuit and the noise stops, you know that the supplier of your spurious signal is upstream of the break.

Disconnecting the cable to the mixer input should have resulted in relative silence. An unterminated line, that is, an input that is NOT connected to upstream electronics, should be very quiet in this day and age. If something unexplained is driving a console input hard enough to show up on an input meter, yanking out the patch should yield a big drop in the visible and audible level. When that didn’t happen, logic dictated an uncomfortable reality:

1) The problem was still audible, and sounded the same.

3) The input meter was unchanged, continuing to show electrical activity.

4) Muting the input stopped the noise.

5) The problem was, therefore, post the signal cable and pre the channel mute.

In a digital console, this strongly indicates that something to do with the analog input has suffered some sort of failure. Maybe the jack’s internals weren’t quite up to spec. Maybe a solder joint was just good enough to make it through Quality Control, but then let go after some time passed.

In any case, we didn’t have a problem we could fix directly. Luckily, we had some spare channels at the other end of the input count, so we moved the drum-brain connections there. The result was a pair of inputs that were free of the annoying hum, which was nice.

But if you looked at the meter for channel two, there it still was: A surprisingly large amount of input on an unterminated line.


The Grand Experiment

A plan for an objective comparison of the SM58 to various other “live sound” microphones.

Please Remember:

The opinions expressed are mine only. These opinions do not necessarily reflect anybody else’s opinions. I do not own, operate, manage, or represent any band, venue, or company that I talk about, unless explicitly noted.

Want to use this image for something else? Great! Click it for the link to a high-res or resolution-independent version.

Purpose And Explanation

Ever since The Small Venue Survivalist became a reality, I have wanted to do a big experiment. I’ve been itching to round up a bunch of microphones that can be purchased for either below, or slightly above the price point of the SM58, and then to objectively compare them to an SM58. (The Shure SM58 continues to be an industry standard microphone that is recognized and accepted everywhere as a sound-reinforcement tool.)

The key word above is “objectively.” Finding subjective microphone comparisons isn’t too hard. Sweetwater just put together (in 2017) a massive studio-mic shootout, and it was subjective. That is, the measurement data is audio files that you must listen to. This isn’t a bad thing, and it makes sense for studio mics – what matters most is how the mic sounds to you. Listening tests are everywhere, and they have their place.

In live audio, though, the mic’s sound is only one factor amongst many important variables. Further, these variables can be quantified. Resistance to mechanically-induced noise can be expressed as a decibel number. So can resistance to wind noise. So can feedback rejection. Knowing how different transducers stack up to one another is critical for making good purchasing decisions, and yet this kind of quantitative information just doesn’t seem to be available.

So, it seems that some attempt at compiling such measurements might be helpful.

Planned Experimental Procedure

Measure Proximity Effect

1) Generate a 100Hz tone through a loudspeaker at a repeatable SPL.

2) Place the microphone such that it is pointed directly at the center of the driver producing the tone. The front of the grill should be 6 inches from the loudspeaker baffle.

3) Establish an input level from the microphone, and note the value.

4) Without changing the orientation of the microphone relative to the driver, move the microphone to a point where the front of the grill is 1 inch from the loudspeaker baffle.

5) Note the difference in the input level, relative to the level obtained in step 3.

Assumptions: Microphones with greater resistance to proximity effect will exhibit a smaller level differential. Greater proximity effect resistance is considered desirable.

Establish “Equivalent Gain” For Further Testing

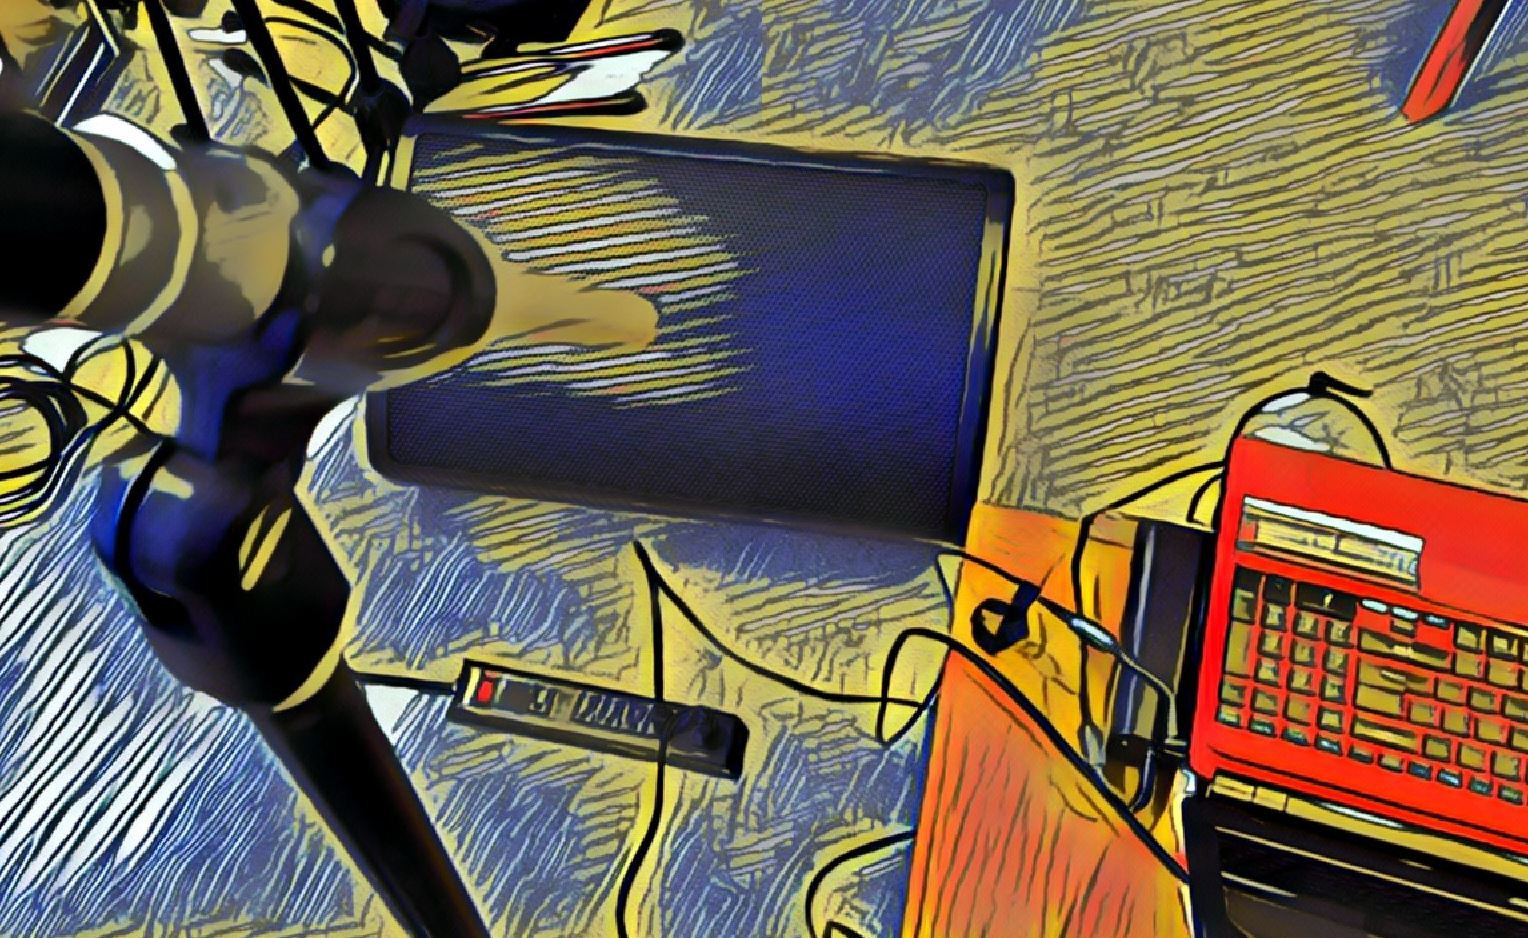
1) Place a monitor loudspeaker on the floor, and position the microphone on a tripod stand. The stand leg nearest the monitor should be at a repeatable distance, at least 1 foot from the monitor enclosure.

2) Set the height of the microphone stand to a repeatable position that would be appropriate for an average-height performer.

3) Changing the height of the microphone as little as possible, point the microphone directly at the center of the monitor.

4) Generate pink-noise through the monitor at a repeatable SPL.

5) Using a meter capable of RMS averaging, establish a -40 dBFS RMS input level.

Measure Mechanical Noise Susceptibility

1) Set the microphone such that it is parallel to the floor.

2) Directly above the point where the microphone grill meets the body, hold a solid, semi-rigid object (like an eraser, or small rubber ball) at a repeatable distance at least 1 inch over the mic.

3) Allow the object to fall and strike the microphone.

4) Note the peak input level created by the strike.

Assumptions: Microphones with greater resistance to mechanically induced noise will exhibit a lower input level. Greater resistance to mechanically induced noise is considered desirable.

Measure Wind Noise Susceptibility

1) Position the microphone on the stand such that it is parallel to the floor.

2) Place a small fan (or other source of airflow which has repeatable windspeed and air displacement volume) 6 inches from the mic’s grill.

3) Activate the fan for 10 seconds. Note the peak input level created.

Assumptions: Microphones with greater resistance to wind noise will exhibit a lower input level. Greater resistance to wind noise is considered desirable.

Measure Feedback Resistance

1) Set the microphone in a working position. For cardioid mics, the rear of the microphone should be pointed directly at the monitor. For supercardioid and hypercardioid mics, the the microphone should be parallel with the floor.

2a) SM58 ONLY: Set a send level to the monitor that is just below noticeable ringing/ feedback.

2b) Use the send level determined in 2a to create loop-gain for the microphone.

3) Set a delay of 1000ms to the monitor.

4) Begin a recording of the mic’s output.

5) Generate a 500ms burst of pink-noise through the monitor. Allow the delayed feedback loop to sound several times.

6) Stop the recording, and make note of the peak level of the first repeat of the loop.

Assumptions: Microphones with greater feedback resistance will exhibit a lower input level on the first repeat. Greater feedback resistance is considered desirable.

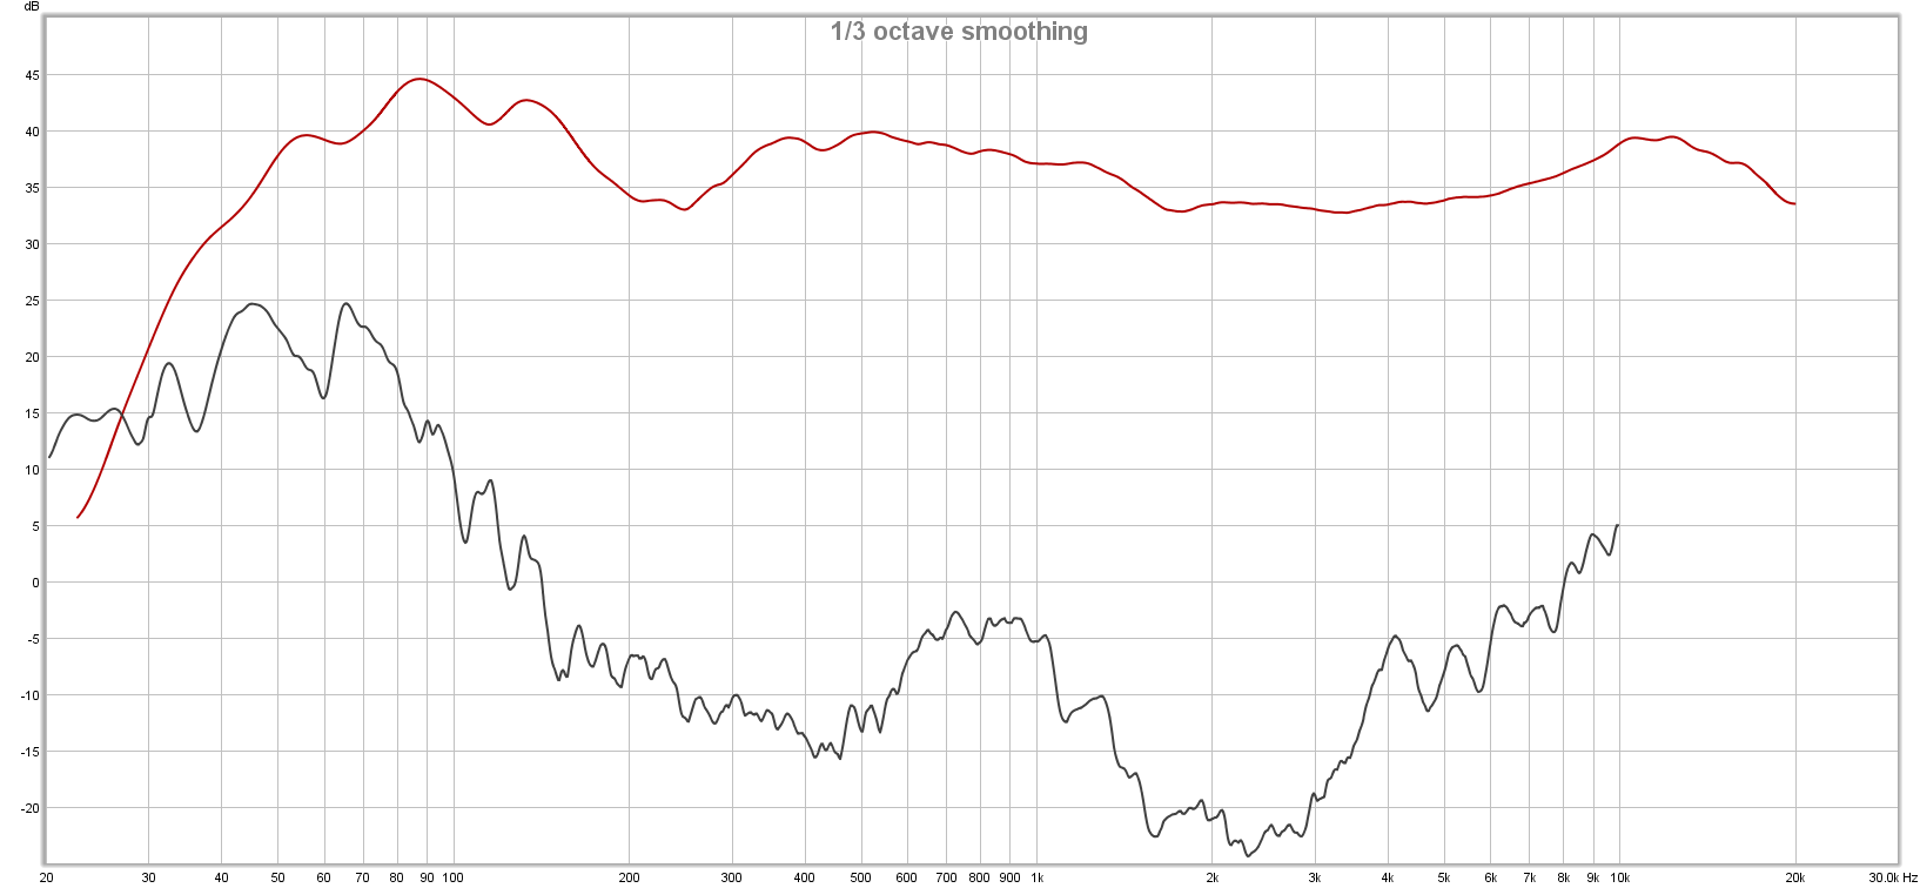
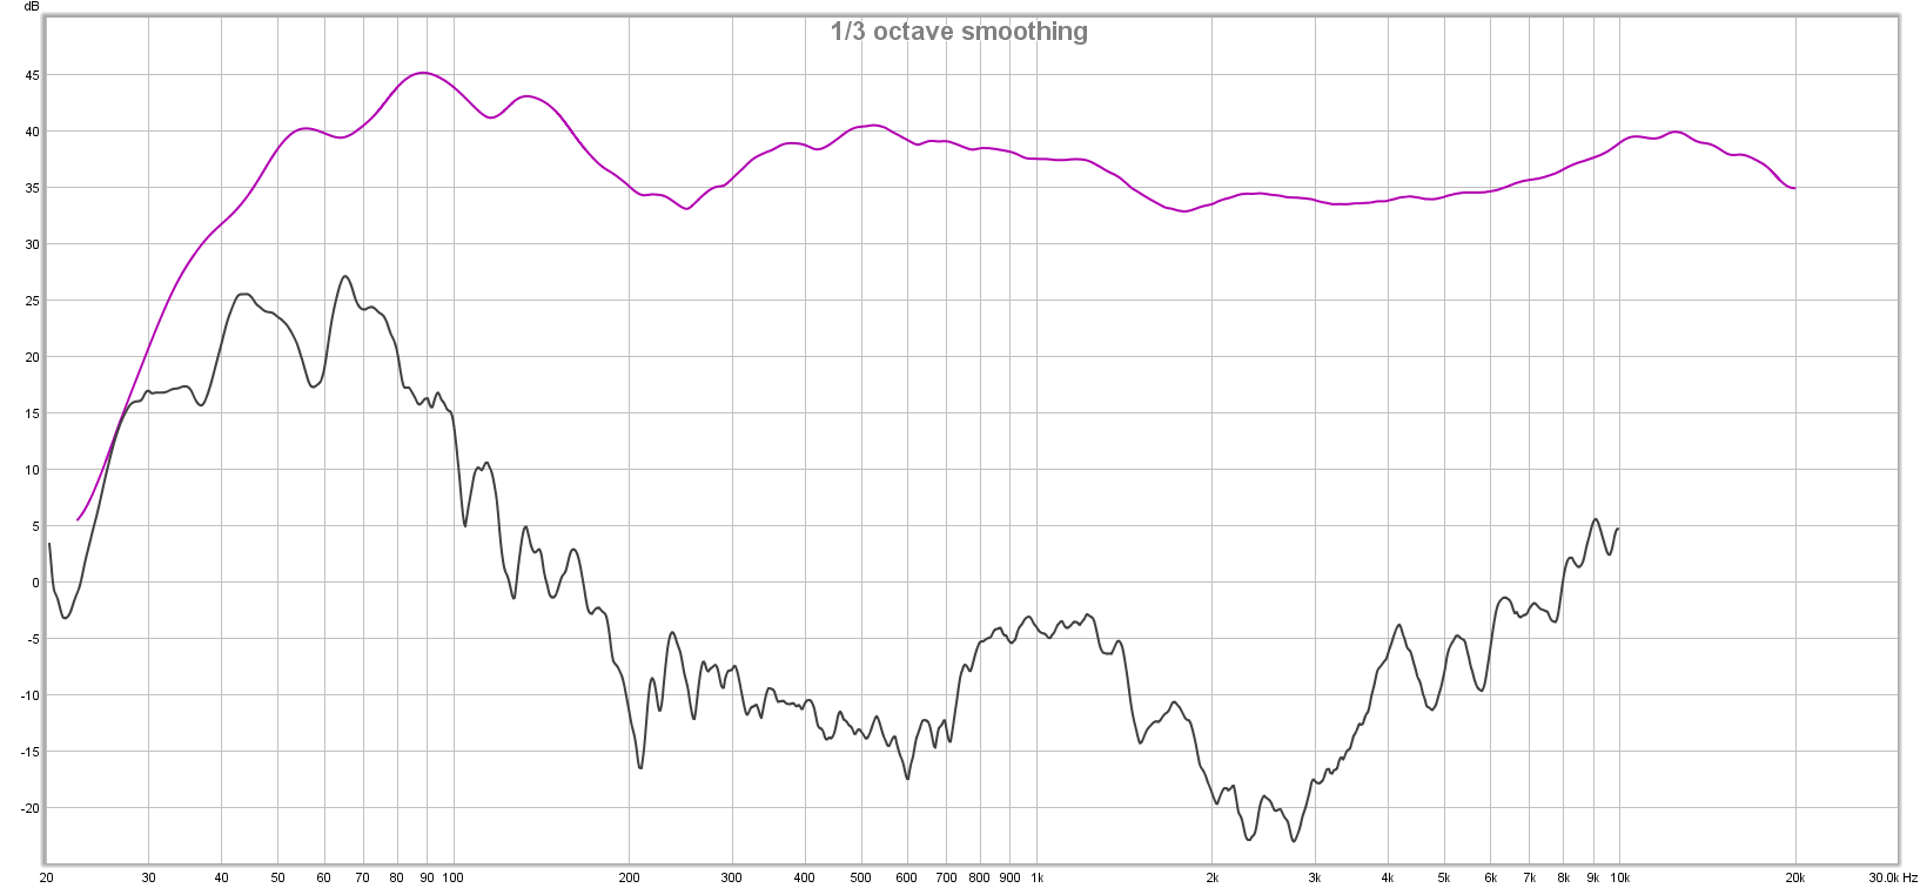
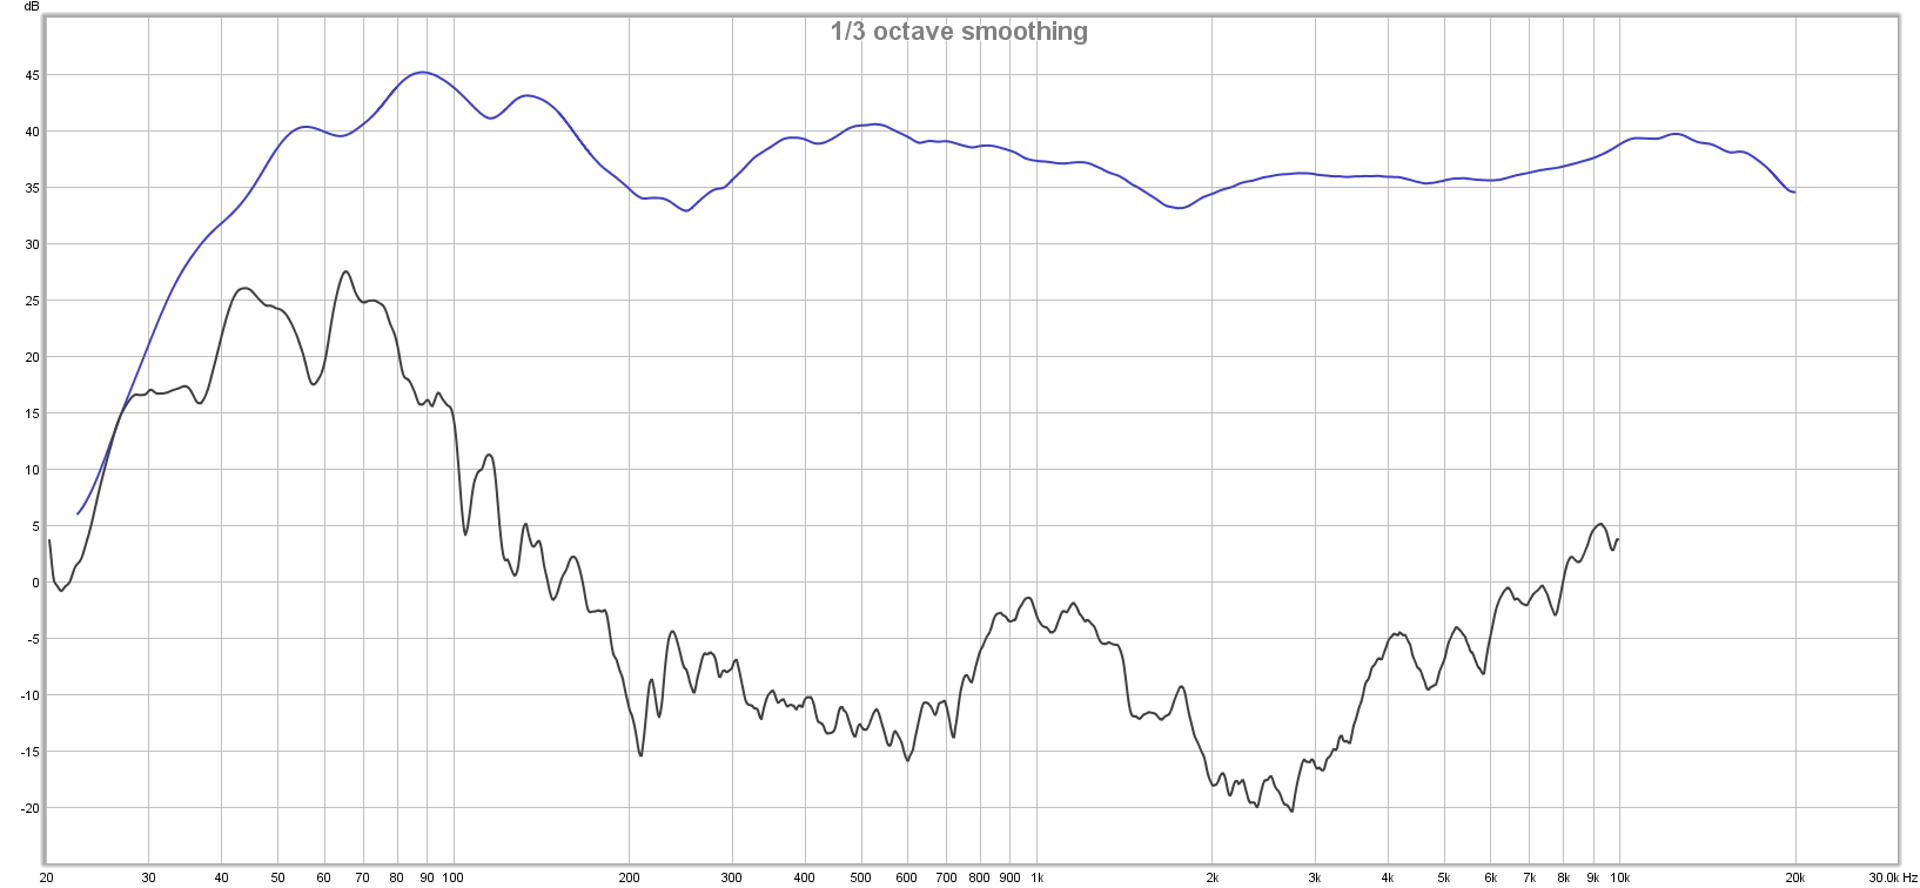
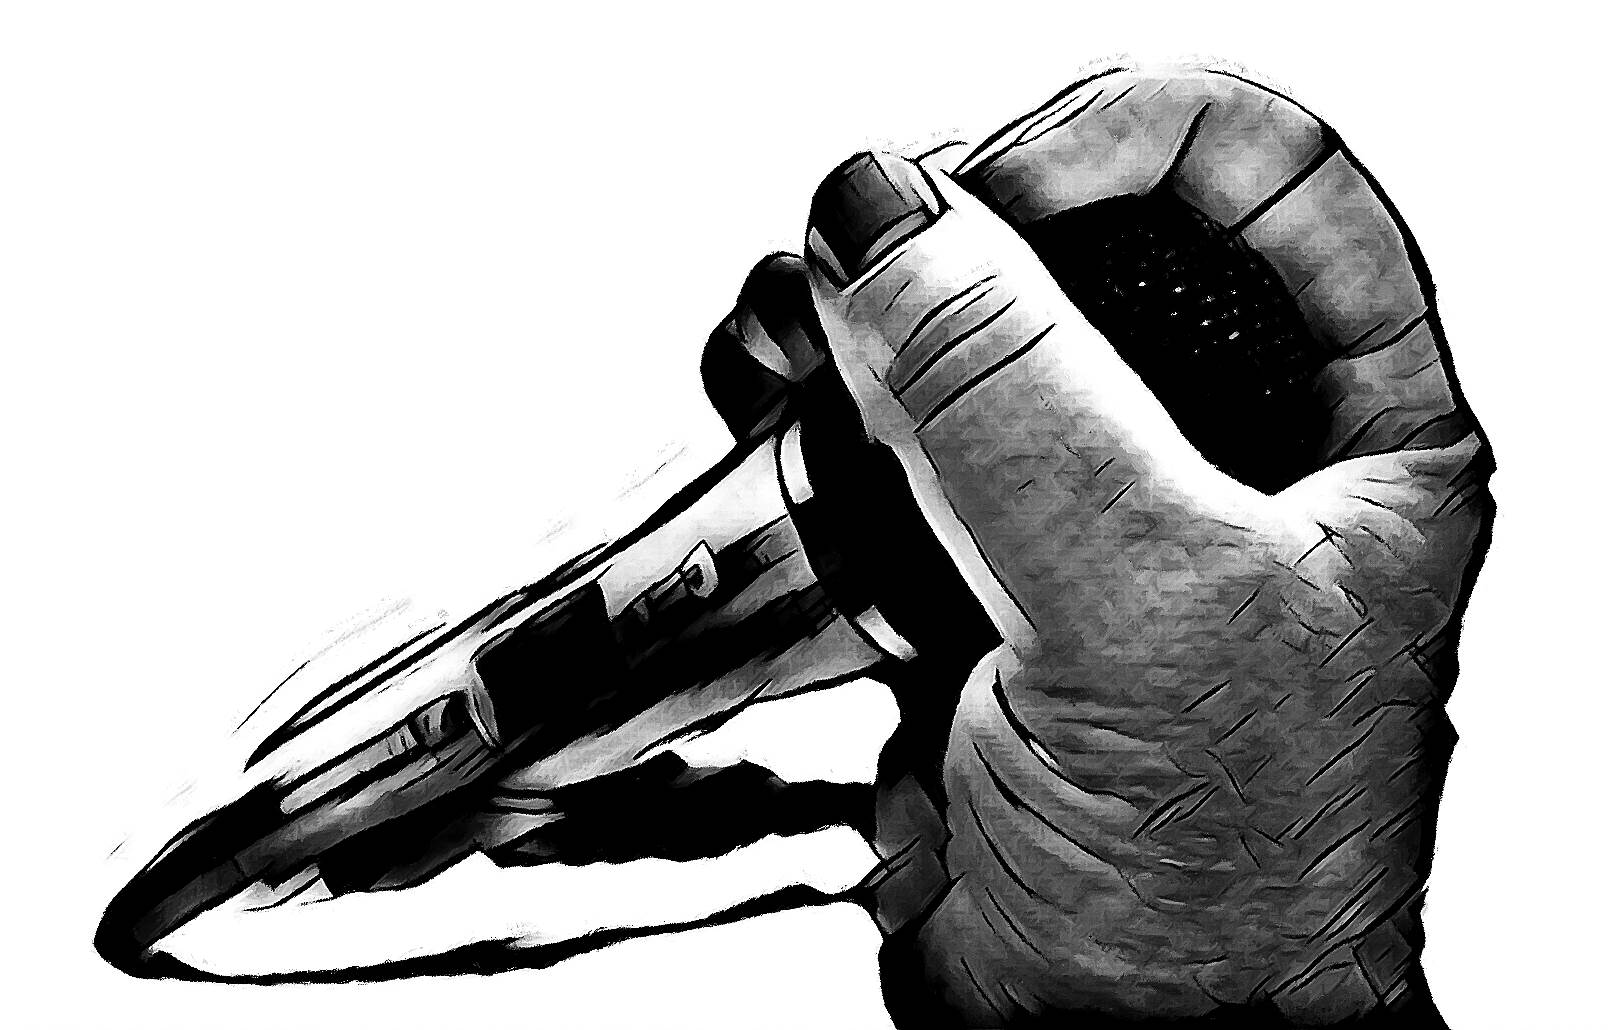
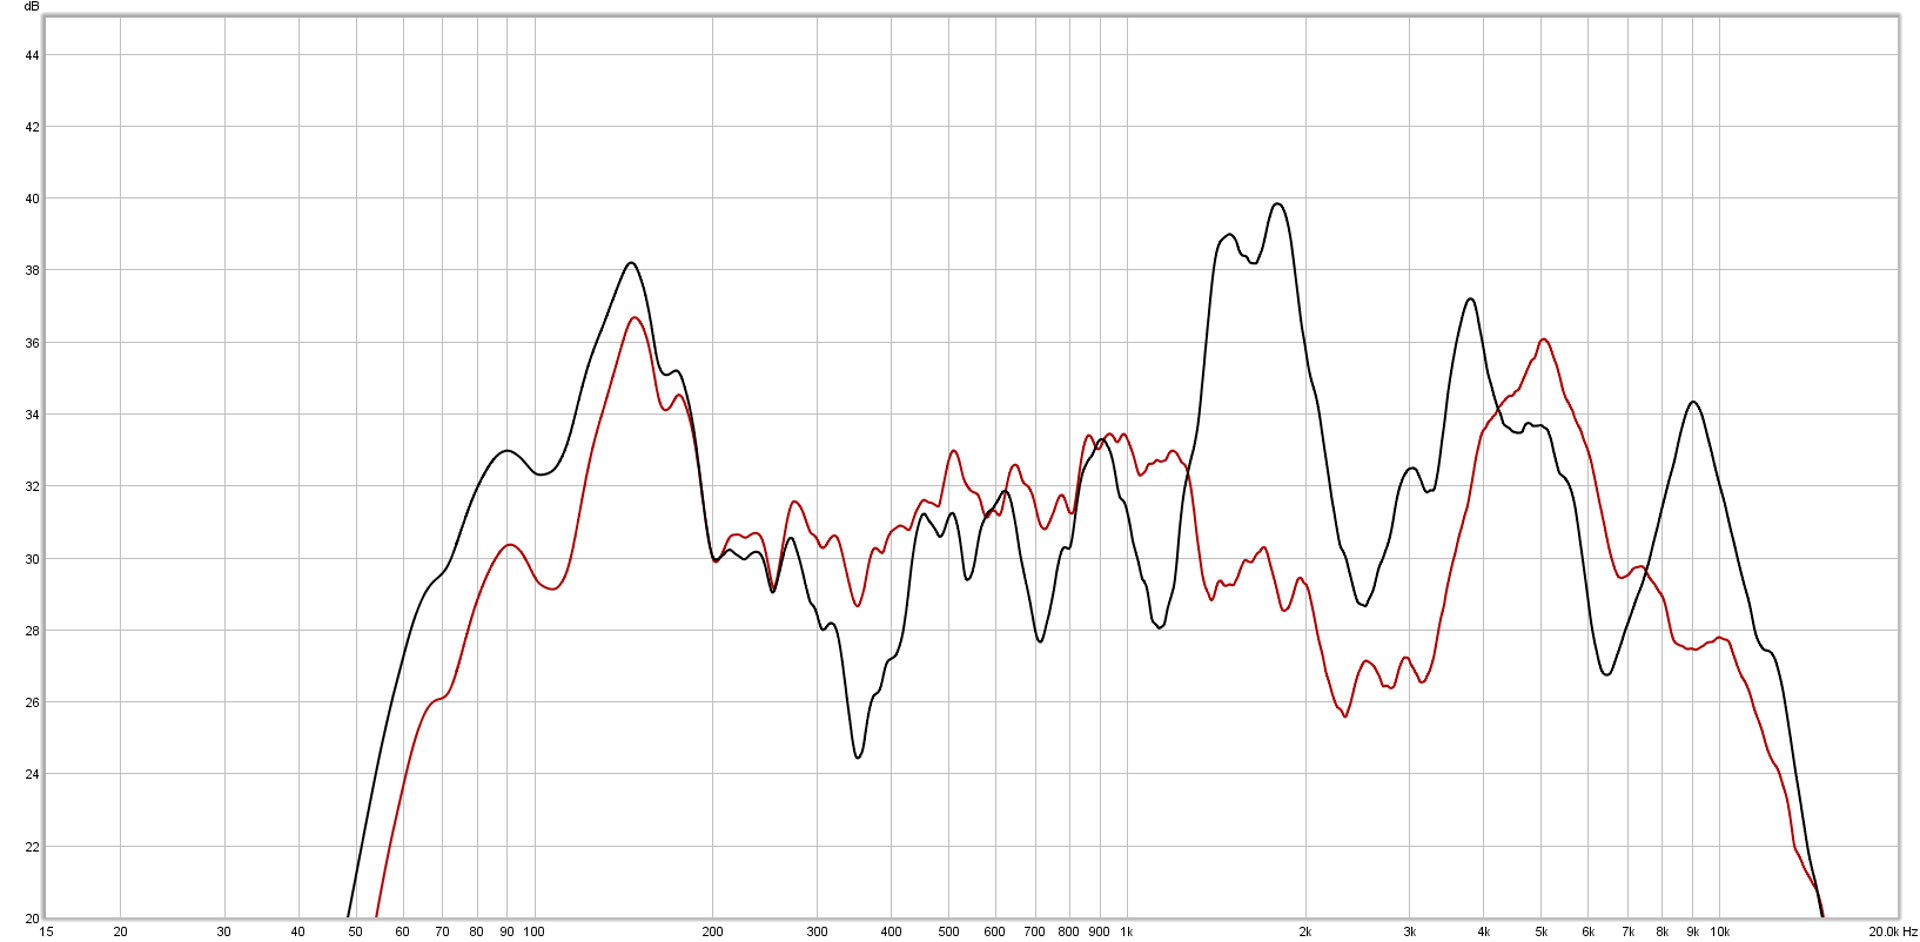
Measure Cupping Resistance

1) Mute the send from the microphone to the monitor.

2) Obtain a frequency magnitude measurement of the microphone in the working position, using the monitor as the test audio source.

3) Place a hand around as much of the mic’s windscreen as is possible.

4) Re-run the frequency magnitude measurement.

5) On the “cupped” measurement, note the difference between the highest response peak, and that frequency’s level on the normal measurement.

Assumptions: Microphones with greater cupping resistance will exhibit a smaller level differential between the highest peak of the cupped response and that frequency’s magnitude on the normal trace. Greater cupping resistance is considered desirable.


THD Troubleshooting

I might have discovered something, or I might not.

Please Remember:

The opinions expressed are mine only. These opinions do not necessarily reflect anybody else’s opinions. I do not own, operate, manage, or represent any band, venue, or company that I talk about, unless explicitly noted.

Want to use this image for something else? Great! Click it for the link to a high-res or resolution-independent version.

Over the last little while, I’ve done some shows where I could swear that something strange was going on. Under certain conditions, like with a loud, rich vocal that had nothing else around it, I was sure that I could hear something in FOH distort.

So, I tried soloing up the vocal channel in my phones. Clean as a whistle.

I soloed up the the main mix. That seemed okay.

Well – crap. That meant that the problem was somewhere after the console. Maybe it was the stagebox output, but that seemed unlikely. No…the most likely problem was with a loudspeaker’s drive electronics or transducers. The boxes weren’t being driven into their limiters, though. Maybe a voice coil was just a tiny bit out of true, and rubbing?

Yeesh.

Of course, the very best testing is done “In Situ.” You get exactly the same signal to go through exactly the same gear in exactly the same place. If you’re going to reproduce a problem, that’s your top-shelf bet. Unfortunately, that’s hard to do right in the middle of a show. It’s also hard to do after a show, when Priority One is “get out in a hurry so they can lock the facility behind you.”

Failing that – or, perhaps, in parallel with it – I’m becoming a stronger and stronger believer in objective testing: Experiments where we use sensory equipment other than our ears and brains. Don’t get me wrong! I think ears and brains are powerful tools. They sometimes miss things, however, and don’t natively handle observations in an analytical way. Translating something you hear onto a graph is difficult. Translating a graph into an imagined sonic event tends to be easier. (Sometimes. Maybe. I think.)

This is why I do things like measure the off-axis response of a cupped microphone.

In this case, though, a simple magnitude measurement wasn’t going to do the job. What I really needed was distortion-per-frequency. Room EQ Wizard will do that, so I fired up my software, plugged in my Turbos (one at a time), and ran some trials. I did a set of measurements at a lower volume, which I discarded in favor of traces captured at a higher SPL. If something was going to go wrong, I wanted to give it a fighting chance of going wrong.

Here’s what I got out of the software, which plotted the magnitude curve and the THD curve for each loudspeaker unit:

I expected to see at least one box exhibit a bit of misbehavior which would dramatically affect the graph, but that’s not what I got. What I can say is that the first measurement’s overall distortion curve is different, lacking the THD “dip” at 200 Hz that the other boxes exhibit, significantly more distortion in the “ultra-deep” LF range, and with the “hump” shifted downwards. (The three more similar boxes center that bump in distortion at 1.2 kHz. The odd one out seems to put the center at about 800 Hz.)

So, maybe the box that’s a little different is my culprit. That’s my strong suspicion, anyway.

Or maybe it’s just fine.

Hmmmmm…


Measuring A Cupped Mic

What you might think would happen isn’t what happens.

Please Remember:

The opinions expressed are mine only. These opinions do not necessarily reflect anybody else’s opinions. I do not own, operate, manage, or represent any band, venue, or company that I talk about, unless explicitly noted.

Want to use this image for something else? Great! Click it for the link to a high-res or resolution-independent version.

The most popular article on this site to date is the one where I talk about why cupping a vocal mic is generally a “bad things category” sort of experience. In that piece, I explain some general issues with wrapping one’s hand around a microphone grill, but there’s something I didn’t do:

I didn’t measure anything.

That reality finally dawned on me, so I decided to do a quck-n-dirty experiment on how a microphone’s transfer function changes when cupping comes into play. Different mics will do different things, so any measurement is only valid for one mic in one situation. However, even if the results can’t truly be generalized, they are illuminating.

In the following picture, the red trace is a mic pointing away from a speaker, as you would want to happen in monitor-world. The black trace is the mic in the same position, except with my hand covering a large portion of the windscreen mesh.

You would think that covering a large part of the mic’s business-end would kill off a lot of midrange and high-frequency information, but the measurement says otherwise. The high-mid and HF information is actually rather hotter, with large peaks at 1800 Hz, 3900 Hz, and 9000 Hz. The low frequency response below 200 Hz is also given a small kick in the pants. Overall, the microphone transfer function is “wild,” with more pronounced differences between peaks and dips.

The upshot? The transducer’s feedback characteristics get harder to manage, and the sonic characteristics of the unit begin to favor the most annoying parts of the audible spectrum.

Like I said, this experiment is only valid for one mic (a Sennheiser e822s that I had handy). At the same time, my experience is that other mics have “cupping behavior” which is not entirely dissimilar.


The Difference Between The Record And The Show

Why is it that the live mix and the album mix end up being done differently?

Please Remember:

The opinions expressed are mine only. These opinions do not necessarily reflect anybody else’s opinions. I do not own, operate, manage, or represent any band, venue, or company that I talk about, unless explicitly noted.

Want to use this image for something else? Great! Click it for the link to a high-res or resolution-independent version.

Jason Knoell runs H2Audio in Utah, and he recently sent me a question that essentially boils down to this: If you have a band with some recordings, you can play those recordings over the same PA in the same room as the upcoming show. Why is it that the live mix of that band, in that room, with that PA might not come together in the same way as the recording? The recording that you just played over the rig? Why would you NOT end up having the same relationship between the drums and guitars, or the guitars and the vocals, or [insert another sonic relationship here].

This is one of those questions where trying to address every tiny little detail isn’t practical. I will, however, try to get into the major factors I can readily identify. Please note that I’m ignoring room acoustics, as those are a common factor between a recording and a live performance being played into the same space.

Magnitude

It’s very likely that the recording you just pumped out over FOH (Front Of House) had a very large amount of separation between the various sources. Sure, the band might have recorded the songs in such a way as to all be together in one room, but even then, the “bleed” factor is very likely to be much smaller than what you get in a live environment. For instance, a band that’s in a single-room recording environment can be set up with gobos (go-betweens) screening the amps and drums. The players can also be physically arranged so that any particular mic has everything else approaching the element from off-axis.

They also probably recorded using headphones for monitors, and overdubbed the “keeper” vocals. They may also have gone for extreme separation and overdubbed EVERYTHING after putting down some basics.

Contrast this with a typical stage, where we’re blasting away with wedge loudspeakers, we have no gobos to speak of, and all the backline is pointed at the sensitive angles of the vocal mics. Effectively, everything is getting into everything else. Even if we oversimplify and look only at the relative magnitudes between sounds, it’s possible to recognize that there’s a much smaller degree of source-to-source distinctiveness. The band’s signals have been smashed together, and even if we “get on the gas” with the vocals, we might also be effectively pushing up part of the drumkit, or the guitars.

Time

Along with magnitude, we also have a time problem. With as much bleed as is likely in play, the oh-so-critical transients that help create vocal and musical intelligibility are very, very smeared. We might have a piece of backline, or a vocal, “arriving” at the listener several times over in quick succession. The recording, on the other hand, has far more sharply defined “timing information.” This can very likely lead to a requirement that vocals and lead parts be mixed rather hotter live than they would be otherwise. That is, I’m convinced that a “conservation of factors” situation exists: If we lose separation cues that come from timing, the only way to make up the deficit is through volume separation.

A factor that can make the timing problems even worse is those wedge monitors we’re using, combined with the PA handling reproduction out front. Not only are all the different sources getting into each other at different times, sources being run at high gain are arriving at their own mics several times significantly (until the loop decay becomes large enough to render the arrivals inaudible). This further “blurs” the timing information we’re working with.

Processing Limits

Because live audio happens in a loop that is partially closed, we can be rather more constrained in what we can do to a signal. For instance, it may be that the optimal choice for vocal separation would simply be a +3 dB, one-octave wide filter at 1 kHz. Unfortunately, that may also be the portion of the loop’s bandwidth that is on the verge of spiraling out of control like a jet with a meth-addicted Pomeranian at the controls. So, again, we can’t get exactly the same mix with the same factors. We might have to actually cut 1 kHz and just give the rest of the signal a big push.

Also, the acoustical contribution of the band limits the effectiveness of our processing. On the recording, a certain amount of compression on the snare might be very effective; All we hear is the playback with that exact dynamics solution applied. With everything live in the room, however, we hear two things: The reproduction with compression, and the original, acoustic sound without any compression at all. In every situation where the in-room sound is a significant factor, what we’re really doing is parallel compression/ EQ/ gating/ etc. Even our mutes are parallel – the band doesn’t simply drop into silence if we close all the channels.


Try as we might, live-sound humans can rarely exert the same amount of control over audio reproduction that a studio engineer has. In general, we are far more at the mercy of our environment. It’s very often impractical for us to simply duplicate the album mix and receive the same result (only louder).

But that’s just part of the fun, if you think about it.


Case Study: Creating A Virtual Guitar Rig In An Emergency

Distortion + filtering = something that can pass as a guitar amplifier in an emergency.

Please Remember:

The opinions expressed are mine only. These opinions do not necessarily reflect anybody else’s opinions. I do not own, operate, manage, or represent any band, venue, or company that I talk about, unless explicitly noted.

Want to use this image for something else? Great! Click it for the link to a high-res or resolution-independent version.

The Video

The Script

Imagine the scene: You’re setting up a band that has exactly one player with an electric guitar. They get to the gig, and suddenly discover a problem: The power supply for their setup has been left at home. Nobody has a spare, because it’s a specialized power supply – and nobody else plays an electric guitar anyway. The musician in question has no way to get a guitar sound without their rig.

At all.

As in, what they have that you can work with is a guitar and a cable. That’s it.

So, what do you do?

Well, in the worst-case scenario, you just find a direct box, run the guitar completely dry, and limp through it all as best you can.

But that’s not your only option. If you’re willing to get a little creative, you can do better than just having everybody grit their teeth and suffer. To get creative, you need to be able to take their guitar rig apart and put it back together again.

Metaphorically, I mean. You can put the screwdriver away.

What I’m getting at is this question: If you break the guitar rig into signal-processing blocks, what does each block do?

When it comes right down to it, a super-simple guitar amp amounts to three things: Some amount of distortion (including no distortion at all), tone controls, and an output filter stack.
The first two parts might make sense, but what’s that third bit?

The output filtering is either an actual loudspeaker, or something that simulates a loudspeaker for a direct feed. If you remove a speaker’s conversion of electricity to sound pressure waves, what’s left over is essentially a non-adjustable equalizer. Take a look at this frequency-response plot for a 12″ guitar speaker by Eminence: It’s basically a 100 Hz to 5 kHz bandpass filter with some extra bumps and dips.

It’s a fair point to note that different guitar amps and amp sims may have these different blocks happening in different orders. Some might forget about the tone-control block entirely. Some might have additional processing available.

Now then.

The first thing to do is to find an active DI, if you can. Active DI boxes have very high input impedances, which (in short) means that just about any guitar pickup will drive that input without a problem.

Next, if you’re as lucky as I am, you have at your disposal a digital console with a guitar-amp simulation effect. The simulator puts all the processing I talked about into a handy package that gets inserted into a channel.

What if you’re not so lucky, though?

The first component is distortion. If you can’t get distortion that’s basically agreeable, you should skip it entirely. If you must generate your own clipping, your best bet is to find some analog device that you can drive hard. Overloading a digital device almost always sounds terrible, unless that digital device is meant to simulate some other type of circuit.
For instance, if you can dig up an analog mini-mixer, you can drive the snot out of both the input and output sides to get a good bit of crunch. (You can also use far less gain on either or both ends, if you prefer.)

Of course, the result of that sounds pretty terrible. The distortion products are unfiltered, so there’s a huge amount of information up in the high reaches of the audible spectrum. To fix that, let’s put some guitar-speaker-esque filtering across the whole business. A high and low-pass filter, plus a parametric boost in the high mids will help us recreate what a 12″ driver might do.
Now that we’ve done that, we can add another parametric filter to act as our tone control.

And there we go! It may not be the greatest guitar sound ever created, but this is an emergency and it’s better than nothing.

There is one more wrinkle, though, and that’s monitoring. Under normal circumstances, our personal monitoring network gets its signals just after each channel’s head amp. Usually that’s great, because nothing I do with a channel that’s post the mic pre ends up directly affecting the monitors. In this case, however, it was important for me to switch the “monitor pick point” on the guitar channel to a spot that was post all my channel processing – but still pre-fader.

In your case, this may not be a problem at all.

But what if it is, and you don’t have very much flexibility in picking where your monitor sends come from?

If you’re in a real bind, you could switch the monitor send on the guitar channel to be post-fader. Set the fader at a point you can live with, and then assign the channel output to an otherwise unused subgroup. Put the subgroup through the main mix, and use the subgroup fader as your main-mix level control for the guitar. You’ll still be able to tweak the level of the guitar in the mix, but the monitor mixes won’t be directly affected if you do.