Category Archives: Live Audio Tactics

Tips, tricks, and strategies for concert sound in small venues.

The Case Of Insufficient Louderization

Noisy folk increase your need for PA output.

Please Remember:

The opinions expressed are mine only. These opinions do not necessarily reflect anybody else’s opinions. I do not own, operate, manage, or represent any band, venue, or company that I talk about, unless explicitly noted.

 
Pixie And The Partygrass BoysWant to use this image for something else? Great! Click it for the link to a high-res or resolution-independent version.

“How…how can this not be loud enough?”

That was my thought as Pixie And The Partygrass Boys launched into their set for the Shredfest afterparty. At soundcheck, I had been concerned that we were running too hot, and also that the overall mud and mush of the room were too much. I had dug a big hole in the midrange trying to fix it, and I had felt pretty successful with the whole endeavor.

That was working against me now.

(I also needed more trim height on the main PA, trim height that simply wasn’t available.)

What had changed, of course, was that we had a gaggle of merry-makers in the room who were there to demonstrate precisely how they were the incarnation of those who ski and party. (You can’t if you don’t, as some of you may well know.) We didn’t have enough of these humans to change the room’s reverb time in any way that I could perceive. What we did have was enough to absorb some of the PA’s output, especially with the loudspeakers having only their HF horns above head-height.

We also had more than enough to make a rather surprising amount of noise in the midrange band of the audible spectrum. You know, human voices and all that.

What I needed was volume. Sheer power. More gain was part of the answer, but I only had so much of that available. Gain before feedback in that room, with the PA deployment on hand, and my original EQ curve applied – well, that was anything but unlimited. What I had as a real option, then, when changing my overall tonal balance. I needed more energy in the “crowd roar” band, because that was the area being masked by all the…you know…crowd roar.

I made my overall EQ solution flatter, and I got on the gas. I got the show about as loud as I could reasonably get it, and it ended up being just about loud enough to get us through. I don’t get into a lot of shoving matches with audience noise, but apparently when I do it works out like this.

Caught In The Crossfire

Too much toe-in on the primary speakers can cause you problems later.

Want to use this image for something else? Great! Click it for the link to a high-res or resolution-independent version.

Please Remember:

The opinions expressed are mine only. These opinions do not necessarily reflect anybody else’s opinions. I do not own, operate, manage, or represent any band, venue, or company that I talk about, unless explicitly noted.


This summer, I encountered some deployment issues when using outfills to cover extra-wide spaces. They occurred when I was a little too aggressive with my “toe-in” of the main loudspeakers.

A bit of toe-in or crossfire on mains is often a handy thing. It helps to fill in the center, which can sometimes get a little lost if your mains are a good distance apart and fired parallel to each other. What can happen with outfills in play, though, is that a listener hears the outfill nearest to them AND the main on the opposite side at a similar intensity.

If you’re thinking that sounds like a recipe for major phase issues, you’d be very correct. The effects are not subtle. It’s clear that you’re listening to multiple arrivals when the sound is a transient (like a drum hit), and the combined sound “blows in the wind” dramatically. One show had a fair bit of air movement to contend with, so much so that we actually had some mishaps with speaker stands. When standing in places with interfering coverage, the wind kicking up would completely obliterate the high-end of the PA. Further, there was a general muddiness that couldn’t be fixed with EQ.

So, what’s the fix?

The best solution is to reduce the crossfiring of the main coverage. What you want is for the folks listening to the outfills to overwhelmingly hear those outfills in comparison to your main coverage. Getting the nominal coverage pattern of the mains away from the outfill zones helps with that greatly, while requiring no tricks with delay or gain. It’s not that delay can’t be helpful, it’s just that it works best at specific places, and less well otherwise. Physically-accomplished coverage provides a far more consistent experience across the audience.

How Matrices Saved The Summer Jam

A mix of mixes can sometimes be exactly what you need to get out of a bind.

Want to use this image for something else? Great! Click it for the link to a high-res or resolution-independent version.

Please Remember:

The opinions expressed are mine only. These opinions do not necessarily reflect anybody else’s opinions. I do not own, operate, manage, or represent any band, venue, or company that I talk about, unless explicitly noted.

The way I mix is often “distributed.” That is, I have at least an inner pair of loudspeakers and an outer pair. Generally, the inner pair gets vocals and the outer pair gets instruments.

Now, of course, what happens when you need outfills for an amphitheater (like at the Millcreek Summer Jam) is that you want a total of eight speakers: Inner main, outer main, inner fill, outer fill. What’s really a bummer is when you discover that one of those eight speakers has a failed HF driver.

So, after you pull down two boxes such that your outfills are a single loudspeaker each, what do you do? You could set up another bus, so that all channels go to the outfills AND one of the main pairs, but what if you want the outfills to reflect the results of processing you do on the primary buses – EQ, compression, and such?

The answer is a matrix. A matrix system lets you create a mix of mixes (i.e., a bus fed by the output of other buses). It’s very much like subgroups that feed a main bus, though with far more flexibility. All I had to do was combine my inner pair and outer pair buses into a matrix, and connect that matrix to the fill loudspeakers. As easy as you please, the show was back on track. Summer Jam saved!

How To Size A Generator

If it will satisfy your peak power requirements, you’ve got a winner.

Want to use this image for something else? Great! Click it for the link to a high-res or resolution-independent version.

Please Remember:

The opinions expressed are mine only. These opinions do not necessarily reflect anybody else’s opinions. I do not own, operate, manage, or represent any band, venue, or company that I talk about, unless explicitly noted.


So – you’re being asked to handle a gig, and the event organizer wants to know a couple of things. First, do you need a generator? Second, how big does the generator have to be?

I always feel that I need a generator if the power situation gives me any pause at all. There’s one outlet available from a building we don’t have access to? That needs a generator. We’ve got power available, but every other vendor at the event might be hooking into it? That needs a generator. We have to run more than 100 feet of cable from regular-ol’ outlets to even reach the stage? That needs a generator. The event organizer is offering to rent a generator because of “prior experiences?” That needs a generator.

So, needing that generator for reasons including, but not limited to, anything or everything above – how much capacity is required? There’s a relatively easy way to get a good number on that front.

On the audio amplification side, tally up all your peak (not continuous – peak) draws. For powered speakers, you can do this by taking the manufacturers peak-power claim at face value. If they tell you it’s a 2000 watt loudspeaker, call it 2000 watts (within limits, because that little HF driver isn’t going to have a 700 watt peak applied to it). For passive speakers, the manufacturer’s claim for the peak wattage at the nominal load you’ve hooked up is the number you want.

Got all that? Great. Now multiply by 1.1 to account for life not being 100% efficient. This is the power needed for your audio output, which is variable over time. After that, total up your other power draws, like mixing consoles and processing. Those units require a fixed amount of power at all times, so you don’t need to account for momentary spikes of demand. For lights, use the highest power-draw number you can find. (For instance, an LED lamp might pull 100 watts, but if you’ve got the lamp on full AND are panning and tilting like crazy you’ll use more power. The motors require energy too, right?)

Here’s the “why” of my being so focused on peaks and other “highest case” draws. When you’re running on a generator, the capacity of the unit is all you have to handle everything that can possibly happen. This is in contrast to when you’re on the municipal grid. When connected to the grid, there is generally a huge power delivery capacity for momentary draw. If you try to pull 10,000+ watts all of a sudden, that’s likely not much trouble for the “megawatts to spare” municipal supply. With a generator, though, there’s no extra capacity. If the unit has a maximum load of 5000 watts, trying to pull 10,000 is futile. The power doesn’t exist. As such, the safe thing to do is to take a good stab at figuring your highest possible momentary draw, and ensuring that instantaneous load can be handled.

By way of example, let’s take a system that I was involved in deploying recently. There were two, double 18 subs that could draw 2000 watts each, plus two tops handling the same amount of power. Add three monitor wedges with 2000 watt peak ratings, and you get 14 kW. Multiply by 1.1 and you have 15.4 kW for loudspeakers. There was a bass amp that could probably deliver a 1kW peak, and a 100 watt guitar amp, so that gets us to 16.5 kW. There were also two mixing consoles needing 120 watts each, and a processing rack that consumed about 25 watts. At this point, we need 16.8 kW. Add about 500 watts of LED lighting, and we’ve reached 17.3 kilowatts.

What the event gave us was a 20 kW diesel generator, which was perfect. The peak power available was in excess of what we needed, and our continuous draw (per the unit’s ammeter) was about 10 amps. We had no power problems with the generator itself, running as loudly as we pleased for several hours.

The conclusion here is, there’s no need to finagle and guess what you can get away with. Instead, spec comfortably and then work with confidence. It’s much better.

Coil Distribution

Coil excess cables in a distributed fashion, rather than collecting them together.

Stylized Cable CoilsWant to use this image for something else? Great! Click it for the link to a high-res or resolution-independent version.

Please Remember:

The opinions expressed are mine only. These opinions do not necessarily reflect anybody else’s opinions. I do not own, operate, manage, or represent any band, venue, or company that I talk about, unless explicitly noted.


Every so often, I’ll either get the explicit question of “where do you want the coils?” or I’ll work with someone who has a different concept of it than I do, and I have to make my preference known.

And, of course, I have a ready answer to where one ought to put those (hopefully) neatly-wound excesses of XLR, TRS, power, and whatever other cable we might have at work. “Put ’em at the mic stands and monitor wedges they belong to,” says I, and off we go towards another evening of music. But what’s the logic? How might we generalize the concept?

Well, first, we don’t want a big, messy pile of excess cable that we can’t sort through easily. (If there’s a connection failure or a mis-patch, this can become a major factor in solving the problem quickly.) Second, we want to be able to re-arrange the stage with the greatest ease possible.

Those needs work out to a pretty simple demand: That coils of excess cable ought to be arranged in a distributed manner, away from any common termination point, and as near to the distributed termination point as safety, functionality, and aesthetics allow. Whether the cable is being used for input or output is immaterial.

In the case of an input-side run (for a mic or DI box, say), this means that the excess is coiled near the bottom of the mic stand, or next to the DI. This distributes the excess away from the stage box (the common termination point), and puts it near the mic or DI, which is the distributed termination point.

For an output-side run, like to monitors or main loudspeakers, the coil should sit at the side or back of the loudspeaker – whichever is less obstructive to controls and patch points – because the loudspeaker is the distributed termination point. For stick-mounted loudspeakers, it’s the same as mics on stands: Put the coil on the ground, near the stand.

Having the coils at the distributed termination points makes those items easier to move. Because the cable “feed” is close to the object being set in a different place, the rest of the cable run, and the other cable runs near it, can be relatively undisturbed by that move. This is a BIG help when you’ve got a lot of cable on the deck. If you do things the other way, feeding more cable to get to a more distant location means a lot more disruption of all the other cable. Plus, if the big pile of cable gets tangled (and you know it will), you may not be able to pull more length easily. Distributed coils stop the big-tangled-pile problem from even starting, as your feed point for more length is already away from everything else.

Further, by keeping the coils separate and therefore “readable” in terms of what they belong to, problems are easier to fix. When all the cable piles up at the stagebox, replacing a bad line or fixing a patch that’s in the wrong spot is a chore. You have to sort out which cable is the right one in a giant ocean of samey spaghetti, and then try to make your fix without turning the whole pile into an even bigger mess. With a distributed approach, it’s much easier to follow a line from the coil to the patch point. The separation between cables is far more apparent. Plus, when you pull and replace the connector, the disturbance to the other cable runs is minimized.

So, yeah, the short answer is “put ’em at the mic stands and monitors,” but the question of where all those coils go has a good bit of philosophy behind it.

Beyond The Mass Factor

It’s not the weight that kicks your butt. It’s the number of trips and their efficiency.

Arrows And SpheresWant to use this image for something else? Great! Click it for the link to a high-res or resolution-independent version.

Please Remember:

The opinions expressed are mine only. These opinions do not necessarily reflect anybody else’s opinions. I do not own, operate, manage, or represent any band, venue, or company that I talk about, unless explicitly noted.

Loading in and out will always take more time than you want it to. It will always be at least somewhat fatiguing. You might think that the key to reducing those consequences is reducing the weight of everything you have. That’s only partially correct, in my estimation.

What I’ve found over the years is that what really makes the loading cycle take forever (and tire you out) isn’t necessarily the mass of the gear. Not directly. Rather, the number of trips you have to take, the gear jostling required, and the amount of climbing you have to do constitute the real factors.

Indeed, if it was just down to mass, it would seem that everything would shake out to be roughly the same. If you have two shows, both involving 1000 lbs of gear and a 200 ft walk from the transport to the staging point, then it looks to be the same amount of total expended energy if a trip involves 75 lbs of gear at a time or 150 lbs of gear. There’s a problem with accepting that logic, though: That simple numeric representation misses the other factors entirely.

First, each loading trip involves getting the gear off the vehicle and arranged for the move. In many cases (THAT’S A BIT OF A STEALTH PUN, BY THE WAY!) the heavier load-per-trip situation involves gear that’s ready to roll off the transport, and a transport where rolling that load involves very little additional effort – say, a trailer with a ramp. In the lighter situation, that gear might be on a van with a deck you have to climb up and down from each time. Since the equipment can’t be packed in a rollable state, it has to be pulled off the van and stacked on a dolly to be moved. After it gets to where it’s going, it has to be unstacked. The result is that a ton of effort is expended on “finagling” that the heavier loads don’t need.

The next issue is the time involved. The finagling that I just mentioned adds time to each trip, on top of the time required to push the gear over the physical distance. Thirteen trips multiplied by 45 seconds of walking and an additional minute of wrestling gear on and off the dolly is almost 23 minutes. The heavier setup is about 7 trips, and might require no wrangling at all for the loads at the basic level. That’s only 5 – 6 minutes of “push” time if everything runs perfectly. Even if problems arise and the difference is only half, it’s still a huge savings.

I also mentioned climbing. Let’s look at that in a little more detail. Working your own body weight against gravity is a big strain. Now, add a bunch of gear to the equation. Consider doing that 13 times…and now consider doing it only the equivalent of 1 – 2 times with a better cargo setup. You’re far less tired, right?

All of this is just one more restatement of the idea that “Guess what? Logistics really matter in this business.” Big shows with good logistics aren’t any more tiring than smaller shows with imperfect orchestration. They can even be easier under certain circumstances.

Details Of A Streaming Setup

A few mics, a few speakers, a few cameras, a mixer, and a laptop.

Backyard Sound SystemWant to use this image for something else? Great! Click it for the link to a high-res or resolution-independent version.

Please Remember:

The opinions expressed are mine only. These opinions do not necessarily reflect anybody else’s opinions. I do not own, operate, manage, or represent any band, venue, or company that I talk about, unless explicitly noted.

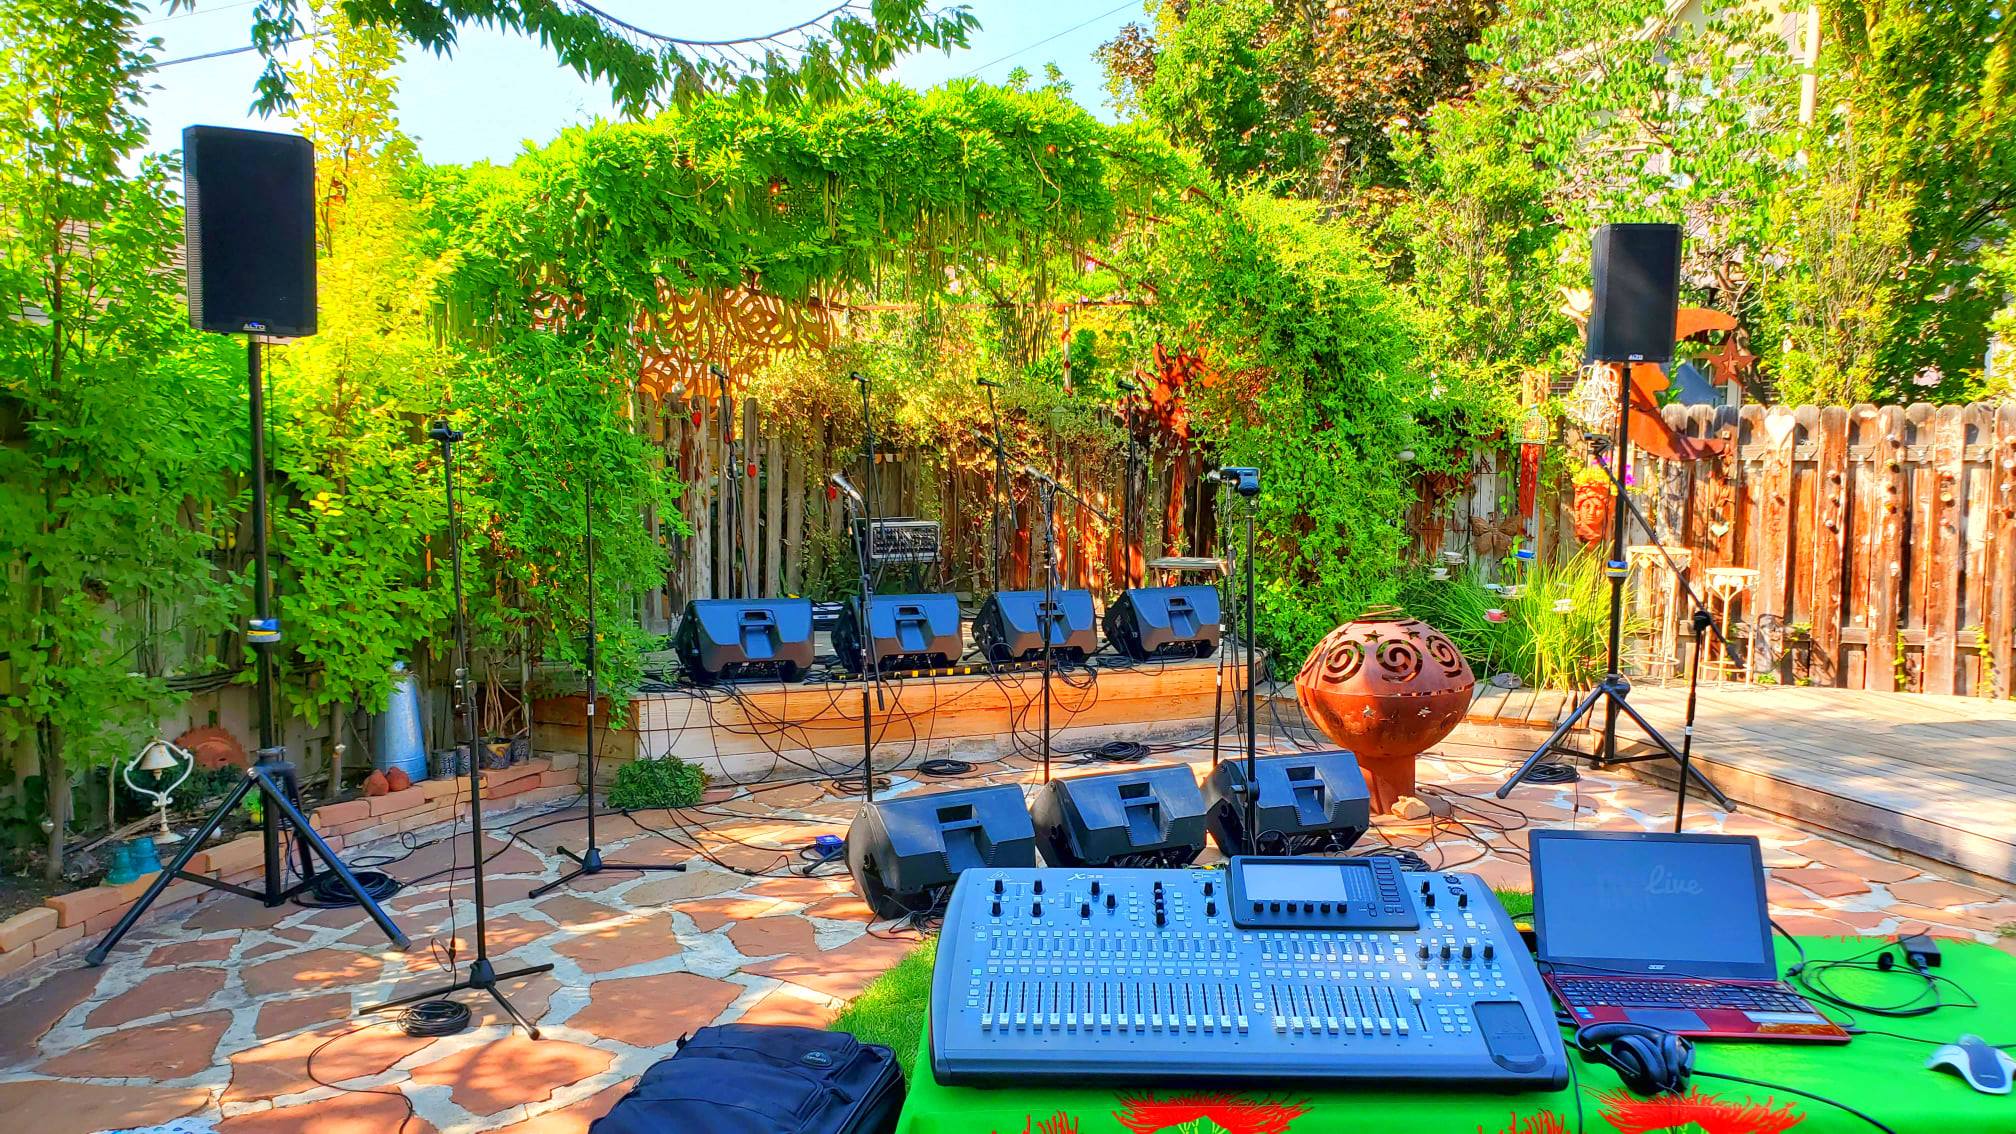
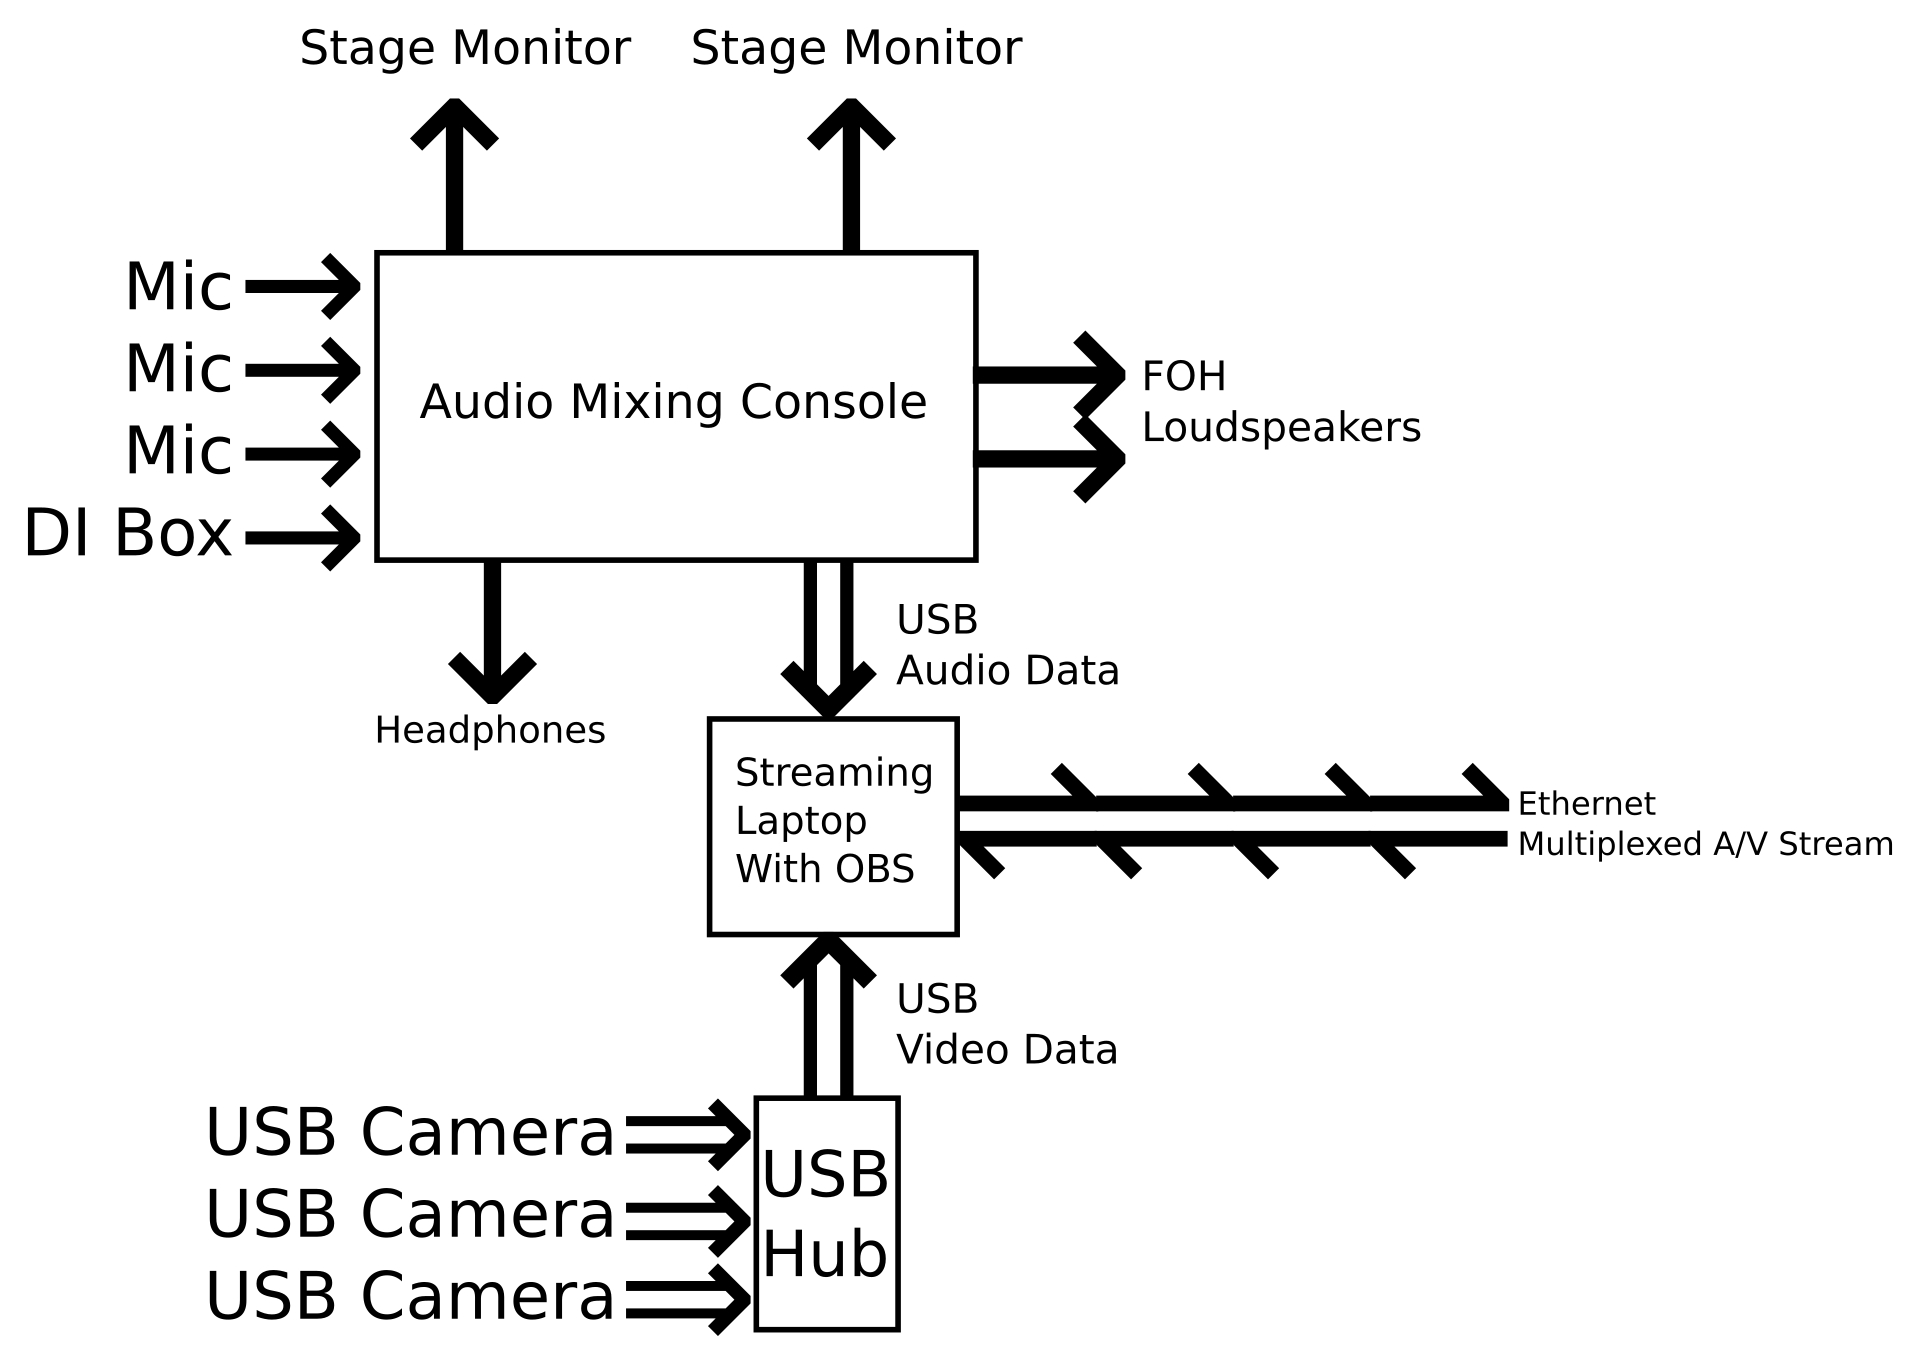
A few days ago, I was contacted by Forest Aeon on Patreon. Forest asked me to go into detail about the streaming setup I’ve been using for Carolyn’s Garden concerts during these days of “pandemia.” I was tickled to be asked and happy to oblige. So, first things first. Here’s a diagram:

Streaming Setup Diagram

But what does it all mean?

To start with, streaming requires audio and video inputs. Those inputs are fed to hardware or software that can combine them into a multiplexed audio/ video stream, and then that stream is sent to an endpoint – like Facebook, YouTube, or (in my case) Restream.io

For my purposes, the audio required a good bit of heavy lifting. High production-values were a must, and those standards – while high everywhere – had to meet different needs at multiple destinations. The musicians needed multiple mixes for stage monitors, the small audience present at Carolyn’s needed something they could listen to, the streaming laptop also needed an appropriately processed version of the main mix, and I needed to monitor that feed to the laptop.

With all those needs, a well-appointed mixing console was a must. An X32 was the natural choice, because it has the routing and processing necessary to make it all happen. There were mixes for the individual musicians, a mix for the live audience, and crucially, a mix for the stream that “followed” the main mix but had some independence.

What I mean by that last phrase is driven by signal flow. The stream mix is post-fader, just like the main mix, so if I put more of a channel into the main mix, that channel will also be driven harder in the stream. This makes sense to have in place, because a solo that needs a little push for the live audience should also get a push for the remote audience. At the same time, I allowed a good bit of margin in where those post-fader sends could be placed. The reason for that was to deal with the difference between a stream mix that is far more immune to acoustic contributions in the room than a live mix. In the live mix, a particular instrument might be “hot” in the monitors, and only need a bit of reinforcement in the room. However, that monitor bleed is not nearly as prevalent for the mix to the stream, so that particular channel might need to be “scaled up” to create an appropriate blend for the remote listeners.

Another reason for a separate stream mix was to be able to have radically different processing for the mix as a whole. Just as a starter, the stream mix was often delayed by 100ms or more to better match the timing of the video. If the stream mix was just a split of the main output, that would have meant a very troublesome delay for the audience in the garden. Further, the stream mix was heavily compressed in order for its volume to be consistently high, as that’s what is generally expected by people listening to “playback.” Such compression would have been quite troublesome (and inappropriate, and unnecessary) for the live audience.

The mix for the stream was directed to the console’s option card, which is a USB audio interface. That USB audio was then handed off to the streaming laptop, which had an OBS (Open Broadcast Studio) input set to use the ASIO plugin available for OBS. All other available audio from the laptop was excluded from the broadcast.

Video managed to be both quite easy and a little tricky, just in divergent ways. On the easy side, getting three – very basic – USB cameras from Amazon into a USB hub and recognized by OBS was pretty much a snap. However, the combined video data from all three cameras ended up saturating the USB bus, meaning that I ended up setting the cameras to shut themselves off when not in use. Transitions from camera to camera were less smooth, then, as the camera being transitioned from would abruptly shut off, but I could keep all three cameras available at a moment’s notice.

With OBS I could combine those camera feeds with the mixer audio, plus some text and graphics, and then encode the result into an RTMP stream to Restream.io (As an aside, a very handy feature of OBS is the Scene Collection, which allowed me to have a set of scenes for each act. In my case, this made having a Venmo address for each act much easier, because switching to the appropriate collection brought up the correct text object.)

A very big thing for me was the manner in which the laptop was connected to the public Internet. I was insistent on using a physical patch cable, because I simply don’t trust Wi-fi to be reliable enough for high-value streaming. That’s not to say I would turn down wireless networking in a pinch, but I would never have it as my first option. Luckily, Cat6 patch cable is pretty darn cheap, being available for about $0.25 per foot. A 100′ cable, then, is all of $25. That’s awfully affordable for peace of mind, and drives home the point that it takes very expensive wireless to be as good as a basic piece of wire.

So, there you have it: My streaming setup for summer concerts.

DMX For All Things

DMX cable works for everything, so why not just use that?

stylized-xlr-endWant to use this image for something else? Great! Click it for the link to a high-res or resolution-independent version.

Please Remember:

The opinions expressed are mine only. These opinions do not necessarily reflect anybody else’s opinions. I do not own, operate, manage, or represent any band, venue, or company that I talk about, unless explicitly noted.


I am currently in the process of converting all of my XLR cable inventory over to 110 Ohm DMX cable. It’s going to take a long time, because I still have a significant amount of “vanilla mic-cable” stock. That stock is comprised of the cables that have lived this long, and are likely (in my mind) to keep on living for a good while. The terrible cables and connectors die early. The rest do tend to linger.

Why do this?

The summary above almost says it all. DMX cable, terminated with 3-pin XLR ends, works in all cases. You can connect mics with it. You can run outputs to amps and loudspeakers with it. You can use it for whatever you would use mic-cable for, and…

…you can also, without spinning up a cloud of doubt in your mind, use it in a DMX lighting-control network.

This is not to say that basic mic cable can never be used for DMX runs. I’ve done it, and without noticeable problems. Even so, it’s not a practice that I would recommend to anyone without caveats. I try to be careful to say the previous: That I’ve done it, and it worked, but your mileage may vary, so the safe option is what I recommend unless you’re truly in a jam.

But anyway, the more I convert to an all-DMX cable inventory, the less sorting out of cable types I have to do. If it’s all (or overwhelmingly) DMX, then no matter what I’m doing I can just grab a cable and go.

Of course, a question does arise: How does something like a dynamic mic react to a DMX cable in place of a regular cable? Lucky for you all, I like to graph things:

The graph is two traces on top of each other. One is the mic cable, and one is the DMX cable. They’re so close that I can’t imagine any of the deviations are something other than experimental error; You can only be so careful about not moving the mic when you replace a cable. I’m confident that any difference between the cables one thinks one might hear is a product of the imagination.

Change Your Solo Setup And Become More Comfortable Mixing IEMs

Exclusive solo follows selection = much happiness.

Please Remember:

The opinions expressed are mine only. These opinions do not necessarily reflect anybody else’s opinions. I do not own, operate, manage, or represent any band, venue, or company that I talk about, unless explicitly noted.

 
Want to use this image for something else? Great! Click it for the link to a high-res or resolution-independent version.

When it comes to mixing in-ears, I’m very average. Workmanlike. I get the job done, but I’m not inspiring at the task. I’ve gotten better lately though, due to a breakthrough I had while running ears for a one-off with a Beatles tribute.

It was one of those moments where necessity was the doting mama of invention. Well, not really invention. Discovery. Thinking about a problem and then working through it.

The group we were working with didn’t have personal remotes for their mixes, and soundcheck hadn’t been particularly detailed for monitor-world. I really wanted to have my finger on the pulse of what the band was listening to, in hopes that I could make changes very quickly and intelligently when asked. With a regular solo setup – the solo setup being how the engineer manages what they listen to in their own ears – I felt like getting around to different mixes was clumsy.

I started asking myself, “What do I want my console to do?” What I came up with was:

  1. I wanted the console to only solo one thing at a time.
  2. I wanted the console to solo what I had selected.

Why?

In my case, it boils down to sends-on-fader behavior. On an X32, you can select a channel, and see the various bus-send levels laid out in the group/ bus section. What you can also do is select a bus, and see the channel-send levels in the channel section. My “IEMs on the fly in a panic” workflow is, overwhelmingly, the latter. I want to “work on” a bus, not channels. That being the case, what I desire to listen to is the bus I’m addressing, and only that bus. Then, if the console will automatically move my active solo to the bus I just pressed “select” on, that saves me some work.

Thankfully, solo configurations as I’ve just described are available on X32s and other consoles. (The nomenclature can vary a good bit, so you’ll need to look up specifics for yourself.) I enabled the settings I wanted, and “boom!” everything was better. Operating the console felt much more fluid, and I was confident that I was listening to the right thing at the right time. I didn’t have to constantly manage my solos, because the console was doing that for me.

Of course, easily listening to the bus you’re working on has limitations. The biggest one is that you don’t know exactly what the performer is hearing. The in-ears or phones you’re using may have wildly different sealing/ isolation characteristics from what the player uses. Plus, you don’t necessarily know how much SPL is pouring out of their drivers vs. yours. You can’t assume that what your ears are getting is exactly what they’ve got. Still, having some sort of immediate reference is very helpful, as it takes some of the mystery out of what’s happening in their mix.

Separation In Real Time Is What Makes Streaming So Terrifying

Broadcasters have known this forever.

Please Remember:

The opinions expressed are mine only. These opinions do not necessarily reflect anybody else’s opinions. I do not own, operate, manage, or represent any band, venue, or company that I talk about, unless explicitly noted.

Want to use this image for something else? Great! Click it for the link to a high-res or resolution-independent version. This image was found on Pixabay, here.

I was recently THE engineer for a concert live stream, my first time being in that position, and it was a bit of a rocky start.

My encoding settings were too much for the streaming machine (a laptop) to handle, and so the stream that the audience saw was a nightmare of frozen video and general “chop.” Folks were greatly displeased, quite understandably, and if you think live music is stressful…

…try adding the stress of trying to figure out why a streaming broadcast is going wrong, while also trying to mix the streaming broadcast AND the show for a few folks in the seats.

AND for the musicians.

Luckily, it was a pretty simple show, or I would have gotten flattened.

For me, as a guy whose work is very heavily weighted towards concert sound, there’s a special terror to broadcast. The fear comes from having realtime output that’s essentially impossible for a single craftsperson to monitor effectively. Folks who specialize in broadcast have had to deal with this problem for ages, and wield all manner of effective strategies for navigating the conundrum. I didn’t, though, and it was tremendously educational to have a shoe on the other foot.

What I mean by that is I was facing what a lot of studio engineers run smack into when coming over to the live-music side: We use lots of the same technology and terminology, but the production disciplines are very different. You can’t expect to be an ace at broadcast simply because you’re a seasoned operator for live music. The needs are different, and the pitfalls don’t have the same geometry.

In live music, what you get used to is hearing the same output (or largely the same output) as everyone else. You hear it immediately, and so does the audience. If something isn’t right, you have a common reference point.

With broadcast, the output is real time for all practical purposes, but you’re separated from it. You experience the show so differently from your audience that the two realities are almost totally unmoored. You can fix that by having a separate broadcast studio or broadcast truck, but that’s not something that happens for sole operators. You can open the stream on your phone and get something of a clue, but all the immediate output in the space basically drowns your sense of what’s happening.

Plus, you can get everything else right and still fail the majority of your participants.

Monitors okay? Check.

Main mix okay? Check.

Streaming preview seems okay? Check.

Audience experience at the far end? HOUSTON WE HAVE A PROBLEM, SEND CHEESE-BALLS AND BEER!

The first three items are plenty difficult by themselves, but the last point is what really matters. It’s the creature that will eat you alive.

So, what’s the lesson here? Other than realizing how broadcast is a different discipline, I’d say that “you haven’t done it until you’ve done it.” You can’t live through the process of streaming production by thought experiment, or even by limited empirical work. Until you’ve actually put a stream through the Internet, and seen how your hardware and software truly interact with that task, you don’t know what you’re dealing with. It’ll sober you up in a hurry.

But getting sobered up is an opportunity to learn, because you begin to get a handle on knowing what you don’t know. That’s true for me, and I have to say that I’m pretty excited to have another crack at the whole thing in July. Once you see things go wrong, it’s a chance to do them the right way. I’m craving that chance.