Category Archives: Gear for Sound and Lighting

Reviews and opinions regarding audio and lighting equipment.

TS312 vs DR110DSP

An apples-to-oranges comparison still reveals a few things.

Want to use this image for something else? Great! Click it for the link to a high-res or resolution-independent version.

Please Remember:

The opinions expressed are mine only. These opinions do not necessarily reflect anybody else’s opinions. I do not own, operate, manage, or represent any band, venue, or company that I talk about, unless explicitly noted.


Bobby Solis of No BS Sound picked up a couple of DR110DSP loudspeakers (a new Behringer offering) for light-duty applications, and of course I wanted to get a sense of their performance. Graciously, Bobby lent me a unit and I proceeded to run test tones through both it and a reference unit – an Alto TS312, to be exact.

To start, I’ll say the obvious. This was an apples-to-oranges comparison. The Alto having a 12″ LF driver makes for a rather different package. Obviously, an Alto TS310 would have been a better box to have a shoot-out with, due to a closer similarity of design. Even so, we can have a conversation about the results.

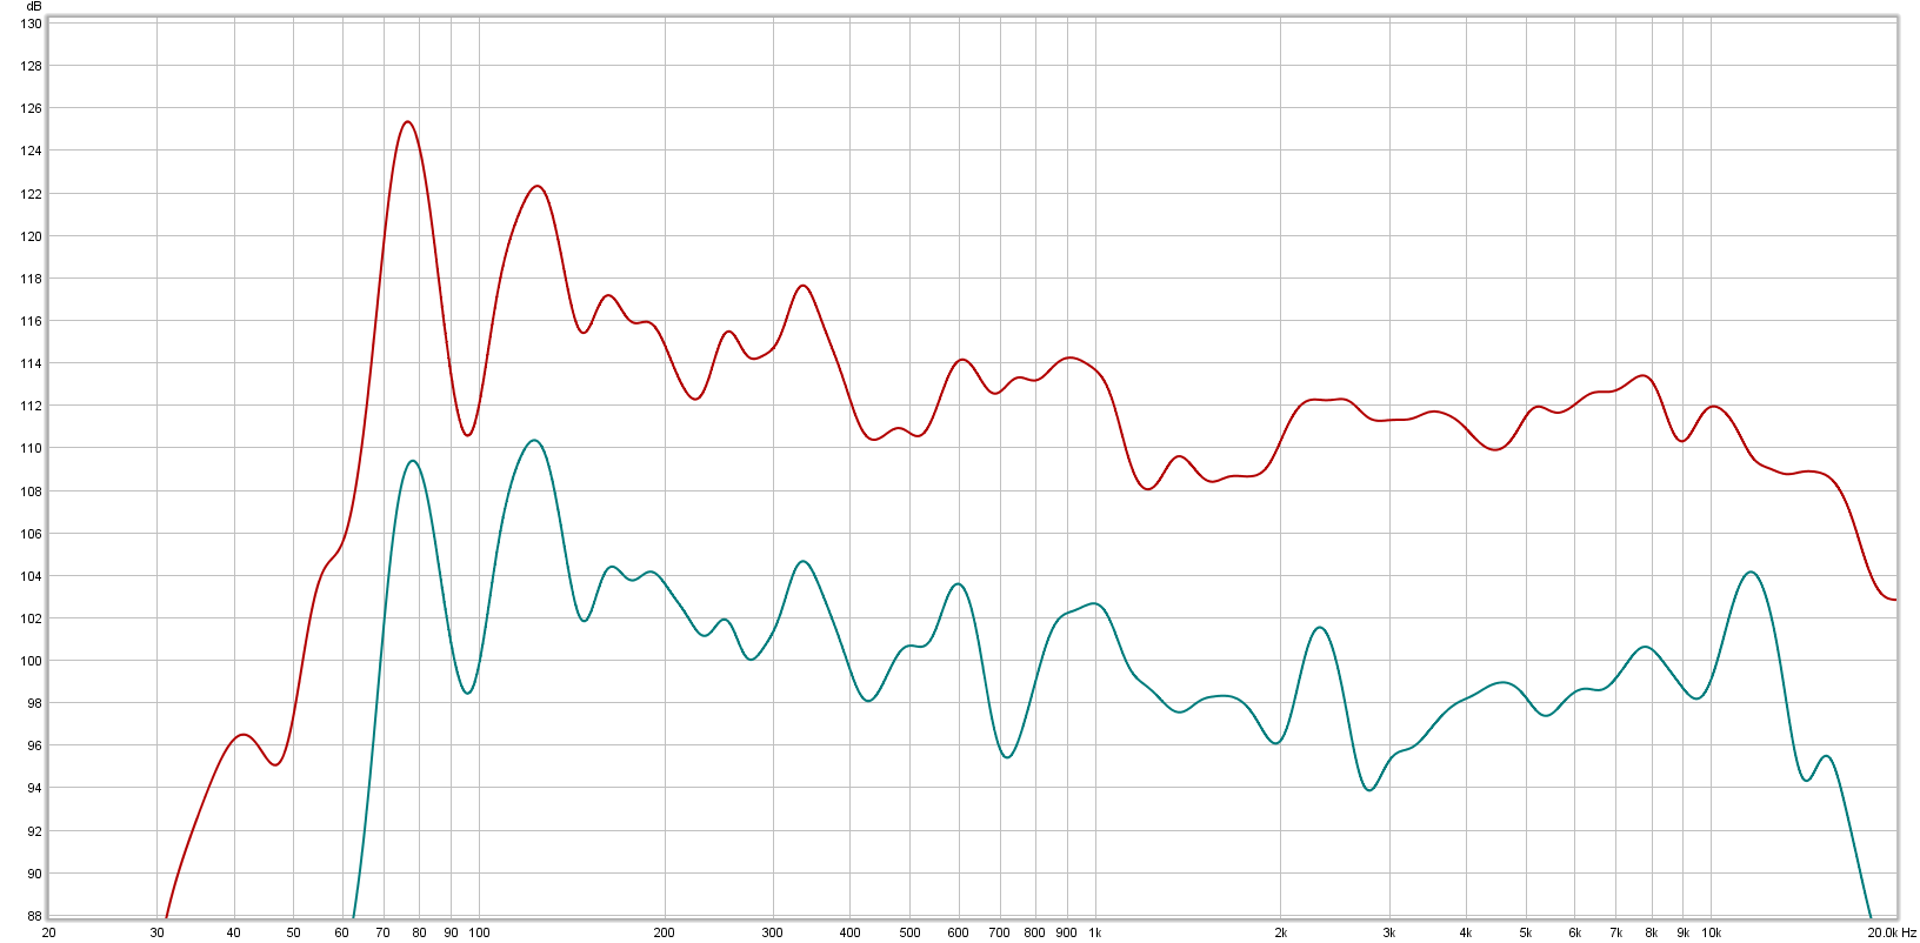
What I did for this comparison was to set up a ground-plane measurement in my garage, with the measurement mic about 10 feet from the loudspeaker grills. As best I could, I tried to find the input level on both loudspeaker units where their built-in limiters would kick in, and measured with that setting in place.

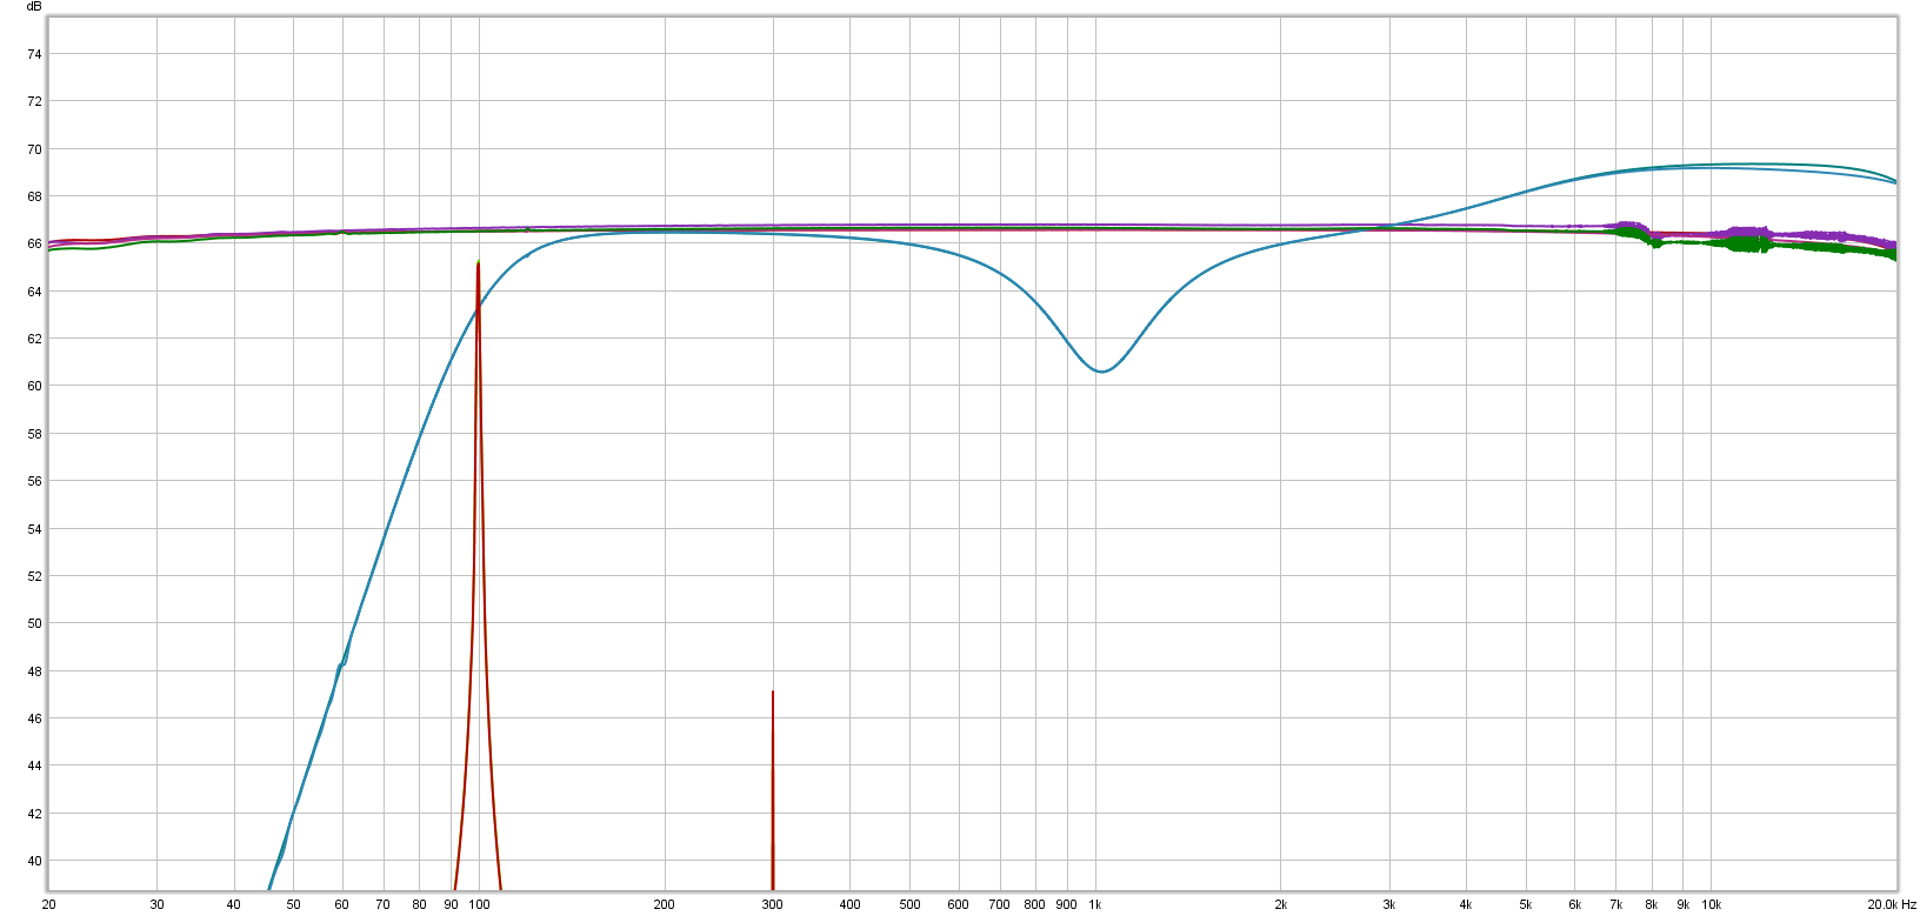
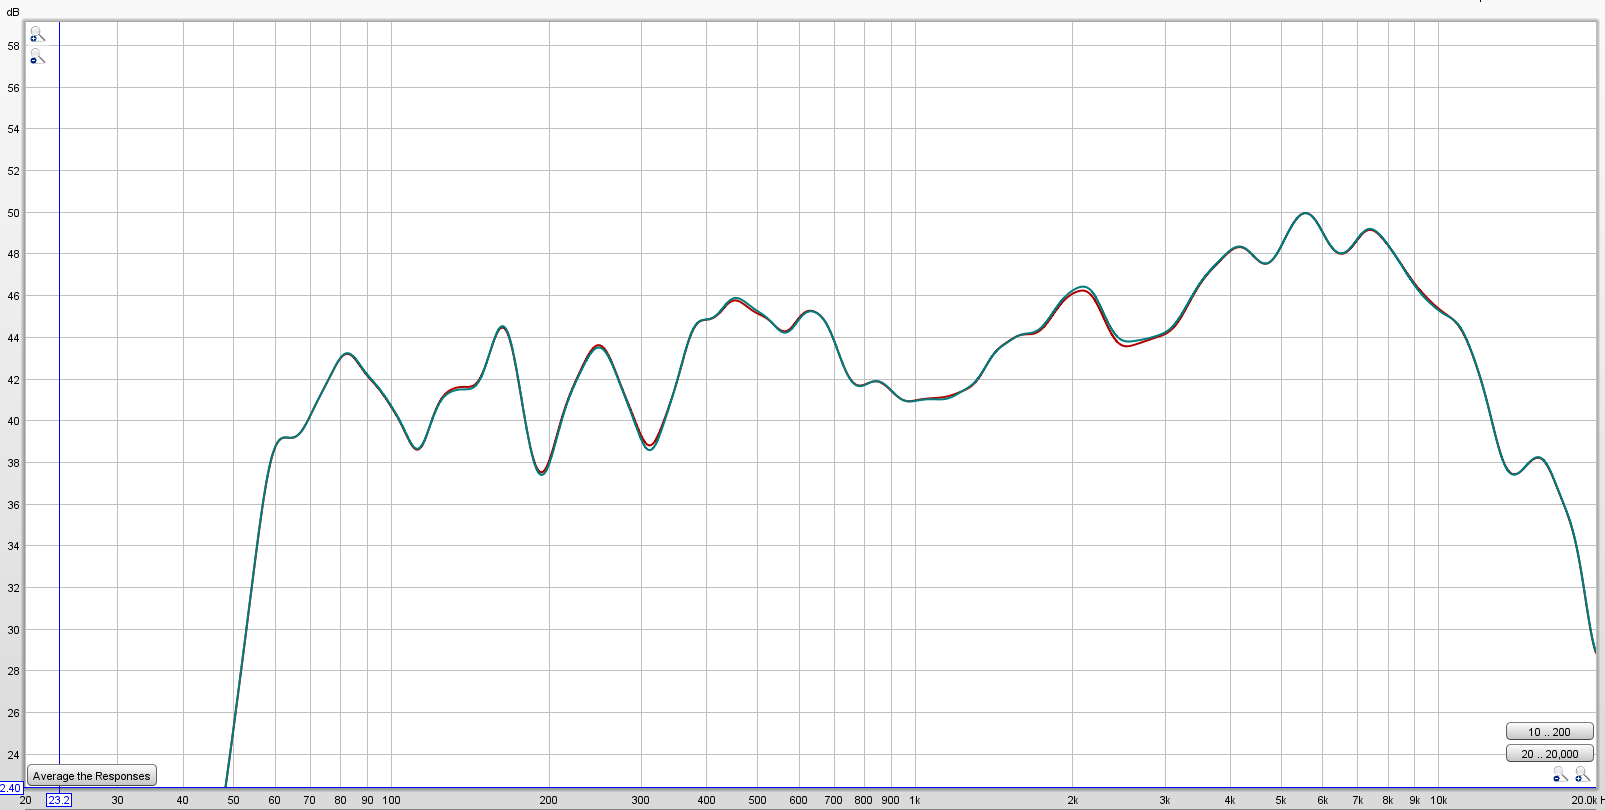
So, what did I learn from looking at the graph you can see up there?

First, a TS312 can play about 12 dB louder than a DR110DSP, on average.

Second, the DR110DSP is a bit peakier overall in its frequency response. This comports with what I hear when I use one, especially at frequencies above 1k: 2500 Hz tends to pop out, and there’s a bit of a rasp at 11 – 12 kHz. This is similar to sonic experiences I remember from the EV ZLX series, which the DR110DSP seems to be built to compete with in terms of electronics. (Interestingly, the Behringer aesthetics seems to be trying for a QSC feel.)

In terms of whizbang features, the Behringer does have a clear edge if that’s what you want. Built in Bluetooth streaming is pretty neat (and saved our bacon on a show a few days back), plus the onboard DSP offers a lot of sound-shaping options. I do appreciate having the ability to set a clearly repeatable master volume, though a continuously-variable input gain undoes that advantage a bit. An Alto TS312 is much simpler on the back panel, and some folks might see that as a disadvantage. I personally prefer my powered speakers to be a bit spartan in their control offerings, though, so the Alto fits me more readily.

So, if what you want is DSP and onboard Bluetooth, but not necessarily a ton of volume, the Behringer seems pretty okay. What I need is output and a better from-the-factory tuning, which is where the Alto leads. Even so, this evaluation was much more about curiosity than hard science. It would be interesting to find an Alto TS310 to run against the DR110DSP on a more even playing field, but I didn’t have one handy.

How To Size A Generator

If it will satisfy your peak power requirements, you’ve got a winner.

Want to use this image for something else? Great! Click it for the link to a high-res or resolution-independent version.

Please Remember:

The opinions expressed are mine only. These opinions do not necessarily reflect anybody else’s opinions. I do not own, operate, manage, or represent any band, venue, or company that I talk about, unless explicitly noted.


So – you’re being asked to handle a gig, and the event organizer wants to know a couple of things. First, do you need a generator? Second, how big does the generator have to be?

I always feel that I need a generator if the power situation gives me any pause at all. There’s one outlet available from a building we don’t have access to? That needs a generator. We’ve got power available, but every other vendor at the event might be hooking into it? That needs a generator. We have to run more than 100 feet of cable from regular-ol’ outlets to even reach the stage? That needs a generator. The event organizer is offering to rent a generator because of “prior experiences?” That needs a generator.

So, needing that generator for reasons including, but not limited to, anything or everything above – how much capacity is required? There’s a relatively easy way to get a good number on that front.

On the audio amplification side, tally up all your peak (not continuous – peak) draws. For powered speakers, you can do this by taking the manufacturers peak-power claim at face value. If they tell you it’s a 2000 watt loudspeaker, call it 2000 watts (within limits, because that little HF driver isn’t going to have a 700 watt peak applied to it). For passive speakers, the manufacturer’s claim for the peak wattage at the nominal load you’ve hooked up is the number you want.

Got all that? Great. Now multiply by 1.1 to account for life not being 100% efficient. This is the power needed for your audio output, which is variable over time. After that, total up your other power draws, like mixing consoles and processing. Those units require a fixed amount of power at all times, so you don’t need to account for momentary spikes of demand. For lights, use the highest power-draw number you can find. (For instance, an LED lamp might pull 100 watts, but if you’ve got the lamp on full AND are panning and tilting like crazy you’ll use more power. The motors require energy too, right?)

Here’s the “why” of my being so focused on peaks and other “highest case” draws. When you’re running on a generator, the capacity of the unit is all you have to handle everything that can possibly happen. This is in contrast to when you’re on the municipal grid. When connected to the grid, there is generally a huge power delivery capacity for momentary draw. If you try to pull 10,000+ watts all of a sudden, that’s likely not much trouble for the “megawatts to spare” municipal supply. With a generator, though, there’s no extra capacity. If the unit has a maximum load of 5000 watts, trying to pull 10,000 is futile. The power doesn’t exist. As such, the safe thing to do is to take a good stab at figuring your highest possible momentary draw, and ensuring that instantaneous load can be handled.

By way of example, let’s take a system that I was involved in deploying recently. There were two, double 18 subs that could draw 2000 watts each, plus two tops handling the same amount of power. Add three monitor wedges with 2000 watt peak ratings, and you get 14 kW. Multiply by 1.1 and you have 15.4 kW for loudspeakers. There was a bass amp that could probably deliver a 1kW peak, and a 100 watt guitar amp, so that gets us to 16.5 kW. There were also two mixing consoles needing 120 watts each, and a processing rack that consumed about 25 watts. At this point, we need 16.8 kW. Add about 500 watts of LED lighting, and we’ve reached 17.3 kilowatts.

What the event gave us was a 20 kW diesel generator, which was perfect. The peak power available was in excess of what we needed, and our continuous draw (per the unit’s ammeter) was about 10 amps. We had no power problems with the generator itself, running as loudly as we pleased for several hours.

The conclusion here is, there’s no need to finagle and guess what you can get away with. Instead, spec comfortably and then work with confidence. It’s much better.

The Art Of Reading Reviews

Careful, there’s a lot of subjectivity out there.

A stairway of stars.Want to use this image for something else? Great! Click it for the link to a high-res or resolution-independent version.

Please Remember:

The opinions expressed are mine only. These opinions do not necessarily reflect anybody else’s opinions. I do not own, operate, manage, or represent any band, venue, or company that I talk about, unless explicitly noted.


At some point, you are going to be buying some gear online, and you are going to look at the ratings and reviews.

(I very nearly typed “rantings” instead of ratings, which would have been funny and also somewhat accurate.)

There are times when the various missives, epistles, and sometimes even novellas written by your fellow purchasers are very helpful. There are times when they are blatantly unhelpful. There are also times when their prose SEEMS helpful, but actually isn’t.

The thing to look out for is subjectivity – and when scanning for that subjectivity, recognizing that unverifiable information can be very sneaky.

An easier example to start with is a, say, 2-out-of-5 rating with a statement like, “It doesn’t sound like a [x] watt speaker at all.”

Okay, all right, so…what does a [x] watt speaker sound like? I’ve been doing this for quite a good while, and I really couldn’t tell you what a [insert watts here] speaker sounds like. I could give you an estimate of how loud I think a loudspeaker with, for example, 2 kW of input might be able to get in these modern times, but my assumptions might be very different from that of the reviewer. That is, when I see a loudspeaker advertised as “[x] watts,” my immediate assumption is that I’m looking at an instantaneous number and not anything that could be sustained. Is that what our unhappy reviewer thought? Maybe that was a continuous number in their mind. How do we know?

Since we don’t know, we can’t put too much stock in the person’s dissatisfaction.

Then there are the folks who say, “It has no headroom.” Again, what are they expecting? Are they even using the thing the right way? There are people running around out there who don’t know how to read a dBFS meter, and are blasting the converters of digital consoles thinking that 0 dBFS is treated the same way as 0 dBu. Some folks will clip the input side of a powered loudspeaker and raise a ruckus, never realizing that a master volume control got bumped down.

Another wrinkle can be found in, “The stupid thing died after one gig.” This one is more tricky, because a device absolutely can, objectively, die after one round of serious use. Manufacturing and post-manufacturing defects can and do happen. You have to ask yourself, though, about what the preponderance of evidence shows. If there are a squazillion instances of that unit out in the wild, and a handful of cases of swift death, is that really a disqualifier? The more copies that are made and shipped, the larger the absolute number of failures that can occur. Furthermore, who’s the most likely to raise their voice about something? There are a lot of satisfied folk who say nothing, but disappointed people have a higher tendency to complain.

So, with reviews, it’s good to be generally suspicious, read between the lines, and look for themes. For one person, a product will be amazing, and for another their expectations won’t have been managed correctly. If a person has a bad experience with a piece of gear, and you don’t get the sense that they know what they’re doing, don’t put too much weight into what they say. You shouldn’t totally discount it, of course, especially if the review basically sounds coherent, but don’t give it more credit than it deserves.

X32 Vs M32

They appear to measure differently, but it might not be how you expected it to be.

Measurement TracesWant to use this image for something else? Great! Click it for the link to a high-res or resolution-independent version.

Please Remember:

The opinions expressed are mine only. These opinions do not necessarily reflect anybody else’s opinions. I do not own, operate, manage, or represent any band, venue, or company that I talk about, unless explicitly noted.


If you’re like me, first – I’m sorry.

But beyond me being sorry, you’re probably also wondering just how different an M32 is from an X32. After all, software wise, they appear to be exactly the same console. They will happily consume each other’s scene files. Their firmware updates are exactly the same size on a disk. If the control surfaces didn’t have large cosmetic differences, and the M32 wasn’t twice as expensive, you might not easily contrast the two units.

So, is there a difference in audio performance between an X32 and an M32? That’s a question that’s been burning in my mind for years, and I just recently had the opportunity to borrow an M32 from a friend for some measuring. (“Thank you” to Bobby Solis of No BS Sound.)

Let’s start off with the assumptions I’m making in undertaking this comparison. First, I’m assuming that the M32 Bobby lent me and the X32 I picked from my inventory are representative of M32 and X32 consoles in general, neither significantly over or under-performing compared to the average unit of either type. I’m also assuming that my measurement system didn’t change significantly between measurements. Finally, I’m assuming that I made good judgements on the basics of the measurement process.

Speaking of which, the measurement process went like this: For both consoles, I ran them at 48 kHz and set up a signal path that went from a preamp, to a channel, and then out the main bus. For one measurement, I set the preamp to unity gain and adjusted the channel level to drive my measurement system as close to -20 dBFS as I could. For another measurement, I kept everything the same except for engaging the channel EQ with a preset curve. Then, I disengaged the EQ and dropped the channel level down, and then tried to get as close to 10% harmonic distortion as I could by clipping the mic pre. I then re-adjusted the channel level to get back to -20 dBFS on my measurement system. With that done, I did two more measurements (one with an RTA to easily see the pattern of harmonics, and one regular sweep.)

Results And Discussion

First, let’s take a look at the “Preamp Unity” comparison between the two consoles. The red trace is the M32, and the purple trace is the X32.

Combined Magnitude And Phase

There are measurable differences, but I did have to zoom the graph quite a bit to make them easy to differentiate. The Midas is flatter overall, with a difference of about 0.8 dB between the minimum and maximum measurement points. The Behringer’s “flatness” is 1.1 dB by comparison. The X32’s top end rolls off earlier, but also more gradually than the M32. Again, bear in mind that the graph is spreading a 1 dB difference into a very large space. The phase traces are so close as to be nearly indistinguishable, although the M32 is just a tiny bit flatter at the bottom and top.

Now, let’s examine the the difference between two equivalent channel equalizations. The M32 is the teal trace, and the X32 is orange.

Combined Magnitude And Phase Of EQ

With EQ applied, the consoles become harder to differentiate. The Midas retains a very small advantage in terms of top-end flatness, though the advantage is only about 0.3 dB. A tiny difference in phase linearity still favors the M32 as well.

So, what about distortion? Here are the harmonic patterns of M32 and X32 preamps being driven into clipping. The M32 is green and the X32 is red.

Combined Distortion Harmonics

The Behringer seems to be a little more pronounced on the higher harmonics than the Midas. The X32 also favors its odd harmonics a bit more than its more expensive counterpart.

The M32’s distortion stats:
THD 10.9 %
THD+N (20Hz..20kHz) 11.7 %
2nd harmonic 0.83%
3rd harmonic 10.5%
4th harmonic 0.29%
5th harmonic 2.69%
6th harmonic 0.19%
7th harmonic 0.93%
8th harmonic 0.13%
9th harmonic 0.65%

The X32’s distortion stats:
THD 11.3 %
THD+N (20Hz..20kHz) 11.8 %
2nd harmonic 0.83%
3rd harmonic 10.9%
4th harmonic 0.29%
5th harmonic 2.81%
6th harmonic 0.20%
7th harmonic 1.02%
8th harmonic 0.13%
9th harmonic 0.79%

Having seen this behavior, I was inspired to go back and look at the distortion differences between the consoles when they were running “clean.” In these traces, the Behringer is the top trace and the Midas is the bottom.

Combined THD

Running a “clean” preamp, the X32 is obviously more noisy – in a measurement, and below 200 Hz – than the M32.

In my opinion, we can very safely conclude that the M32 has better audio performance than the X32 “on paper.” Any other conclusion is one that I have far less confidence in. Is the top-end extension of the M32 something that most of us are likely to hear? Some folks would insist the answer is a resounding “yes,” whereas I remain skeptical. (I’ve never listened to a show mixed on an X32 and ended up wondering where the high-end was.) Similarly, I now know that an X32 might not pass as clean a signal as an M32, especially in the low end. But I’ve never “heard” that before and thought it was a problem; I had to see a graph to have any idea that the difference was even there.

Herein lies the difficulty: There are folks out there who are absolutely convinced that an M32 sounds noticeably and obviously better than an X32. There are folks out there (including me) who are similarly persuaded that any differences present are inaudible when encountered in the field.

What I can come to say at the end of all this is relatively simple. Spending more money to get a Midas certainly gets you a piece of equipment that measures a bit better and presents different characteristics when you drive the frontend hard. Are those differences alone enough to justify paying twice as much? That’s a question you have to answer for yourself. For my part, I will continue to use my Behringer units without a worry (especially because driving the preamps hard is something I avoid whenever possible). That might not be your story.

Patch Pain Points

The digital world is very flexible, but sometimes a bit confusing.

Tangled FractalWant to use this image for something else? Great! Click it for the link to a high-res or resolution-independent version.

Please Remember:

The opinions expressed are mine only. These opinions do not necessarily reflect anybody else’s opinions. I do not own, operate, manage, or represent any band, venue, or company that I talk about, unless explicitly noted.


I’ve spent a good deal of time in the last few years running into various patching/ routing problems. A few of them were my own, but many have been other folks who got tripped up. All of them that I can easily remember had to do with digital consoles.

I think I have an idea why.

The analog world tends to be very – shall we say – 1:1. If you plug a microphone into mic-pre 1, then it’s very likely that mic-pre 1 easily and automatically shows up in channel 1. Further, you tend to have a general alignment between the number of inputs available and the channels for those inputs to flow through. Yes, it’s true that you might have a fancier console with separate mic and line inputs on each channel. You might even have to switch between them. Even so, the tendency is for [input point n] to belong to [channel n], with a change to that scheme requiring a very obvious and very physical patch.

Digital consoles are also ubiquitously 1:1 when just “out of the box,” of course, but there are more and more consoles at accessible price points that don’t have to be that way at all. They might have a great many input options available, and those inputs may outstrip the channel count by far. For instance, the Behringer X32s in my inventory have something like 168 inputs available, but only 40 channels (32 first-class and 8 “auxiliary”) to run them through. That is, they have 32 analog inputs on the back, plus 48 inputs from AES A, 48 more inputs from AES B, 32 inputs from the USB card, and 8 “aux” inputs on top of that. With such an array of possible input points, and the very non-physical nature of the digital input matrix that chooses what input points are actually connected, the logical divorce from the channels available is – potentially – very great. Channel 1 might be handling audio from AES B 9. Channel 16 might be onboard mic pre 1. Unless you look at the totality of the input matrix and the channel’s source assignment, you can’t be sure.

The same is true of outputs. Folks invested in analog mixers are used to the idea that mix bus 1 very likely shows up on an output tied forever to that bus. Furthermore, terminology is tied strongly to fixed routing choices. E.g., a “bus” is fed from the channel, post fader, at unity gain, whereas an “aux” might be fed from either a pre or post-fader point, at a user-selectable gain.

Now, we go to digital world, and it’s increasingly more likely that “bus” is used as a generic term for any signal line that can be fed from multiple channels. That bus might be fed as pre-fader, post-channel-eq on channel 1, post-fade with user-selectable gain on channel 15, and sub-group style with post-fade unity gain on channel 31. So…what is that bus, then? A subgroup? Yes. A post-fade “aux” mix? Yes. A pre-fade “aux” mix? Also yes.

And now, which output stream does that bus feed? It’s entirely possible that there are far more buses than physical outputs. Again, an X32 has 16 configurable buses, 6 matrices, two main mix buses, a mono mix bus,  32 channel direct outs, 8 aux channel direct outs, 8 FX rack direct outs, the monitor mix bus, and the talkback. That’s 76 output sources, but an X32 only has 16 output streams…which can connect to 16 analog output “ports” if you have a full-size console or stagebox. Otherwise, you might only have 8 ports available. You can patch the streams to different physical outputs as well.

I don’t want to overplay my hand here. Most of us try to set things up so that inputs and outputs aren’t patched around in utterly mind-boggling configurations. Even with that being so, I think you can see that the flexibility and complexity of digital routing can catch a person off guard. I confuse myself sometimes, and I’m almost a native resident of digital consoles. (I’ve been around them, and have preferred them, for a very long time.)

So, what’s my point?

My point is that a full-featured digital mixer requires thought and understanding to operate. You have to have a clear idea of what you want from your signal flow, and avoid “flailing about” at all costs. Randomly banging away at the various patching matrices available to you is likely to make things worse. You have to go in with a plan, and make any changes deliberately. If you don’t, you’re likely to dig yourself a pretty deep hole.

Details Of A Streaming Setup

A few mics, a few speakers, a few cameras, a mixer, and a laptop.

Backyard Sound SystemWant to use this image for something else? Great! Click it for the link to a high-res or resolution-independent version.

Please Remember:

The opinions expressed are mine only. These opinions do not necessarily reflect anybody else’s opinions. I do not own, operate, manage, or represent any band, venue, or company that I talk about, unless explicitly noted.

A few days ago, I was contacted by Forest Aeon on Patreon. Forest asked me to go into detail about the streaming setup I’ve been using for Carolyn’s Garden concerts during these days of “pandemia.” I was tickled to be asked and happy to oblige. So, first things first. Here’s a diagram:

Streaming Setup Diagram

But what does it all mean?

To start with, streaming requires audio and video inputs. Those inputs are fed to hardware or software that can combine them into a multiplexed audio/ video stream, and then that stream is sent to an endpoint – like Facebook, YouTube, or (in my case) Restream.io

For my purposes, the audio required a good bit of heavy lifting. High production-values were a must, and those standards – while high everywhere – had to meet different needs at multiple destinations. The musicians needed multiple mixes for stage monitors, the small audience present at Carolyn’s needed something they could listen to, the streaming laptop also needed an appropriately processed version of the main mix, and I needed to monitor that feed to the laptop.

With all those needs, a well-appointed mixing console was a must. An X32 was the natural choice, because it has the routing and processing necessary to make it all happen. There were mixes for the individual musicians, a mix for the live audience, and crucially, a mix for the stream that “followed” the main mix but had some independence.

What I mean by that last phrase is driven by signal flow. The stream mix is post-fader, just like the main mix, so if I put more of a channel into the main mix, that channel will also be driven harder in the stream. This makes sense to have in place, because a solo that needs a little push for the live audience should also get a push for the remote audience. At the same time, I allowed a good bit of margin in where those post-fader sends could be placed. The reason for that was to deal with the difference between a stream mix that is far more immune to acoustic contributions in the room than a live mix. In the live mix, a particular instrument might be “hot” in the monitors, and only need a bit of reinforcement in the room. However, that monitor bleed is not nearly as prevalent for the mix to the stream, so that particular channel might need to be “scaled up” to create an appropriate blend for the remote listeners.

Another reason for a separate stream mix was to be able to have radically different processing for the mix as a whole. Just as a starter, the stream mix was often delayed by 100ms or more to better match the timing of the video. If the stream mix was just a split of the main output, that would have meant a very troublesome delay for the audience in the garden. Further, the stream mix was heavily compressed in order for its volume to be consistently high, as that’s what is generally expected by people listening to “playback.” Such compression would have been quite troublesome (and inappropriate, and unnecessary) for the live audience.

The mix for the stream was directed to the console’s option card, which is a USB audio interface. That USB audio was then handed off to the streaming laptop, which had an OBS (Open Broadcast Studio) input set to use the ASIO plugin available for OBS. All other available audio from the laptop was excluded from the broadcast.

Video managed to be both quite easy and a little tricky, just in divergent ways. On the easy side, getting three – very basic – USB cameras from Amazon into a USB hub and recognized by OBS was pretty much a snap. However, the combined video data from all three cameras ended up saturating the USB bus, meaning that I ended up setting the cameras to shut themselves off when not in use. Transitions from camera to camera were less smooth, then, as the camera being transitioned from would abruptly shut off, but I could keep all three cameras available at a moment’s notice.

With OBS I could combine those camera feeds with the mixer audio, plus some text and graphics, and then encode the result into an RTMP stream to Restream.io (As an aside, a very handy feature of OBS is the Scene Collection, which allowed me to have a set of scenes for each act. In my case, this made having a Venmo address for each act much easier, because switching to the appropriate collection brought up the correct text object.)

A very big thing for me was the manner in which the laptop was connected to the public Internet. I was insistent on using a physical patch cable, because I simply don’t trust Wi-fi to be reliable enough for high-value streaming. That’s not to say I would turn down wireless networking in a pinch, but I would never have it as my first option. Luckily, Cat6 patch cable is pretty darn cheap, being available for about $0.25 per foot. A 100′ cable, then, is all of $25. That’s awfully affordable for peace of mind, and drives home the point that it takes very expensive wireless to be as good as a basic piece of wire.

So, there you have it: My streaming setup for summer concerts.

DMX For All Things

DMX cable works for everything, so why not just use that?

stylized-xlr-endWant to use this image for something else? Great! Click it for the link to a high-res or resolution-independent version.

Please Remember:

The opinions expressed are mine only. These opinions do not necessarily reflect anybody else’s opinions. I do not own, operate, manage, or represent any band, venue, or company that I talk about, unless explicitly noted.


I am currently in the process of converting all of my XLR cable inventory over to 110 Ohm DMX cable. It’s going to take a long time, because I still have a significant amount of “vanilla mic-cable” stock. That stock is comprised of the cables that have lived this long, and are likely (in my mind) to keep on living for a good while. The terrible cables and connectors die early. The rest do tend to linger.

Why do this?

The summary above almost says it all. DMX cable, terminated with 3-pin XLR ends, works in all cases. You can connect mics with it. You can run outputs to amps and loudspeakers with it. You can use it for whatever you would use mic-cable for, and…

…you can also, without spinning up a cloud of doubt in your mind, use it in a DMX lighting-control network.

This is not to say that basic mic cable can never be used for DMX runs. I’ve done it, and without noticeable problems. Even so, it’s not a practice that I would recommend to anyone without caveats. I try to be careful to say the previous: That I’ve done it, and it worked, but your mileage may vary, so the safe option is what I recommend unless you’re truly in a jam.

But anyway, the more I convert to an all-DMX cable inventory, the less sorting out of cable types I have to do. If it’s all (or overwhelmingly) DMX, then no matter what I’m doing I can just grab a cable and go.

Of course, a question does arise: How does something like a dynamic mic react to a DMX cable in place of a regular cable? Lucky for you all, I like to graph things:

The graph is two traces on top of each other. One is the mic cable, and one is the DMX cable. They’re so close that I can’t imagine any of the deviations are something other than experimental error; You can only be so careful about not moving the mic when you replace a cable. I’m confident that any difference between the cables one thinks one might hear is a product of the imagination.

The Inverted Microphone

Passive, cardioid subwoofers? We have passive, cardioid mics.

Please Remember:

The opinions expressed are mine only. These opinions do not necessarily reflect anybody else’s opinions. I do not own, operate, manage, or represent any band, venue, or company that I talk about, unless explicitly noted.

Want to use this image for something else? Great! Click it for the link to a high-res or resolution-independent version.

In the spring, I finally became a homeowner. That means I have a yard, and that means I have time for podcasts.

Seriously, podcasts make lawn mowing interesting.

It’s especially interesting when you get to hear Dave Gunness talk about his career. And then, Mr. Gunness goes into how to build a passive, cardioid subwoofer, and everything comes full-circle.

What I mean is, a lot of us with anything that even halfway resembles a traditional education in audio are taught that speakers and microphones are inverted versions of each other. One’s an input, and one’s an output – and you can even turn a speaker into a microphone if you wire a connector in the correct way.

What we don’t always realize, though, is that the inversion works “all the way down.”

The Gunness-built, passive cardioid subwoofer, when described in any sort of detail makes a person go, “Of course!” The entire idea is that radiation from inside the box goes through acoustical filtering that causes a tuned null at the rear. This filtering causes some difficult resonances that have to be dealt with.

And that’s exactly how a cardioid microphone works, if it’s a passive unit. An acoustical phase-changing network causes the incoming radiation from the mic’s rear to cancel out when it reaches the front of the microphone. Creating an effective version of the network requires careful tuning, because some nasty resonances can result. (The exact methods for doing so are trade secrets to the microphone companies.)

It’s. All. The. Same. Concept.

It’s yet another example of how everything in this business is made of the same “physics blocks.” You can make pretty much anything you want if you understand what the parts are.

It makes me wonder if a line-array of microphones might have an interesting application…

Better Livestream Quality

Good light and audio interfaces are a big help.

Please Remember:

The opinions expressed are mine only. These opinions do not necessarily reflect anybody else’s opinions. I do not own, operate, manage, or represent any band, venue, or company that I talk about, unless explicitly noted.

Want to use this image for something else? Great! Click it for the link to a high-res or resolution-independent version.

There’s a whole lot of livestreaming going on, even with COVID19 worries easing a bit, I’ve encountered some questions about it. Mostly, they come down to how to do it well without spending a million bucks. As with anything in show production, there are some pretty big wins to be had with strong basics. Sure, very elaborate setups can provide very impressive results – but you can get a lot of mileage out of a little money and homework.

Good Light

Livestreaming is so firmly entwined with video that any discussion of quality has to involve the visual aspects. Obviously, a decent capture device (camera) is helpful, but what’s less obvious is how you can use lighting to your advantage. Even relatively down-market phone cameras can get pretty decent pictures in strong light. If you remove the need for the sensor to be run at a high ISO value, image grain drops significantly.

Just hitting yourself with a lot of light isn’t enough, though. The color of the light matters, and so does the distribution.

I strongly recommend starting any lighting experiment with warm but desaturated tones. (Tons of saturation can cause you to quickly overload the image sensor in one color range.) The more your lighting reminds you of some flavor of afternoon sunlight, the better. Soft-white is a good place to look first. Start off by making yourself look natural, and then you can go off in wild directions later.

In terms of distribution, strive for very even light across everything you want to see. Avoid hotspots; Diffuse light through lampshades, or paper, or thin sheets if you’re having trouble. You can also try bouncing strong light off of walls. The reason for diffusion and even-ness is that most cameras have a pretty limited dynamic range. They aren’t as forgiving of large intensity ranges as your eyes are. Subjects hit by disproportionately strong light may “clip” into large blobs of white if darker areas are made visible, or the parts of the picture in shadow may be indiscernible if the exposure is dialed back to rein in the extra hot areas.

Direct Connections

Your best shot at good sound is to mix your stream directly to a line input. Sure, using a device’s built-in mic can work reasonably well, and I’m always going to tell you to get the show to sound good in the room. However, I’m also a vocal and fervent proponent of deleting the room from the equation whenever possible. That means going for direct coupling of signal, rather than via multiple transductions from electricity, to sound pressure waves, and back again.

Achieving a direct connection on a phone can be a little challenging. You can certainly get a breakout cable and connect something directly to the microphone input on the headset jack. It’s likely, though, that driving the input too hard will be very easy. Plus, the connections might not be the most robust…and let’s not even get started on automatic gain control doing weird things to your input audio. (It might be an issue, or it might not.)

It’s much better to spend a bit of money on an interface that allows for robust, pro-audio connections (like XLR), and delivers a digital audio stream to the phone over the USB port. There are many such devices available, a good crop of which are under $200 US. Armed with such a unit, you can send a mix straight to the phone with minimal fuss. (Try to find something with good input metering, if you can. Guessing at when you’ll hit a device’s clipping point is vexing. Seeing that point clearly is divine.)

When getting set up, make a test-recording that you can play back to hear your broadcast mix. Monitoring in headphones is okay, but unless the performance is very quiet you’ll get plenty of “leakage that lies to you.”

***

None of what I’ve presented is particularly earth-shattering. In fact, it may sound rather simple. That’s my point about strong basics, though. A huge number of streamers aren’t even getting to the level of intentional lighting choices and a direct audio-signal connection. Standing out from the pack does take a little work, more than a lot of other folks are doing, but it’s really not that bad.

Black Gold, Silver Gold, Gold Gold

The value of Sharpies is hard to overstate.

Please Remember:

The opinions expressed are mine only. These opinions do not necessarily reflect anybody else’s opinions. I do not own, operate, manage, or represent any band, venue, or company that I talk about, unless explicitly noted.

 
Want to use this image for something else? Great! Click it for the link to a high-res or resolution-independent version.

When the world economy collapses in The Apocalypse, Sharpies will probably be the main form of currency. Sorry, “Fallout” fans, but I don’t think bottlecaps are going to cut it. Two of these iconic markers will buy a whole farm, plus a generator filled with the last diesel to exist on the planet. Just you watch.

And why not? They’re already the most valuable thing that an audio craftsperson can possess. Apparently, I mean. It’s even surprising to me how I feel about Sharpies. I have this sneaky suspicion that if I lent out a 30′ XLR cable and it didn’t come back, I’d be over it in a couple of days. In contrast, somebody borrowed a silver Sharpie from me at the beginning of the month…and I don’t think it was returned…and I’m still thinking about it. And the person I lent it to. Their name, it is known to me. It is filed forever in a corner of my brain reserved entirely for the purpose of remembering persons that I have handed any sort of marking pen to.

Seriously, people ask me for an adapter, or a cable, or a roll of gaff tape, and I hand it over without thinking. Ask me for a Sharpie, and I become a bird of prey. I will constantly be looking around for you and my precious marker. I will be able to zero in on you from several thousand feet. My vision extends into the infrared and ultraviolet portions of the spectrum when a Sharpie is out of my FOH bag. I can hear the fabric of spacetime bending around you and my precious writing instrument. It sings to me across the aeons. It calls to me across the event horizons of black holes. Don’t even think about going outside the venue with that thing. No. NO. You can write on things in here, you villain, YOU KNAVE!

You want a mic stand? No problem, here you go. Want me to leave you the lighting computer and the password? Yeah, okay. You want a Sharpie?

I will get  your name and home address, and I will 100% look on Google Maps to see if it’s a legitimate place that exists. There will be a background check. Fingerprints. I will demand three references and call them.

Maybe it’s because the things are so useful. (Pro Tip: Silver sharpies on black gaff tape make really decent, semi-permanent labels for many racks and workboxes.) Maybe it’s because they seem expensive for their classification. Maybe it’s because they disappear so readily. Maybe it’s because everybody wants one. Maybe it’s because they’re hard to find when you really need one.

Maybe it’s all those things.

“No, dude, first you hand me the money, THEN I hand you the Sharpie.” It’s at that level. The things are made of some precious metal, I swear. Of all the “magic markers” in this world, they seem to have the most magic.

You could replace The One Ring in “Lord Of The Rings” with a Sharpie, and all the dialogue would still make perfect sense. That’s how valuable the things are.

“Is it secret? Is it safe?”

I’m tellin’ ya.