Tag Archives: Preparation

Seventeen Days For Three And A Half Hours

Production success has just as much to do with logistics as with any other factor.

Please Remember:

The opinions expressed are mine only. These opinions do not necessarily reflect anybody else’s opinions. I do not own, operate, manage, or represent any band, venue, or company that I talk about, unless explicitly noted.

17for3.5Want to use this image for something else? Great! Click it for the link to a high-res or resolution-independent version.

Last week, I worked on a special birthday show for Amanda Grapes. Amanda handles various fiddle and vocal duties for The Nathan Spenser Revue, The Puddle Mountain Ramblers, and The Green Grapes Band. All three groups played that evening. It was excellent. I also enjoyed the cupcakes.

My opening sentence makes it sound like the day of the gig was the day that effort was put in. Actually, Amanda, the other band members, and I worked on putting the evening together for over two weeks – and that, right there, is a stumbling block that has tripped up a good number of bands. There are plenty of folks who think that the most important work on a show happens just before downbeat. That’s incorrect. Loading in, setting up, getting checked, and all that great stuff is the most ACUTE work of the show, but that activity is preceded by the logistics that make it all meaningful.

The more work I do in this business, the more I see “production execution” as entailing almost trivial concern, and logistics as a major factor that has to be worried over.

Why? Well…

Just Getting The Date Settled Is Hard

Think about the challenges involved in wrangling a band of 3-5 people. Imagine the schedules that have to be coordinated to both practice for, and arrive at some sort of show. Now imagine doing that across three separate bands (11 regular players), a couple of guests who’ll be sitting in, and an audio human. Now visualize doing that while trying to nail down a “moving target” date with the venue booker.

Sound “fun?”

In this environment, the organized have a much better shot at survival than the disorganized. Yes – there are artists who do well in spite of not really being “with it,” but I’ll bet a good percentage of that cohort is being helped along by people who are REALLY good at managing the details.

Being proficient at managing these kinds of logistics is a big part of what separates the “varsity level” bands, venues, and production personnel from the JV crowd. Shepherding such details is the very root of getting shows done, because if the scheduling doesn’t happen, then…what?

No show. At all. Discussing the production doesn’t even matter, because there’s no production to do.

Further, handling the details just well enough to land the night, but not well enough to really know what’s going on – well, that ends up putting a lot of stress on the production side of things. If you don’t know who’s going to show up, and with what, then how do you prepare production for the gig? Your effectiveness drops like a rock. You either have to over-prepare (which isn’t necessarily bad, but can be annoying in larger doses), or just throw things together at the last minute (which can be a recipe for awful production, riddled with technical difficulties and evil surprises).

On the other hand, it’s a joy to work with the folks who are effective at getting the whole herd pointed in the same direction and moving at the same speed. Things just become easier.

It Ain’t A Good Plan If It Won’t Fit The Van

Another make-or-break factor that rests on logistical prowess is making sure the production fits the boundaries it’s going into. One such boundary is the transport of all the gear and people involved, which I won’t detail here.

A boundary which I will get into a bit is that of venue production – and this lies near the core of my feeling that “production is easy, and logistics are tough.” At some point, production techs begin to realize that the biggest shows, with the most complex execution, are just lots of simple bits that are plugged into each other. A 10,000 scene light show is built a step at a time. You need to do some weird thing with lots of mics and lots of monitor wedges going every which way? It’s not really a big deal if you arrive on time, and the routing and hookup is handled methodically. The problem really isn’t the number of “moving parts,” just by itself. The problem is the number of moving parts can be practically stuffed in the box that is the venue.

Figuring that out is logistics, and thinking is DEFINITELY required.

This is why audio humans love to get accurate input lists. It’s also why we like getting an accurate picture of how bands want the night to develop. We like to get both because the intersection of the input list with the show-flow is “A Very Big Deal Indeed.”™ It’s “A Very Big Deal Indeed”™ because a show that isn’t repatched midstream can easily overrun the capacity of the stage or mixing console.

And many small-venue gigs are not repatched in the middle, because reworking what’s going into the snake can be pretty challenging when you only have one production person on hand.

In fact, I very nearly got “bit” by a channel overrun problem on Amanda’s show. It was because I temporarily became lazy about working out that intersection between the input lists and the show’s progression. I read the input requests that I’d been given, but only considered them individually from band to band. Turning them over in my head, everything seemed dandy. The day before the show, though, my cautionary inner voice started to nag me:

“You really should write this all out.”

I listened to that internal warning and wrote up an input list that considered how the night would actually happen: We were not going to repatch anything. Every channel had to be ready to go from downbeat to the last note, because there wouldn’t be time to futz with what was going on at the snake head.

It was lucky that I wrote out the no-repatch input list, because it exposed a problem that I hadn’t considered. Without a repatch, we would not have enough channels to do the show “exactly as written.” If I had just gone, “Yeah, yeah, we’ll be fine,” the show would still have happened – but we would have had to cut down the drum mics at the last moment. That would have been unpleasant and unprofessional.

…but armed with my discovery, I could now use another bit of good logistics to manage the problem. I could call the drummer’s number (which I had been thoughtfully provided with in advance) and discuss the options ahead of time. We decided that he would submix the drums to two channels, which neatly fixed our “not enough inputs” problems, and there were no surprises on the actual day of show. Much better.

**********

The point of all this is that, again, the assembly and operation of a show’s production is basically academic. You place and plug in what you need, check that it’s working, suss out the connection problems and the feedback issues, and off you go. What makes it possible to be effective and focused in that process is the organizational work that “sets up the setting up.”

That’s why it can take 17 days to do a three-hour and thirty-minute show.


It Always Costs More And Takes Longer Than You Think

The story of a lighting upgrade.

Please Remember:

The opinions expressed are mine only. These opinions do not necessarily reflect anybody else’s opinions. I do not own, operate, manage, or represent any band, venue, or company that I talk about, unless explicitly noted.

lightupgradeWant to use this image for something else? Great! Click it for the link to a high-res or resolution-independent version.

My dad has a list of maxims about life, with one of the most memorable being “It always costs more and takes longer than you think.” I’ve never doubted that particular piece of Papa’s wisdom, but it’s not often that it’s so perfectly demonstrated in practical reality. There’s a bit of a tale here, if you haven’t guessed:

This last weekend was the final (as far as is currently planned) Floyd Show.

Floyd Show was a Utah-based tribute act that performed (what else?) the music of Pink Floyd. They were fronted by Tim Hollinger, a monstrously talented guy who probably knew more about Pink Floyd than Pink Floyd did. Tim loved to push the boundaries of what could be achieved in a small-venue setting, and this caused his productions to be what I can only describe as “deliciously challenging.” Working on a gig that takes a day or more to setup, with the stage packed full of people and gear, and the mix being done in quadrophonic surround is the kind of unbridled hilarity that I live for.

And then, Tim unexpectedly passed away.

It was decided that there would be one more gig to “close the shop.” This would be the last, planned chance to work on the biggest production show that comes through my regular job. (Roll The Bones, our local Rush tribute, will now take the top spot.) Since this was the last chance, and I had been wanting to install a lighting upgrade to – among other reasons – do Floyd Show justice, the announcement of the show prompted a “rush to completion.” Yes, I had wanted to wait longer, but this was it. There might never be another opportunity to do a night that came close to what I had wanted to do with Tim at the helm.

I wanted to have plenty of time to get things working, so I started the upgrade a month before downbeat.

The upgrade was finished about four hours before the show started.

Trial Balloons

A partial reason that everything took a while is because I was being cautious.

I wanted to use moving-head wash lights, but what I wanted in terms of equipment hasn’t really been a priority for the mainstream light manufacturers. Moving-head spots that use optics to create a sharp-edged beam are everywhere. Spendy ($400+) movers built around some kind of soft-edge beam are only slightly less common than dirt. This is all fine and dandy, but truly entry-level moving-heads are basically “off the radar” for even ADJ and Chauvet. I checked with my favorite “off-the-wall and discounted” lighting vendor, and they had the fixture that I wanted…but at a price point that was too close to the next step up to be much of a differentiation.

I checked with some Ebay vendors, and behold! The fixture I wanted was available at a price that was commensurate with what it could do.

Even so, as I said, I wanted to be cautious. I wanted to buy just a couple of units at first, so that if what I got was utter rubbish I would be able to recover in time. I got my first shipment, and the news was good and bad.

On the good side, the lights had a LOT more output than I expected. I had figured that they would outdo the RGBA “puck-pars” that were currently hanging at the venue, but I was pretty surprised at just how much “firepower” a cheap mover could have. (A relatively tight beam angle helps greatly, of course.) Both units moved well, responded to their control panels, and could successfully reset themselves in a reliable fashion.

The bad news was that one of the units refused to shut off its blue LEDs under any circumstances.

I figured that this was just an odd fluke, and I contacted the vendor about a return. It took a couple of days to get things sorted out, but the whole shootin’-match satisfied me enough that the vendor got the sale for the rest of the fixtures. Back to the source went the problem child, and just like that, only three weeks of lead-time remained.

Stand and Deliver

What I had also discovered when I was testing my “trial balloon” fixtures was that mounting them to the installed, vertical stage truss wouldn’t be the greatest idea. The topmost light would have decent trim height, but other units hung below wouldn’t be in the best spot for maximum usability. This is where the “it costs more than you think” starts to come in. I had considered that light stands might be necessary, but I had managed to convince myself that the new toys might not truly require them.

Wrong!

I needed DMX cable anyway, so I visited my aforementioned “off-the-wall and discounted” gear vendor. I found some better-than-entry-level trees and placed my order.

Great – except that the warehouse wasn’t in a hurry to get things shipped. It was days before my order was on a truck. By the time all the lights and the stands were in my possession, I had only two-weeks of lead time.

Nuts

When I ordered the stands, I had assumed that the included mounting hardware would do a satisfactory job at clamping the lights to the crossbars.

Nope.

Getting the fixture bracket secured to the crossbar was an impossible task with the bolts and wingnuts supplied. The luminaires aren’t really heavy, but even a not-too-heavy light can be a bit much when you need to hold it in the air, maneuver it so that a non-captive bolt goes through a hole in a bracket, and then keep the whole shebang still while you fumble with washers and wingnuts in a small space. In theory, it all works. In practice, not so much.

I needed to order O-clamps. More cost.

One week of “lead” remained. After that, it would be the week of the show. The gear had to arrive on time, and it had to work, or things would get REALLY tight and REALLY spendy.

This was not the time to go through a discount vendor. It was time to call someone who would ship in a day – so, I did. Through a minor misadventure, I actually got upgraded shipping. That was an important help.

Down To The Wire

My clamps arrived in time for the weekend preceding the big gig. I then proceeded to realize that I’m the dumbest guy to ever hang a light in this town.

See, I hadn’t worked with O-clamps before. It didn’t take long to figure out the rock-bottom basics (they’re not complicated creatures), but I didn’t exactly take note of every functional thing about them. I managed to get the first light hung. Then, I tried to clamp the second light – to no avail. No matter how I tried, I could not get the clamp to close sufficiently for the retention bolt to be swung into position.

“Cheap crap,” I thought.

“I can fix this,” I thought.

I yanked one of the inserts out of the offending clamp, which made internal diameter wider. I then folded over a napkin to put in place of the insert, which allowed the clamp to close more tightly with just finger-pressure. This allowed me to swing the retention bolt up, and then tighten the whole assembly. It wasn’t pretty, but it did work. “I’m resourceful!” I congratulated myself.

The next clamp didn’t need all that falderol, but the fourth did. The fifth clamp was fine out of the box, but the sixth was a pain.

It was while I was struggling with clamp #6 that I made an important discovery: The nut tightening the retention bolt could be loosened a great deal before it came off the assembly. By pure luck, I had loosened the nut sufficiently on some of the clamps to allow me to use them as intended. On the others, I simply hadn’t gone far enough. There was NOTHING WRONG with the clamps – the problem was the idiot using them. (Me, in other words.)

All of my futzing had cost me time, but I was able to get all the lights ignited and a few basic cues built. I figured that the next evening would allow me the time to get more done…except I misjudged how early I would need to arrive, especially because the band was coming in early themselves to prep for a video shoot. The lights were re-hung, and a few more cues were programmed, but I still wasn’t where I wanted to be when I had to switch gears to tasks that were “mission critical for RIGHT NOW.”

I figured that our scheduled, Floyd Show prep-day would afford me all the remaining time needed to get the lights programmed.

Can you see where this is going?

Prep-day arrived, and I went in promptly after lunch. Even so, the “must do this now” portion of what I had to accomplish (which mostly amounted to a clear stage) took until the first musician arrived. We moved the light trees, which caused a latent problem in the electronics of one of the fixtures to reveal itself. I reworked my hang to fix the issue, and by the time all that was done, the rest of the players were in the room. It was time to do other things, again.

Those other things revealed that there were some pretty rough edges around the sonic part of the show, but it was getting rather late and there was no time to fix them.

So everything got pushed into the next day.

It was about 2:00 PM on show-day when I finally started programming the light show in earnest. It was about 5:00 when I had what I needed.

Downbeat was at 9:00 PM.

It always costs more and takes longer than you think.


Speed Fishing

“Festival Style” reinforcement means you have to go fast and trust the musicians.

Please Remember:

The opinions expressed are mine only. These opinions do not necessarily reflect anybody else’s opinions. I do not own, operate, manage, or represent any band, venue, or company that I talk about, unless explicitly noted.

Want to use this image for something else? Great! Click it for the link to a high-res or resolution-independent version.

Last Sunday was the final day of the final iteration of a local music festival called “The Acoustic All-Stars.” It’s a celebration of music made with traditional or neo-traditional instruments – acoustic-electric guitars, fiddles, drums, mandolins, and all that sort of thing. My perception is that the musicians involved have a lot of anticipation wrapped up in playing the festival, because it’s a great opportunity to hear friends, play for friends, and make friends.

Of course, this anticipation can create some pressure. Each act’s set has a lot riding on it, but there isn’t time to take great care with any one setup. The longer it takes to dial up the band, the less time they have to play…and there are no “do overs.” There’s one shot, and it has to be the right shot for both the listeners and the players.

The prime illustrator for all this on Sunday was Jim Fish. Jim wanted to use his slot to the fullest, and so assembled a special team of musicians to accompany his songs. The show was clearly a big deal for him, and he wanted to do it justice. Trying to, in turn, do justice to his desires required that a number of things take place. It turns out that what had to happen for Jim can (I think) be generalized into guidelines for other festival-style situations.

Pre-Identify The Trouble Spots, Then Make The Compromises

The previous night, Jim had handed me a stage plot. The plot showed six musicians, all singing, wielding a variety of acoustic or acoustic-electric instruments. A lineup like that can easily have its show wrecked by feedback problems, because of the number of open mics and highly-resonant instruments on the deck. Further, the mics and instruments are often run at (relatively) high-gain. The PA and monitor rig need to help with getting some more SPL (Sound Pressure Level) for both the players and the audience, because acoustic music isn’t nearly as loud as a rock band…and we’re in a bar.

Also, there would be a banjo on stage right. Getting a banjo to “concert level” can be a tough test for an audio human, depending on the situation.

Now, there’s no way you’re going to get “rock” volume out of a show like this – and frankly, you don’t want to get that kind of volume out of it. Acoustic music isn’t about that. Even so, the priorities were clear:

I needed a setup that was based on being able to run with a total system gain that was high, and that could do so with as little trouble as possible. As such, I ended up deploying my “rock show” mics on the deck, because they’re good for getting the rig barking when in a pinch. The thing with the “rock” mics is that they aren’t really sweet-sounding transducers, which is unfortunate in an acoustic-country situation. A guy would love to have the smoothest possible sound for it all, but pulling that off in a potentially high-gain environment takes time.

And I would not have that time. Sweetness would have to take a back seat to survival.

Be Ready To Abandon Bits Of The Plan

On the day of the show, the lineup ended up not including two people: The bassist and the mandolin player. It was easy to embrace this, because it meant lower “loop gain” for the show.

I also found out that the fiddle player didn’t want to use her acoustic-electric fiddle. She wanted to hang one particular mic over her instrument, and then sing into that as well. We had gone with a similar setup at a previous show, and it had definitely worked. In this case, though, I was concerned about how it would all shake out. In the potentially high-gain environment we were facing, pointing this mic’s not-as-tight polar pattern partially into the monitor wash held the possibility for creating a touchy situation.

Now, there are times to discuss the options, and times to just go for it. This was a time to go for it. I was working with a seasoned player who knew what she wanted and why. Also, I would lose one more vocal mic, which would lower the total loop-gain in the system and maybe help us to get away with a different setup. I knew basically what I was getting into with the mic we chose for the task.

And, let’s be honest, there were only minutes to go before the band’s set-time. Discussing the pros and cons of a sound-reinforcement approach is something you do when you have hours or days of buffer. When a performer wants a simple change in order to feel more comfortable, then you should try to make that change.

That isn’t to say that I didn’t have a bit of a backup plan in mind in case things went sideways. When you’ve got to make things happen in a hurry, you need to be ready to declare a failing option as being unworkable and then execute your alternate. In essence, festival-style audio requires an initial plan, some kind of backup plan, the willingness to partially or completely drop the original plan, and an ability to formulate a backup plan to the new plan.

The fiddle player’s approach ended up working quite nicely, by the way.

Build Monitor World With FOH Open

If there was anything that helped us pull-off Jim’s set, it was this. In a detail-oriented situation, it can be good to start with your FOH (Front Of House) channels/ sends/ etc. muted (or pulled back) while you build mixes for the deck. After the monitors are sorted out, then you can carefully fill in just what you need to with FOH. There are times, though, that such an approach is too costly in terms of the minutes that go by while you execute. This was one such situation.

In this kind of environment, you have to start by thinking not in terms of volume, but in terms of proportions. That is, you have to begin with proportions as an abstract sort of thing, and then arrive at a workable volume with all those proportions fully in effect. This works in an acoustic music situation because the PA being heavily involved is unlikely to tear anyone’s head off. As such, you can use the PA as a tool to tell you when the monitor mixes are basically balanced amongst the instruments.

It works like this:

You get all your instrument channels set up so that they have equal send levels in all the monitors, plus a bit of a boost in the wedge that corresponds to that instrument’s player. You also set their FOH channel faders to equal levels – probably around “unity” gain. At this point, the preamp gains should be as far down as possible. (I’m spoiled. I can put my instruments on channels with a two-stage preamp that lets me have a single-knob global volume adjustment from silence to “preamp gain +10 dB.” It’s pretty sweet.)

Now, you start with the instrument that’s likely to have the lowest gain before feedback. You begin the adventure there because everything else is going to have to be built around the maximum appropriate level for that source. If you start with something that can get louder, then you may end up discovering that you can’t get a matching level from the more finicky channel without things starting to ring. Rather than being forced to go back and drop everything else, it’s just better to begin with the instrument that will be your “limiting factor.”

You roll that first channel’s gain up until you’ve got a healthy overall volume for the instrument without feedback. Remember, both FOH and monitor world should both be up. If you feel like your initial guess on FOH volume is blowing past the monitors too much (or getting swamped in the wash), make the adjustment now. Set the rest of the instruments’ FOH faders to that new level, if you’ve made a change.

Now, move on to the subsequent instruments. In your mind, remember what the overall volume in the room was for the first instrument. Roll the instruments’ gains up until you get to about that level on each one. Keep in mind that what I’m talking about here is the SPL, not the travel on the gain knob. One instrument might be halfway through the knob sweep, and one might be a lot lower than that. You’re trying to match acoustical volume, not preamp gain.

When you’ve gone through all the instruments this way, you should be pretty close to having a balanced instrument mix in both the house and on deck. Presetting your monitor and FOH sends, and using FOH as an immediate test of when you’re getting the correct proportionality is what lets you do this.

And it lets you do it in a big hurry.

Yes, there might be some adjustments necessary, but this approach can get you very close without having to scratch-build everything. Obviously, you need to have a handle on where the sends for the vocals have to sit, and your channels need to be ready to sound decent through both FOH and monitor-world without a lot of fuss…but that’s homework you should have done beforehand.

Trust The Musicians

This is probably the nail that holds the whole thing together. Festival-style (especially in an acoustic context) does not work if you aren’t willing to let the players do their job, and my “get FOH and monitor world right at the same time” trick does NOT work if you can’t trust the musicians to know their own music. I generally discourage audio humans from trying to reinvent a band’s sound anyway, but in this kind of situation it’s even more of something to avoid. Experienced acoustic music players know what their songs and instruments are supposed to sound like. When you have only a couple of minutes to “throw ‘n go,” you have to be able to put your faith in the music being a thing that happens on stage. The most important work of live-sound does NOT occur behind a console. It happens on deck, and your job is to translate the deck to the audience in the best way possible.

In festival-style acoustic music, you simply can’t “fix” everything. There isn’t time.

And you don’t need to fix it, anyway.

Point a decent mic at whatever needs micing, put a working, active DI on the stuff that plugs in, and then get out of the musicians’ way.

They’ll be happier, you’ll be happier, you’ll be much more likely to stay on schedule…it’s just better to trust the musicians as much as you possibly can.


Tuesday Thoughts

Just some ideas to chew on.

Please Remember:

The opinions expressed are mine only. These opinions do not necessarily reflect anybody else’s opinions. I do not own, operate, manage, or represent any band, venue, or company that I talk about, unless explicitly noted.

Want to use this image for something else? Great! Click it for the link to a high-res or resolution-independent version.

If the singer is being drowned it is better to partially drain the bathtub than to buy flippers and a snorkel.

Meditate upon this.

Want to use this image for something else? Great! Click it for the link to a high-res or resolution-independent version.

It’s not a “binary” choice. There are plenty of grey shades. Even so…

At some point, you will probably have to figure out what means more to you: The craft, or the money.

Only the very lucky get all they want of both.


Echoes Of Feedback

By accident, I seem to have discovered an effective, alternate method for “ringing out” PA systems and monitor rigs.

Please Remember:

The opinions expressed are mine only. These opinions do not necessarily reflect anybody else’s opinions. I do not own, operate, manage, or represent any band, venue, or company that I talk about, unless explicitly noted.

Want to use this image for something else? Great! Click it for the link to a high-res or resolution-independent version.

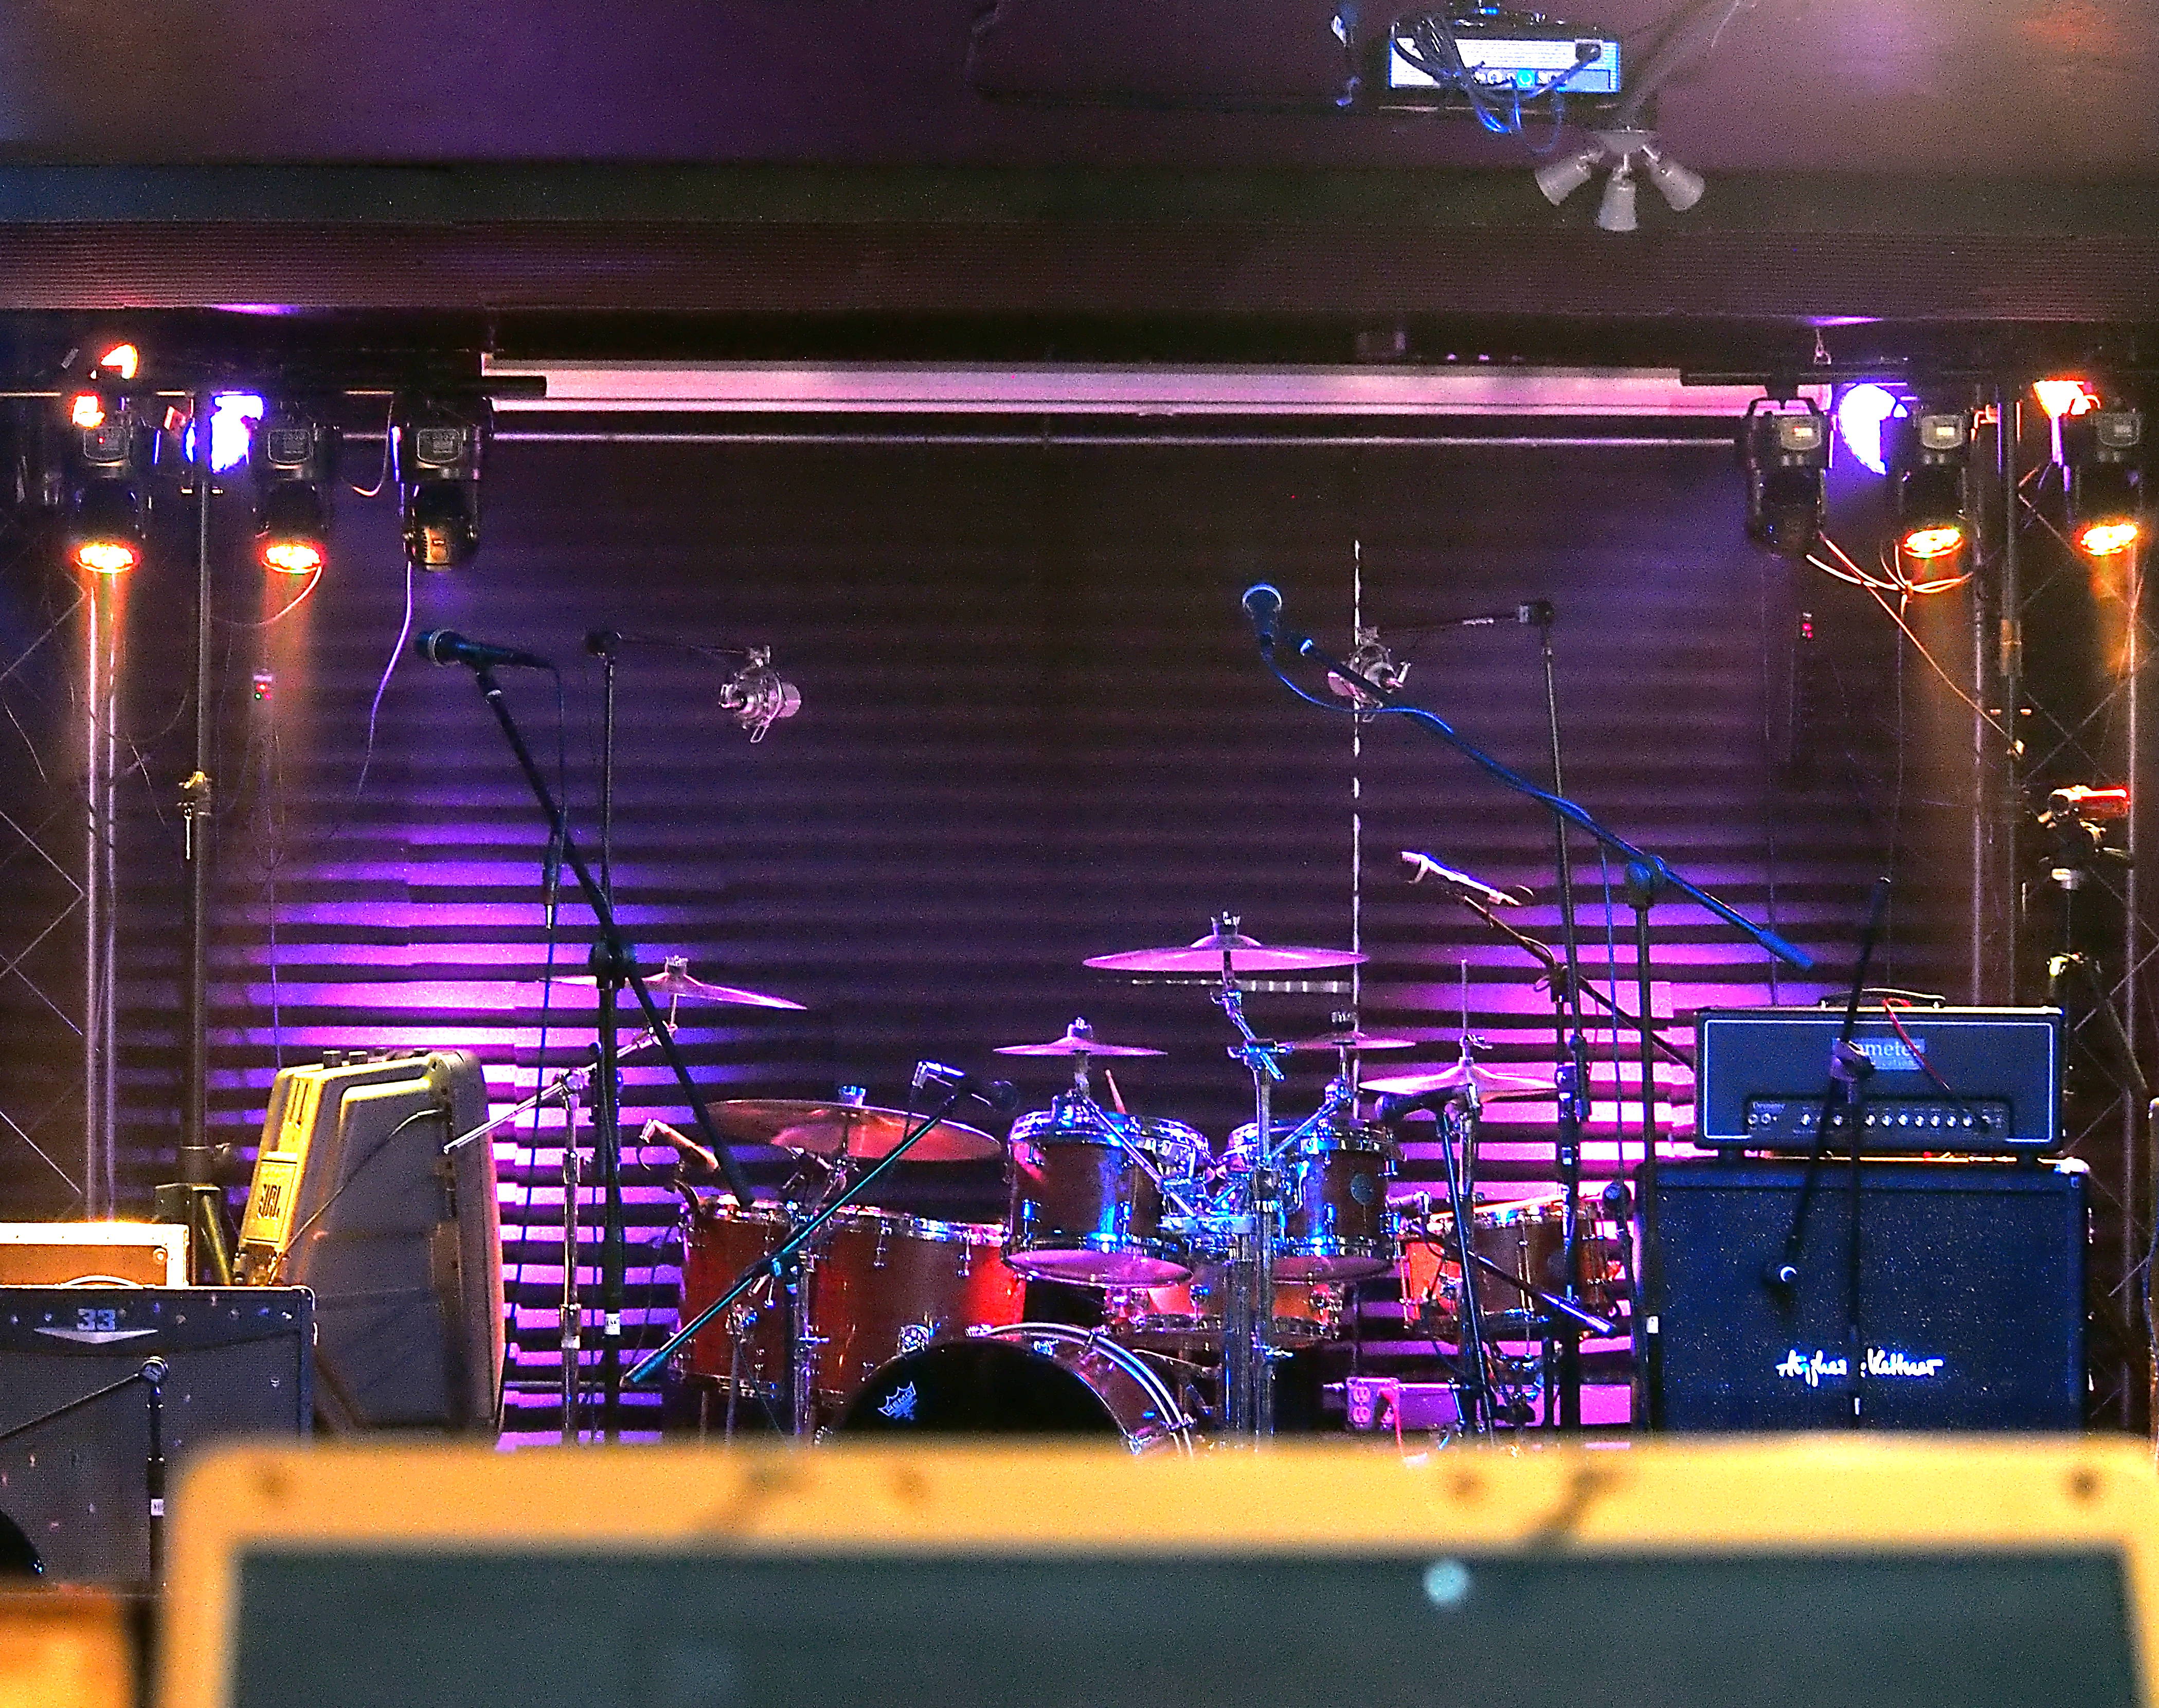
Sometimes, the best way to find something is to be looking for something else entirely.

A couple of weeks ago, I got it into my head to do a bit of testing. I wanted to see how much delay time I could introduce into a monitor feed before I noticed that something was amiss. To that end, I took a mic and monitor that were already set up, routed the mic through the speaker, and inserted a delay (with no internal feedback) on the signal path. I walked between FOH (Front Of House) and the stage, each time adding another millisecond of delay and then talking into the mic.

For several go-arounds, everything was pretty nondescript. I finally got to a delay time that was just noticeable, and then I thought, “What the heck. I should put in something crazy to see how it sounds.” I set the delay time to something like a full second, and then barked a few words into the mic.

That’s when it happened.

First, silence. Then, loud and clear, the delayed version of what I had said.

…and then, the delayed version of the delayed version of what I had just said, but rather more quietly.

“Whoops,” I thought, “I must have accidentally set the delay’s feedback to something audible.” I began walking back to FOH, only to suddenly realize that I hadn’t messed up the delay’s settings at all. I had simply failed to take into account the entire (and I do mean the ENTIRE) signal path I was working on.

Hold that thought.

Back In The Day

There was a time when delay effects weren’t the full-featured devices we’re used to. Whether the unit was using a bit of tape or some digital implementation, you didn’t always get a processor with a knob labeled “feedback,” or “regen,” or “echoes,” or whatever. There was a chance that your delay processor did one thing: It made audio late. Anything else was up to you.

Because of this, certain consoles of the day had a feature on their aux returns that allowed for the signal passing through the return to be “multed” (split), and then sent back through the aux send to the processor it came from. (On SSL consoles, this feature was called “spin.”) You used this to get the multiple echoes we usually associate with delay as an effect for vocals or guitar.

At some point, processor manufacturers decided that including this feature inside the actual box they were selling was a good idea, and we got the “feedback” knob. There’s nothing exotic about the control. It just routes some of the output back to the input. So, if you have a delay set for some number of milliseconds, and send a copy of the output back to the input end (at a reduced level), then you get a repeat every time your chosen number of milliseconds ticks by. Each repeat drops in level by the gain reduction applied at the feedback control…and eventually, the echo signal can’t be readily heard anymore.

But anyway, the key point here is that whether or not it’s handled “internally,” repeating echoes from a delay line are usually caused by some amount of the processor’s output returning to the front end to be processed again. (I say “usually” because it’s entirely possible to conceive of a digital unit that operates by taking an input sample, delaying the sample, playing the sample back at some volume, and then repeats the process for the sample a certain number of times before stopping the process. In this case, the device doesn’t need to listen to its own output to get an echo.)

I digress. Sorry.

If the output were to be routed back to the input at “unity gain,” (with no reduction or increase in level relative to the original output signal) what would happen? That’s right – you’d get an unlimited number of repeats. If the output is routed back to the front end at greater than unity gain, what would happen? Each repeat would grow in level until the processor’s output was completely saturated in a hellacious storm of distorted echo.

Does that remind you of anything?

Acoustical Circuits

This is where my previous sentence comes into play: “I had simply failed to take into account the entire (and I do mean the ENTIRE) signal path I was working on.” I had temporarily forgotten that the delay line I was using for my tests had not magically started to exist in a vacuum, somehow divorced from the acoustical circuit it was attached to. Quite the opposite was true. The feedback setting on the processor might have been set at “negative infinity,” but that did NOT mean that processor output couldn’t return to the input.

It’s just that the output wasn’t returning to the input by a path that was internal to the delay processor.

I’ve talked about acoustical, resonant circuits before. We get feedback in live-audio rigs because, rather like a delay FX unit, our output from the loudspeakers is acoustically routed back to our input microphones. As the level of this re-entrant signal rises towards being equal with the original input, the hottest parts of the signal begin to “smear” and “ring.” If the level of the re-entrant signal reaches “unity,” then the ringing becomes continuous until we do something to reduce the gain. If the returning signal goes beyond unity gain, we get runaway feedback.

This is not fundamentally different from our delay FX unit. The signal output from the PA or monitor speakers takes some non-zero amount of time to get back into the microphone, just like the feedback to the delay takes a non-zero amount of time to return. We’re just not used to thinking of the microphone loop in that way. We don’t consciously set a delay time on the audio re-entering the mic, and we don’t intentionally set an amount of signal that we want to re-enter the capsule – we would, of course, prefer that ZERO signal re-entered the capsule.

And the “delay time” through the mic-loudspeaker loop is just naturally imposed on us. We don’t dial up “x number of milliseconds” on a display, or anything. However long it takes audio to find its way back through the inputs is however long it takes.

Even so, feedback through our mics is basically the same creature as our “hellacious storm” of echoes through a delay processor. The mic just squeals, howls, and bellows because of differences in overall gain at different frequencies. Those frequencies continue to echo – usually, so quickly that we don’t discern individual repeats – while the other frequencies die down. That’s why the fighting of feedback so often involves equalization: If we can selectively reduce the gain of the frequencies that are ringing, we can get their “re-entry level” down to the point where they don’t noticeably ring anymore. The echoes decay so far and so fast that we don’t notice them, and we say that the system has stabilized.

All of this is yet another specific case where the patterns of audio behavior mirror and repeat themselves in places you might not expect.

As it turns out, you can put this to very powerful use.

The Application

As I discussed in “Transdimensional Noodle Baking,” we can do some very interesting things with audio when it comes to manipulating it in time. Making light “late” is a pretty unwieldy thing for people to do, but making audio late is almost trivial in comparison.

And making audio events late, or spreading them out in time, allows you to examine them more carefully.

Now, you might not associate careful examination with fighting feedback issues, but being able to slow things down is a big help when you’re trying to squeeze the maximum gain-before-feedback out of something like a a monitor rig. It’s an especially big help when you’re like me – that is to say, NOT an audio ninja.

What I mean by not being an audio ninja is that I’m really quite poor at identifying frequencies. Those guys who can hear a frequency start to smear a bit, and instantly know which fader to grab on their graphic EQ? That’s not me. As such, I hate graphic EQs and avoid putting them into systems whenever possible. I suppose that I could dive into some ear-training exercises, but I just can’t seem to be bothered. I have other things to do. As such, I have to replace ability with effort and technology.

Now, couple another issue with that. The other issue is that the traditional method of “ringing out” a PA or monitor rig really isn’t that great.

Don’t get me wrong! Your average ringout technique is certainly useful. It’s a LOT better than nothing. Even so, the method is flawed.

The problem with a traditional ringout procedure is that it doesn’t always simulate all the variables that contribute to feedback. You can ring out a mic on deck, walk up, check it, and feel pretty good…right up until the performer asks for “more me,” and you get a high-pitched squeal as you roll the gain up beyond where you had it. The reason you didn’t find that high-pitched squeal during the ringout was because you didn’t have a person with their face parked in front of the mic. Humans are good absorbers, but we’re also partially reflective. Stick a person in front of the mic, and a certain, somewhat greater portion of the monitor’s output gets deflected back into the capsule.

You can definitely test for this problem if you have an assistant, or a remote for the console, but what if you have neither of those things? What if you’ve got some other weird, phantom ring that’s definitely there, and definitely annoying, but hard to pin down? It might be too quiet to easily catch on a regular RTA (Real Time Analyzer), and you might not be able to accurately whistle or sing the tone while standing where you can easily read your RTA. Even if you can carry an RTA with you (if you have a smartphone, you can carry a basic analyzer with you everywhere – for free) you still might not be able to accurately whistle or sing the offending frequency.

But what if you could spread out the ringing into a series of discrete echoes? What if you could visually record and inspect those echoes? You’d have a very powerful tuning tool at your disposal.

The Implementation

I admit, I’m pretty lucky. Everything I need to implement this super-nifty feedback finding tool lives inside my mixing console. For other folks, there’s going to be more “doing” involved. Nevertheless, you really only need to add two key things to your audio setup to have access to all this:

1) A digital delay that can pass all audio frequencies equally, is capable of long (1 second or more) delays, and can be run with no internal feedback.

2) A spectrograph that will show you a range of 10 seconds or more, and will also show you the frequency under a cursor that you can move around to different points of interest.

A spectrograph is a type of audio analysis system that is specifically meant to show frequency magnitude over a certain amount of time. This is similar to “waterfall” plots that show spectral decay, but a spectrograph is probably much easier to read for this application.

The delay is inserted in the audio path of the microphone, in such a way that the only signal audible in the path is the output of the delay. The delay time should be set to somewhere around 1.5 to 2 seconds, long enough to speak a complete phrase into the mic. The output of the signal path is otherwise routed to the PA or monitors as normal, and the spectrograph is hooked up so that it can directly (that is, via an electrical connection) “listen” to the signal path you’re testing. The spectrograph should be set up so that ambient noise is too low to be visible on the analysis – otherwise, the output will be harder to interpret.

To start, you apply a “best guess” amount of gain to the mic pre and monitor sends. You’ll need to wait several seconds to see if the system starts to ring out of control, because the delay is making everything “late.” If the system does start to ring, the problem frequencies should be very obvious on the spectrograph. Adjust the appropriate EQs accordingly, or pull the gain back a bit.

With the spectrograph still running, walk up to the mic. Stick your face right up on the mic, and clearly but quickly say, “Check, test, one, two.” (“Check, test, one, two” is a phrase that covers most of the audible frequency spectrum, and has consonant sounds that rely on high-mid and high frequency reproduction to sound good.)

DON’T FREAKIN’ MOVE.

See, what you’re effectively doing is finding the “hot spots” in the sound that’s re-entrant to the microphone, and if you move away from the mic you change where those hot spots are. So…

Stay put and listen. The first thing you’ll hear is the actual, unadulterated signal that went through the microphone and got delivered through the loudspeaker. The repeats you will hear subsequently are what is making it back into the microphone and getting re-amplified. If you hear the repeats getting more and more “odd” and “peaky” sounding, that’s actually good – it means that you’re finding problem areas.

After the echoes have decayed mostly into silence, or are just repeating and repeating with no end in sight, walk back to your spectrograph and freeze the display. If everything is set up correctly, you should be able to to visually identify sounds that are repeating. The really nifty thing is that the problem areas will repeat more times than the non-problem areas. While other frequencies drop off into black (or whatever color is considered “below the scale” by your spectrograph) the ringy frequencies will still be visible.

You can now use the appropriate EQs to pull your problem frequencies down.

Keep iterating the procedure until you feel like you have a decent amount of monitor level. As much as possible, try to run the tests with gains and mix levels set as close to what they’ll be to the show as possible. Lots of open mics going to lots of different places will ring differently than a few mics only going to a single destination each.

Also, make sure to remember to disengage the delay, walk up on deck, and do a “sanity” check to make sure that everything you did was actually helpful.


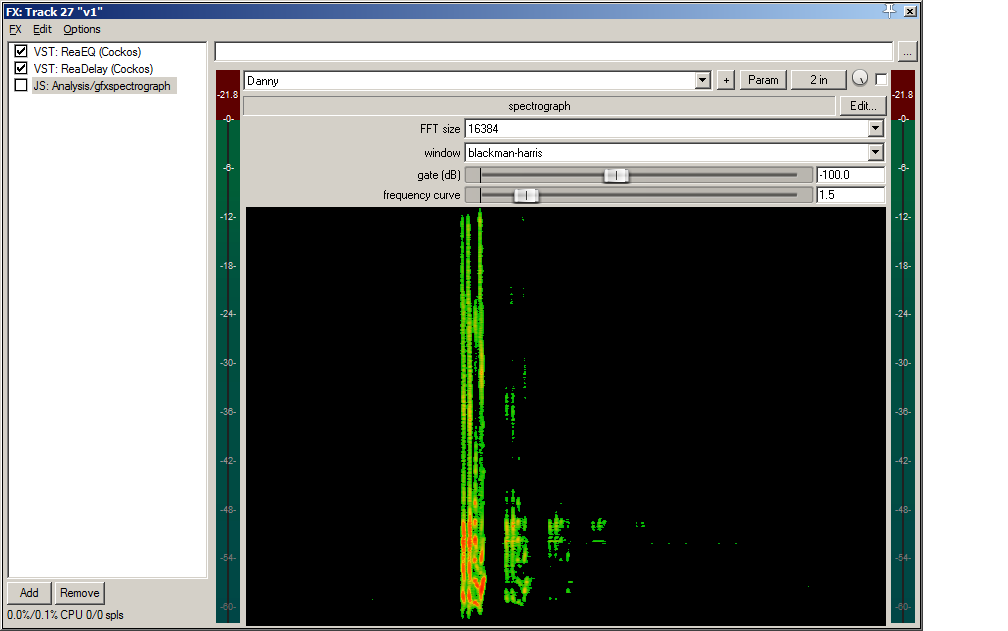
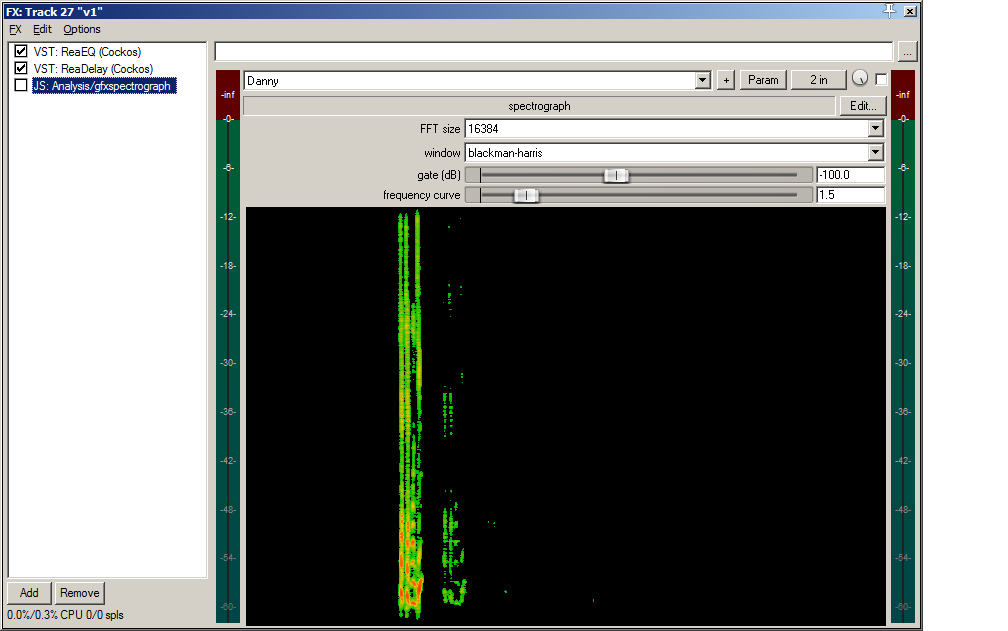
If you’re having trouble visualizing this, here are some screenshots depicting one of my own trips through this process:

This spectrograph reading clearly shows some big problems in the low-mid area.

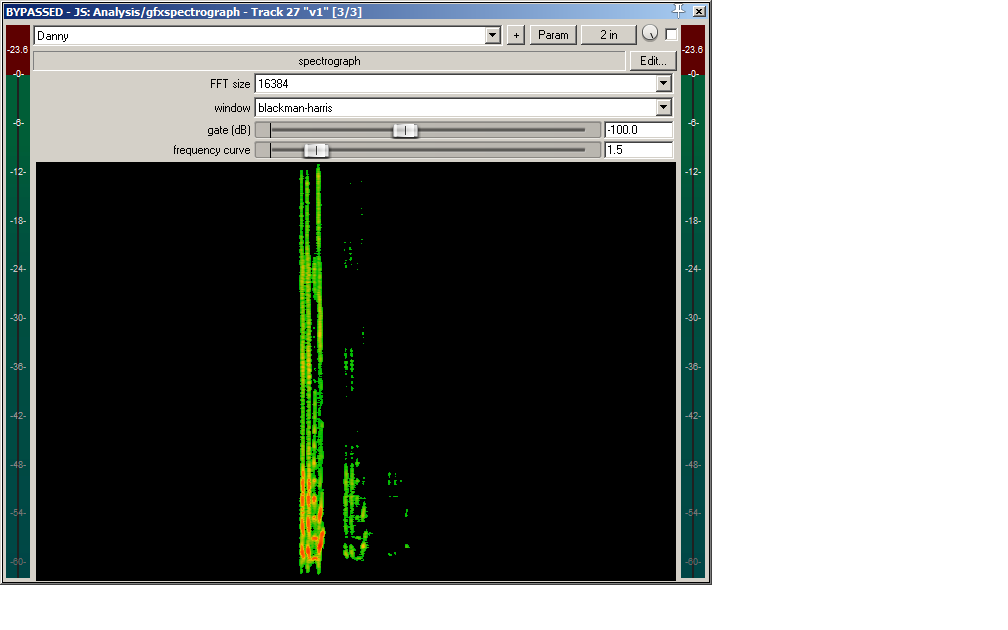
Some corrective EQ goes in, and I retest.

That’s better, but we’re not quite there.
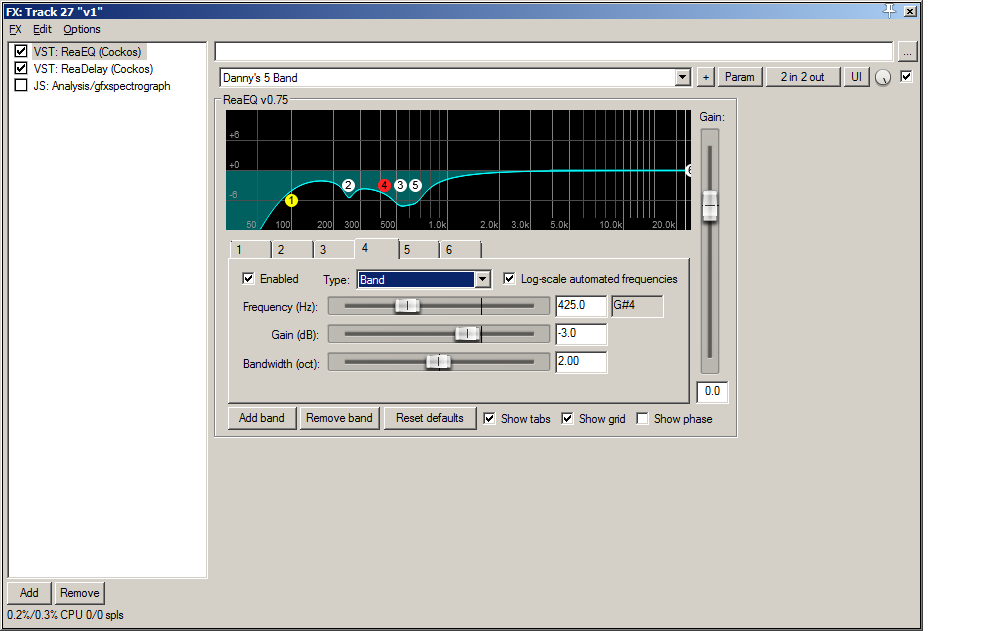
More EQ.

That seems to have done the trick.


I can certainly recognize that this might be more involved than what some folks are prepared to do. I also have to acknowledge that this doesn’t work very well in a noisy environment.

Even so, turning feedback problems into a series of discrete, easily examined echoes has been quite a revelation for me. You might want to give it a try yourself.


Four Tidbits

Because it’s the Fourth of July!

Please Remember:

The opinions expressed are mine only. These opinions do not necessarily reflect anybody else’s opinions. I do not own, operate, manage, or represent any band, venue, or company that I talk about, unless explicitly noted.

Want to use this image for something else? Great! Click it for the link to a high-res or resolution-independent version.

When I was starting out, I did something that many other audio humans do: I made an effort to build a “bag of tricks.”

What I learned later was that my memorization of these tricks was being done in place of understanding the basic principles of my craft.

The more that I understand the basic principles, the more I find that logical problem solving gets better results than the bag of tricks I tried to internalize.

Somewhat ironically, I’ve also found that engaging in logical problem solving creates a self-filling bag of tricks.

Want to use this image for something else? Great! Click it for the link to a high-res or resolution-independent version.

Midrange is the soul of almost every instrument’s sound.

Removing too much is perilous if done recklessly.

Want to use this image for something else? Great! Click it for the link to a high-res or resolution-independent version.

Putting gear “under test” is great, but you have to be careful with your conclusions.

The reality is that you only know EXACTLY what you tested – that specific piece of gear, in that room, under those precise conditions. Even your testing rig itself is part of those conditions.

Want to use this image for something else? Great! Click it for the link to a high-res or resolution-independent version.

People think that the hard part of learning live-audio is to get a handle on what all the controls do.

In my experience, one of the toughest disciplines in the craft is keeping your hands off the controls that don’t actually need to be used.


Fix It In Rehearsal

…because many music problems are best fixed by musicians.

Please Remember:

The opinions expressed are mine only. These opinions do not necessarily reflect anybody else’s opinions. I do not own, operate, manage, or represent any band, venue, or company that I talk about, unless explicitly noted.

Want to use this image for something else? Great! Click it for the link to a high-res or resolution-independent version.

Problems discovered in rehearsal should be fixed in rehearsal.

If they are not fixed, you have to hope that the venue has a powerful PA, experienced tech, large room, and highly tolerant audience.

Letting issues go, and hoping for all of the above to be true will not likely lead to a successful show.


A Motto For Audio Humans

Corollary: Boredom is preferable to panic.

Please Remember:

The opinions expressed are mine only. These opinions do not necessarily reflect anybody else’s opinions. I do not own, operate, manage, or represent any band, venue, or company that I talk about, unless explicitly noted.

It is far better to be completely set up, desperately wishing you were making noise, than to be making noise while desperately wishing you were completely set up.


Nobody’s Too Important To Haul Gear

If there isn’t a dedicated “truck load/ unload” crew, YOU are that crew.

Please Remember:

The opinions expressed are mine only. These opinions do not necessarily reflect anybody else’s opinions. I do not own, operate, manage, or represent any band, venue, or company that I talk about, unless explicitly noted.

Yes,

It IS your job to help the musicians load their gear in and out.

No,

You do NOT get an exemption because you’re running FOH sound or the lighting computer.

If ya ain’t pushin’ buttons and faders, you can push some boxes. It won’t kill ya, and you’ll help make the show more successful.

Which definitely is your job.


Mixing For The Stream

The sound for a stream and the sound for an in-room audience have competing priorities.

Please Remember:

The opinions expressed are mine only. These opinions do not necessarily reflect anybody else’s opinions. I do not own, operate, manage, or represent any band, venue, or company that I talk about, unless explicitly noted.

Over the last several weeks, I’ve had the pretty-darn-neat job of mixing for livestreamed shows. AMR.fm is doing these live broadcasts on Monday nights, broadcasts that include Q&A with bands as well as live music.

It’s pretty nifty, both as an event and as a technical exercise. Putting your best foot forward on a live stream isn’t a trivial thing, but a big part of having fun is rising to a challenge, right?

Right?

Oh, come on. Don’t look at me like that. You know that challenges are where the serious enjoyment is. (Unless the challenge is insurmountable. Then it’s not so fun.)

Anyway.

The real bugaboo of doing an actual, honest-to-Pete live gig that’s also being streamed is that you have at least two different audiences, each with different priorities. To keep them all happy, you need to be able to address each separate need independently (or quasi-independently, at least). I use the word “need” because of one particular reality:

In a small-venue, the needs of the show in the room are often contrary to the needs of the show on the stream.

One way that is manifests in practical terms is that…

You Probably Don’t Want A Board Feed

“Board Feeds” can be wondrous things. In a large venue, with reasonable stage-volume, there’s a real chance that everything is in the PA, and at “full range.” That is to say, the mix includes all the instruments (even the loud ones), and the tonal shaping applied to each input is only minimally influenced by the acoustic contribution from the stage. The PA is being used to get the ENTIRE band out to the audience, and not just to fill in the spaces where a particular input isn’t at the right volume.

In the above scenario, taking a split from the main mix (before loudspeaker processing) could be a great and easy option for getting audio to stream out.

In a small venue, though, things can be rather more tricky.

I’ve written about this before. In a small room, putting everything in the PA is often unnecessary…and also a bad idea. It’s very possible to chase everybody out with that kind of volume. Rather, it’s desirable to only use the PA for what’s absolutely necessary, and ignore everything else. The “natural” acoustical contribution from the band, plus a selective contribution from the PA come together into a total acoustic solution that works for the folks in the room.

The key word there is “acoustic.”

A small-venue board feed to a live stream is often the wrong idea, because that feed is likely to sound VERY different than what’s actually in the room. The vocals might be aggressively high-passed. The guitar amps might not be present at all. The drums might sound very odd, and be very low in the mix.

And it’s all because the content of that feed is meant to combine with acoustic events to form a pleasant whole. Unfortunately, in this situation, a board-feed plus nothing is lacking those acoustical events, and so the stream sounds terrible.

The Right Mix For The Right Context

Obviously, you don’t want the stream to sound bad, or even just “off.” So – what can you do? There are two major options:

1) Capture the total acoustical event in the room, and stream that.

2) Have a way to create an independent mix for the stream that includes everything, and in a natural tonality.

The first option is easy, and often inexpensive, but it rarely sounds all that great. Micing a room, even in stereo, can be pretty “hit or miss.” Sure, a nice stereo pair in a symphony hall is likely to sound pretty good, but most folks aren’t playing symphonies in a concert hall to a quiet crowd. As likely as not, you’re streaming some kind of popular music style that’s taking place in a club, and the crowd is NOT being quiet.

Now, even with all that, there’s nothing wrong with taking the first option if it’s all you’ve got. I’ve personally enjoyed my fair share of concert videos that are nothing more complex than “micing the room.” Still, why not reach higher if you can?

Trying for something better requires some kind of “broadcast split.” There are different ways to make it happen, but the most generally feasible way is likely the route that I’ve chosen: Connect each input to two separate mix rigs. A simple splitter snake and a separate “stream mix” console are pretty much what you need to get started.

The great thing about using a separate console for the broadcast is that you have the freedom to engage in all kinds of weirdness on either console (live or stream), without directly affecting the other mix. Need a “thin” vocal in the room, but a rich and full tone for the stream? No problem! Do the guitar amps need no help from the PA, but do need to be strongly present for the broadcast audience? No sweat! Having separate consoles means that the “in-studio” audience and the stream listeners can both be catered to, without having to completely sacrifice one group on the other’s altar.

Having a totally separate mix for the broadcast is not without its own challenges, though. It would be irresponsible for me to forget to point out that mixing for two, totally separate audiences can be a real workout. If you’re new to audio, you might want to have a different person handle one mix or the other. (I’m not new to being a sound human, but I still have to cope by giving neither the live nor the broadcast mixes my full attention. I take every shortcut I can on “broadcast day,” and I let plenty of things just roll along without correction for much longer than I usually would.) Even with separate mix rigs, the broadcast mix is still partially (though indirectly) affected by the acoustical events in the room – like “ringy” monitors on deck. That being so, any “live” problem you have is likely to be VERY audible to the broadcast audience. If you’re the only one around to manage it all, that’s fine…but be ready.

I should also mention that having some way to do “broadcast levelling” on the stream feed is a good idea. Especially in my case, where we transition from Q&A to music, the dynamic range difference involved can be pretty startling. To the folks in the room, the dynamic swing is expected to some degree. To the stream listeners, though, having to lunge for the volume control isn’t too pleasant. One way to create a broadcast leveller is to insert a brickwall (infinity:1, zero attack) limiter with a long (say, five seconds) release time across the entire broadcast mix. You then set the threshold and output gain so as to minimize the difference between the loud and soft portions of the program. Using automatic levelling does sound a bit odd versus doing it manually, but it can free up your attention for other things at times.

Then again, automatic levelling does require you to do more to manage your broadcast-mix channel mutes, because a side effect of making everything “the same amount of loud at all times” means that your noise floor gets CRANKED.

…but hey, if this gig wasn’t interesting, we wouldn’t want it, right?