Tag Archives: EQ

The Pro-Audio Guide For People Who Know Nothing About Pro-Audio, Part 6

I believe in life after the console.

Please Remember:

The opinions expressed are mine only. These opinions do not necessarily reflect anybody else’s opinions. I do not own, operate, manage, or represent any band, venue, or company that I talk about, unless explicitly noted.

Want to use this image for something else? Great! Click it for the link to a high-res or resolution-independent version.

“The point of loudspeaker management is to make final, overall adjustments to console output so that devices which actually create acoustical output (speakers, that is) can be used most effectively.”


The rest of this article is available – free! – right here.


Graphic Content

Transfer functions of various reasonable and unreasonable graphic EQ settings.

Please Remember:

The opinions expressed are mine only. These opinions do not necessarily reflect anybody else’s opinions. I do not own, operate, manage, or represent any band, venue, or company that I talk about, unless explicitly noted.

Want to use this image for something else? Great! Click it for the link to a high-res or resolution-independent version.

An aphorism that I firmly believe goes like this: “If you can hear it, you can measure it.” Of course, there’s another twist to that – the one that reminds you that it’s possible to measure things you can’t hear.

The graphic equalizer, though still recognizable, is losing a bit of its commonality as an outboard device. With digital consoles invading en masse, making landings up and down the treasure-laden coasts of live audio, racks and racks of separate EQ devices are being virtualized inside computer-driven mix platforms. At the same time, hardware graphics are still a real thing that exists…and I would wager that most of us haven’t seen a transfer function of common uses (and abuses) of these units, which happen whether you’ve got a physical object or a digital representation of one.

So – let me dig up a spare Behringer Ultragraph Pro, and let’s graph a graphic. (An important note: Any measurement that you do is a measurement of EXACTLY that setup. Some parts of this exercise will be generally applicable, but please be aware that what we’re measuring is a specific Behringer EQ and not all graphic EQs in the world.)

The first thing to look at is the “flat” state. When you set the processing to “out,” is it really out?

In this case, very much so. The trace is laser flat, with +/- 0.2 dB of change across the entire audible spectrum. It’s indistinguishable from a “straight wire” measurement of my audio interface.

Now, we’ll allow audio to flow through the unit’s filtering, but with the high and low-pass filters swept to their maximums, and all the graph filters set to 0 dB.

The low and high-pass filters are still definitely having an effect in the audible range, though a minimal one. Half a decibel down at 45 Hz isn’t nothing, but it’s also pretty hard to hear.

What happens when the filters are swept to 75 Hz and 10 kHz?

The 3dB points are about where the labeling on the knobs tells you it should be (with a little bit of overshoot), and the filters roll off pretty gently (about 6 dB per octave).

Let’s sweep the filters out again, and make a small cut at 500 Hz.

Interestingly, the filter doesn’t seem to be located exactly where the faceplate says it should be – it’s about 40% of a third-octave space away from the indicated frequency center, if the trace is accurate in itself.

What if we drop the 500 Hz filter all the way down, and superimpose the new trace on the old one?

The filter might look a bit wider than what you expected, with easily measurable effects happening at a full octave below the selected frequency. Even so, that’s pretty selective compared to lots of wide-ranging, “ultra musical” EQ implementations you might run into.

What happens when we yank down two filters that are right next to each other?

There’s an interesting ripple between the cuts, amounting to a little bit less than 1 dB.

How about one of the classic graphic EQ abuses? Here’s a smiley-face curve:

Want to destroy all semblance of headroom in an audio system? It’s easy! Just kill the level of the frequency range that’s easiest to hear and most efficient to reproduce, then complain that the system has no power. No problem! :Rolls Eyes:

Here’s another EQ abuse, alternately called “Death To 100” or “I Was Too Cheap To Buy A Crossover:”

It could be worse, true, but…really? It’s not a true substitute for having the correct tool in the first place.


But WHY Can’t You Fix Acoustics With EQ?

EQ is meant for fixing a different set problems.

Please Remember:

The opinions expressed are mine only. These opinions do not necessarily reflect anybody else’s opinions. I do not own, operate, manage, or represent any band, venue, or company that I talk about, unless explicitly noted.

Want to use this image for something else? Great! Click it for the link to a high-res or resolution-independent version.

A distinct inevitability is that someone will be in a “tough room.” They will look at the vast array of equalization functionalities offered by modern, digital, sound-reinforcement tools, and they will say, “Why can’t I fix the space?”

Here’s the deal. A difficult room – that is, one with environmental attributes that make our job harder – is a time problem in the acoustical domain. EQ, on the other hand, is a tool for changing frequency magnitude in the electronic domain.

When it comes right down to it, bad acoustics is just shorthand for “A sound arrived at a listener multiple times, and it was unpleasant.” A noise was made, and part of its energy traveled directly to somebody’s ears. Some other part of its energy splattered off a wall, ceiling, or floor…or a combination of all of those, at least once, and then also arrived at somebody’s ears. Maybe a lot of the high-frequency information was absorbed, causing the combined result to be a muddy garble. Of course, all the transients getting smeared around didn’t help much, either. It gets even more fun when a sound is created, and bounces around, and some of it goes into a monitor system, and gets made again, and bounces around, and some of it goes to the FOH PA, and gets made AGAIN, and bounces around, and all of that gets back into the microphone, and so that sound gets generated again, except at a different level and frequency response, and…

How’s an EQ going to fix that? I mean, really fix it?

You might be able to dig out a hole in the system’s response that compensates for annoying frequency buildup. If the room causes a big, wide bump at 250 Hz, dialing that out of the PA in correct proportion will certainly help a bit. It’s a very reasonable thing to do, and we engage in such an exercise on a regular basis.

But all the EQ did was change the magnitude response of the PA. Sure, equalization uses time to precipitate frequency-dependent gain changes, but it doesn’t do a thing in relation to environmental time issues. The noise from the PA is still bouncing madly off of a myriad of surfaces. It’s still arriving at the listener multiple times. The transients are still smeared. The information in the electronic domain got turned into acoustical information (by necessity), and at that point, the EQ stopped having any direct influence at all.

You can’t use EQ to fix the problem. You can alleviate frequency-related effects of the acoustical nightmare you have on your hands, but an actual solution involves changing the behavior of the room. Your EQ is not inserted across the environment, nor can it be, so recognize what it can and can’t do.


EQ Propagation

The question of where to EQ is, of course, tied inextricably to what to EQ.

Please Remember:

The opinions expressed are mine only. These opinions do not necessarily reflect anybody else’s opinions. I do not own, operate, manage, or represent any band, venue, or company that I talk about, unless explicitly noted.

Want to use this image for something else? Great! Click it for the link to a high-res or resolution-independent version.

On occasion, I get the opportunity to guest-lecture to live-sound students. When things go the way I want them to, the students get a chance to experience the dialing up of monitor world (or part of it). One of the inevitable and important questions that arises is, “Why did you reach for the channel EQ when you were solving that one problem, but then use the EQ across the bus for this other problem?”

I’ve been able to give good answers to those questions, but I’ve also wanted to offer better explanations. I think I’ve finally hit upon an elegant way to describe my decision making process in regards to which EQ I use to solve different problems. It turns out that everything comes down to the primary “propagation direction” that I want for a given EQ change:

Effectively speaking, equalization on an input propagates downstream to all outputs. Equalization on an output effectively propagates upstream to all inputs.


What I’ve just said is, admittedly, rather abstract. That being so, let’s take a look at it concretely.

Let’s say we’re in the process of dialing up monitor world. It’s one of those all-too-rare occasions where we get the chance to measure the output of our wedges and apply an appropriate tuning. That equalization is applied across the appropriate bus. What we’re trying to do is equalize the box itself, so we can get acoustical output that follows a “reference curve.” (I advocate for a flat reference curve, myself.)

It might seem counter-intuitive, but if we’re going to tune the wedge electronically, what we actually have to do is transform all of the INPUTS to the box. Changing the loudspeaker itself to get our preferred reference curve would be ideal, but also very difficult. So, we use an EQ across a system output to change all the signals traveling to the wedge, counteracting the filtering that the drivers and enclosure impose on whatever makes it to them. If the monitor is making everything too crisp (for example), the “output” EQ lets us effectively dial high-frequency information out of every input traveling to the wedge.

Now, we put the signal from a microphone into one of our wedges. It starts off sounding generally good, although the channel in question is a vocal and we can tell there’s too much energy in the deep, low-frequency area. To fix the problem, we apply equalization to the microphone’s channel – the input. We want the exact change we’ve made to apply to every monitor that the channel might be sent to, and EQ across an input effectively transforms all the outputs that signal might arrive at.

There’s certainly nothing to stop us from going to each output EQ and pulling down the LF, but:

1) If we have a lot of mixes to work with, that’s pretty tedious, even with copy and paste, and…

2) We’ve now pushed away from our desired reference curve for the wedges, potentially robbing desired low-end information from inputs that would benefit from it. A ton of bottom isn’t necessary for vocals on deck, but what if somebody wants bass guitar? Or kick?

It makes much more sense to make the change at the channel if we can.

This also applies to the mud and midrange feedback weirdness that tends to pile up as one channel gets routed to multiple monitors. The problems aren’t necessarily the result of individual wedges being tuned badly. Rather, they are the result of multiple tunings interacting in a way that’s “wrong” for one particular mic at one particular location. What we need, then, is to EQ our input. The change then propagates to all the outputs, creating an overall solution with relative ease (and, again, we haven’t carved up each individual monitor’s curve into something that sounds weird in the process).

The same idea applies to FOH. If the whole mix seems “out of whack,” then a change to the main EQ effectively tweaks all the inputs to fix the offending frequency range.

So, when it’s time to grab an EQ, think about which way you want your changes to flow. Changes to inputs flow to all the connected outputs. Changes to outputs flow to all connected inputs.


The Difference Between The Record And The Show

Why is it that the live mix and the album mix end up being done differently?

Please Remember:

The opinions expressed are mine only. These opinions do not necessarily reflect anybody else’s opinions. I do not own, operate, manage, or represent any band, venue, or company that I talk about, unless explicitly noted.

Want to use this image for something else? Great! Click it for the link to a high-res or resolution-independent version.

Jason Knoell runs H2Audio in Utah, and he recently sent me a question that essentially boils down to this: If you have a band with some recordings, you can play those recordings over the same PA in the same room as the upcoming show. Why is it that the live mix of that band, in that room, with that PA might not come together in the same way as the recording? The recording that you just played over the rig? Why would you NOT end up having the same relationship between the drums and guitars, or the guitars and the vocals, or [insert another sonic relationship here].

This is one of those questions where trying to address every tiny little detail isn’t practical. I will, however, try to get into the major factors I can readily identify. Please note that I’m ignoring room acoustics, as those are a common factor between a recording and a live performance being played into the same space.

Magnitude

It’s very likely that the recording you just pumped out over FOH (Front Of House) had a very large amount of separation between the various sources. Sure, the band might have recorded the songs in such a way as to all be together in one room, but even then, the “bleed” factor is very likely to be much smaller than what you get in a live environment. For instance, a band that’s in a single-room recording environment can be set up with gobos (go-betweens) screening the amps and drums. The players can also be physically arranged so that any particular mic has everything else approaching the element from off-axis.

They also probably recorded using headphones for monitors, and overdubbed the “keeper” vocals. They may also have gone for extreme separation and overdubbed EVERYTHING after putting down some basics.

Contrast this with a typical stage, where we’re blasting away with wedge loudspeakers, we have no gobos to speak of, and all the backline is pointed at the sensitive angles of the vocal mics. Effectively, everything is getting into everything else. Even if we oversimplify and look only at the relative magnitudes between sounds, it’s possible to recognize that there’s a much smaller degree of source-to-source distinctiveness. The band’s signals have been smashed together, and even if we “get on the gas” with the vocals, we might also be effectively pushing up part of the drumkit, or the guitars.

Time

Along with magnitude, we also have a time problem. With as much bleed as is likely in play, the oh-so-critical transients that help create vocal and musical intelligibility are very, very smeared. We might have a piece of backline, or a vocal, “arriving” at the listener several times over in quick succession. The recording, on the other hand, has far more sharply defined “timing information.” This can very likely lead to a requirement that vocals and lead parts be mixed rather hotter live than they would be otherwise. That is, I’m convinced that a “conservation of factors” situation exists: If we lose separation cues that come from timing, the only way to make up the deficit is through volume separation.

A factor that can make the timing problems even worse is those wedge monitors we’re using, combined with the PA handling reproduction out front. Not only are all the different sources getting into each other at different times, sources being run at high gain are arriving at their own mics several times significantly (until the loop decay becomes large enough to render the arrivals inaudible). This further “blurs” the timing information we’re working with.

Processing Limits

Because live audio happens in a loop that is partially closed, we can be rather more constrained in what we can do to a signal. For instance, it may be that the optimal choice for vocal separation would simply be a +3 dB, one-octave wide filter at 1 kHz. Unfortunately, that may also be the portion of the loop’s bandwidth that is on the verge of spiraling out of control like a jet with a meth-addicted Pomeranian at the controls. So, again, we can’t get exactly the same mix with the same factors. We might have to actually cut 1 kHz and just give the rest of the signal a big push.

Also, the acoustical contribution of the band limits the effectiveness of our processing. On the recording, a certain amount of compression on the snare might be very effective; All we hear is the playback with that exact dynamics solution applied. With everything live in the room, however, we hear two things: The reproduction with compression, and the original, acoustic sound without any compression at all. In every situation where the in-room sound is a significant factor, what we’re really doing is parallel compression/ EQ/ gating/ etc. Even our mutes are parallel – the band doesn’t simply drop into silence if we close all the channels.


Try as we might, live-sound humans can rarely exert the same amount of control over audio reproduction that a studio engineer has. In general, we are far more at the mercy of our environment. It’s very often impractical for us to simply duplicate the album mix and receive the same result (only louder).

But that’s just part of the fun, if you think about it.


Case Study: Creating A Virtual Guitar Rig In An Emergency

Distortion + filtering = something that can pass as a guitar amplifier in an emergency.

Please Remember:

The opinions expressed are mine only. These opinions do not necessarily reflect anybody else’s opinions. I do not own, operate, manage, or represent any band, venue, or company that I talk about, unless explicitly noted.

Want to use this image for something else? Great! Click it for the link to a high-res or resolution-independent version.

The Video

The Script

Imagine the scene: You’re setting up a band that has exactly one player with an electric guitar. They get to the gig, and suddenly discover a problem: The power supply for their setup has been left at home. Nobody has a spare, because it’s a specialized power supply – and nobody else plays an electric guitar anyway. The musician in question has no way to get a guitar sound without their rig.

At all.

As in, what they have that you can work with is a guitar and a cable. That’s it.

So, what do you do?

Well, in the worst-case scenario, you just find a direct box, run the guitar completely dry, and limp through it all as best you can.

But that’s not your only option. If you’re willing to get a little creative, you can do better than just having everybody grit their teeth and suffer. To get creative, you need to be able to take their guitar rig apart and put it back together again.

Metaphorically, I mean. You can put the screwdriver away.

What I’m getting at is this question: If you break the guitar rig into signal-processing blocks, what does each block do?

When it comes right down to it, a super-simple guitar amp amounts to three things: Some amount of distortion (including no distortion at all), tone controls, and an output filter stack.
The first two parts might make sense, but what’s that third bit?

The output filtering is either an actual loudspeaker, or something that simulates a loudspeaker for a direct feed. If you remove a speaker’s conversion of electricity to sound pressure waves, what’s left over is essentially a non-adjustable equalizer. Take a look at this frequency-response plot for a 12″ guitar speaker by Eminence: It’s basically a 100 Hz to 5 kHz bandpass filter with some extra bumps and dips.

It’s a fair point to note that different guitar amps and amp sims may have these different blocks happening in different orders. Some might forget about the tone-control block entirely. Some might have additional processing available.

Now then.

The first thing to do is to find an active DI, if you can. Active DI boxes have very high input impedances, which (in short) means that just about any guitar pickup will drive that input without a problem.

Next, if you’re as lucky as I am, you have at your disposal a digital console with a guitar-amp simulation effect. The simulator puts all the processing I talked about into a handy package that gets inserted into a channel.

What if you’re not so lucky, though?

The first component is distortion. If you can’t get distortion that’s basically agreeable, you should skip it entirely. If you must generate your own clipping, your best bet is to find some analog device that you can drive hard. Overloading a digital device almost always sounds terrible, unless that digital device is meant to simulate some other type of circuit.
For instance, if you can dig up an analog mini-mixer, you can drive the snot out of both the input and output sides to get a good bit of crunch. (You can also use far less gain on either or both ends, if you prefer.)

Of course, the result of that sounds pretty terrible. The distortion products are unfiltered, so there’s a huge amount of information up in the high reaches of the audible spectrum. To fix that, let’s put some guitar-speaker-esque filtering across the whole business. A high and low-pass filter, plus a parametric boost in the high mids will help us recreate what a 12″ driver might do.
Now that we’ve done that, we can add another parametric filter to act as our tone control.

And there we go! It may not be the greatest guitar sound ever created, but this is an emergency and it’s better than nothing.

There is one more wrinkle, though, and that’s monitoring. Under normal circumstances, our personal monitoring network gets its signals just after each channel’s head amp. Usually that’s great, because nothing I do with a channel that’s post the mic pre ends up directly affecting the monitors. In this case, however, it was important for me to switch the “monitor pick point” on the guitar channel to a spot that was post all my channel processing – but still pre-fader.

In your case, this may not be a problem at all.

But what if it is, and you don’t have very much flexibility in picking where your monitor sends come from?

If you’re in a real bind, you could switch the monitor send on the guitar channel to be post-fader. Set the fader at a point you can live with, and then assign the channel output to an otherwise unused subgroup. Put the subgroup through the main mix, and use the subgroup fader as your main-mix level control for the guitar. You’ll still be able to tweak the level of the guitar in the mix, but the monitor mixes won’t be directly affected if you do.


Sounding “Good” Everywhere

This is actually about studio issues, but hey…

Please Remember:

The opinions expressed are mine only. These opinions do not necessarily reflect anybody else’s opinions. I do not own, operate, manage, or represent any band, venue, or company that I talk about, unless explicitly noted.

Want to use this image for something else? Great! Click it for the link to a high-res or resolution-independent version.

My latest article for Schwilly Family Musicians has to do with the recorded side of life. Even so, I thought some of you might be interested:

‘Even before the age of smartphones, “translation” was a big issue for folks making records. The question that was constantly asked was, “How do I make this tune sound good everywhere?”

In my mind, that’s the wrong question.

The real question is, “Does this mix continue to make sense, even if the playback system has major limitations?”’


Read the whole piece here.


EQ: Separating The Problems

You have to know what you’re solving if you want to solve a problem effectively.

Please Remember:

The opinions expressed are mine only. These opinions do not necessarily reflect anybody else’s opinions. I do not own, operate, manage, or represent any band, venue, or company that I talk about, unless explicitly noted.

Want to use this image for something else? Great! Click it for the link to a high-res or resolution-independent version.

There’s a private area on Facebook for “musicpreneurs” to hang out in. I’ve been trying to get more involved, so I’ve asked people to pose their sonic quandaries to me. One person was asking how to set up their system so as to get a certain, desired tone from their instrument.

I won’t rehash the whole answer here, but I will definitely tell you the key to my answer: Separate your problems. Figure out which “domain” a particular issue resides in, and then work within that area to find a solution.

That’s a statement that you can definitely generalize, but the particular discussion was mostly in the context of equalization. Equalization of live-audio signal chains seems to invite unfocused flailing at least as much as anything else. Somebody gets into a jam (not a jam session, but rather a difficult situation), and they start tweaking every tonal control they can get their hands on. Several minutes later, they’ve solved and unsolved several different problems, and might be happy with some part of their fix. Of course, they may have broken something else in the process.

If you’re like me, you’d prefer not to do that.

Not doing that involves being very clear about where your problem actually is.


Lots of people use the “wrong” EQ to address a perceived shortcoming with their sound. I think I’ve mentioned before that a place to find this kind of approach is with vocal processors. I’ve encountered more than person who, as far as I could tell, was trying to fix a PA system through the processing of an individual channel. That is, at a regular gig or rehearsal, they were faced with a system that exhibited poor tonality. For instance, for whatever reason, they might have felt that the PA lacked in high-end crispness.

So, they reach down to their processor, and throw a truckload of high-frequency boost onto their voice. Problem solved!

Except they just solved the problem everywhere, even if the problem doesn’t exist everywhere. They plug that vocal processor into a rig which has been nicely tuned, and now their voice is a raspy, irritating, sand-paper-esque noise that’s constantly on the verge of hard feedback.

They used channel-specific processing to manage a system-level problem, and the result was a channel that only works with one system – or a system with one channel that sounds right, while everything else is still a mess. They found a fix, but the fix was in the wrong domain.

The converse case of this is also common. An engineer gets into a bind when listening to a channel or two, and reaches for the EQ across the main speakers. Well, no problem…except that any new solution has now been applied to EVERYTHING running through the mains. That might be helpful, or it might mean that a whole new hole has just been dug. If the PA is well-tuned, then the problem isn’t the PA. Rather, the thing to solve is specific to a channel or group of channels, and should be addressed there if possible.

If you find yourself gunning the bottom end on every channel of your console, you’d be better served by changing the main EQ instead. If everything sounds fine except for one channel, leave the main processing alone and build a fix specific to your problem-child.

Obviously, there are “heat of the moment” situations where you just have to grab-n-go. At the same time, taking a minute to figure out which bridge actually has the troll living under it is a big help. Find the actual offender, correct that offender, leave everything else alone, and get better results overall.


Pre Or Post EQ?

Stop agonizing and just go with post to start.

Please Remember:

The opinions expressed are mine only. These opinions do not necessarily reflect anybody else’s opinions. I do not own, operate, manage, or represent any band, venue, or company that I talk about, unless explicitly noted.

Want to use this image for something else? Great! Click it for the link to a high-res or resolution-independent version.

Oh, the hand-wringing.

Should the audio-human take the pre-EQ split from the amplifier, or the post-EQ split? Isn’t there more control if we choose pre-EQ? If we choose incorrectly, will we ruin the show? HELP!

Actually, I shouldn’t be so dismissive. Shows are important to people – very important, actually – and so taking some time to chew on the many and various decisions involved is a sign of respect and maturity. If you’re actually stopping to think about this, “good on ya.”

What I will not stop rolling my eyes at, though, are live-sound techs who get their underwear mis-configured over not getting a pre-EQ feed from the bass/ keys/ guitar/ whatever. Folks, let’s take a breath. Getting a post-EQ signal is generally unlikely to sink any metaphorical ship, sailboat, or inflatable canoe that we happen to be paddling. In fact, I would say that we should tend to PREFER a post-EQ direct line. Really.


First of all, if this terminology sounds mysterious, it really isn’t. You almost certainly know that “pre” means “before” and “post” means “after.” If you’re deducing, then, that setting a line-out to “pre-EQ” gets you a signal from before the EQ happens, then you’re right. You’re also right in thinking that post-EQ splits happen after all the EQ tweaking has been applied to the signal.

And I think we should generally be comfortable with, and even gravitate toward getting our feed to the console from a point which has the EQ applied.

1) It’s consistent with lots of other things we do. Have you ever mic’ed a guitar amp? A drum? A vocalist? Of course you have. In all of those cases (and many others), you are effectively getting a post-EQ signal. Whether the tone controls are electronic, related to tuning, or just part of how someone sings, you are still subject to how those tonal choices are playing out. So, why are you willing to cut people the slack to make choices that affect your signal when it’s a mic that’s involved, but not a direct line?

2) There’s no reason to be afraid of letting people dial up an overall sound that they want. In fact, if it makes it easier on you, the audio-human, why would that be a bad thing? I’ve been in situations where a player was trying desperately to get their monitor mix to sound right, but was having to fight with an unfamiliar set of tone controls (a parametric EQ) through an engineer. It very well might have gone much faster to just have given the musician a good amount of level through their send, and then let them turn their own rig’s knobs until they felt happy. You can do that with a post-EQ line.

3) Along the same track, what if the player changes their EQ from song to song? What if there are FX going in and out that appear at the post-EQ split, but not from the pre-EQ option? Why throw all that work out the window, just to have “more control” at the console? That sounds like a huge waste of time and effort to me.

4) In any venue of even somewhat reasonable size, having pre-EQ control over the sound from an amplifier doesn’t mean as much as you think it might. If the player does call up a completely horrific, pants-wettingly terrible tone, the chances are that the amplifier is going to be making a LOT of that odious racket anyway. If the music is even somewhat loud, using your sweetly-tweaked, pre-EQ signal to blast over the caterwauling will just be overwhelming to the audience.

Ladies and gents, as I say over and over, we don’t have to fix everything – especially not by default. If we have the option, let’s trust the musicians and go post-EQ as our first attempt. If things turn out badly, toggling the switch takes seconds. (And even taking the other option might not be enough to fix things, so take some deep breaths.) If things go well, we get to ride the momentum of what the players are doing instead of swimming upstream. I say that’s a win.


A Guided Tour Of Feedback

It’s all about the total gain from the microphone’s reference point.

Please Remember:

The opinions expressed are mine only. These opinions do not necessarily reflect anybody else’s opinions. I do not own, operate, manage, or represent any band, venue, or company that I talk about, unless explicitly noted.

smoothed-monitorsWant to use this image for something else? Great! Click it for the link to a high-res or resolution-independent version.

This site is mostly about live audio, and as such, I talk about feedback a lot. I’m used to the idea that everybody here has a pretty good idea of what it is.

But, every so often, I’ll do a consulting gig and be reminded that feedback can be a mysterious and unknown force. So, for those of you who are totally flummoxed by feedback monsters, this article exists for your specific benefit.

All Locations Harbor Dragons

The first thing to say is this: Any PA system with real mics on open channels, and in a real room, is experiencing feedback all the time. Always.

Feedback is not a phenomenon which appears and disappears. It may or may not be a problem at any particular moment in time. You may or may not be able to hear anything like it at a given instant. Even so, any PA system that is doing anything with a microphone is guaranteed to be in a feedback loop.

What matters, then, is the behavior of the signal running through that loop. If the signal is decaying into the noise floor before you can notice it, then you DO have feedback, but you DON’T have a feedback problem. If the signal is dropping slowly enough for you to notice some lingering effects, you are beginning to have a problem. If the signal through the feedback loop isn’t dropping at all, then you are definitely having a problem, and if the looped signal level is growing, you have a big problem that is only getting bigger.

Ouroboros

If every PA system is a dragon consuming its own tail – an ouroboros – then how does that self-consuming action take place?

It works like this:

1) A sound is made in the room.
2) At least one microphone converts that sound into electricity.
3) The electricity is passed through a signal chain.
4) At the end of the chain is the microphone’s counterpart, which is a loudspeaker.
5) The loudspeaker converts the signal into a sound in the room.
6) The sound in the room travels through direct and indirect paths to the same microphone(s) as above.
7) The new sound in the room, which is a reproduction of the original event, is converted into electricity.

The loop continues forever, or until the loop is broken in some way. The PA system continually plays a copy of a copy of a copy (etc) of the original sound.

How Much Is The Dragon Being Fed?

What ultimately determines whether or not your feedback dragon is manageable or not is the apparent gain from the microphone’s reference point.

Notice that I did NOT simply say “the gain applied to the microphone.”

The gain applied to the microphone certainly has a direct and immediate influence on the apparent gain from the mic’s frame of reference. If all other variables are held constant, then greater applied gain will reliably move you closer toward an audible feedback issue. Even so, the applied gain is not the final predictor of ringing, howling, screeching, or any other unkind noise.

What really matters is the apparent gain at the capsule(s).


Gain in “absolute” terms is a signal multiplier. A gain of 1, which may be referred to as “unity,” is when the signal level coming out of a system (or system part) is equal in level to the signal going in. A signal level X 1 is the same signal level. A gain of less than 1 (but more than zero) means that signal level drops across the in/ out junction, and a gain of greater than 1 indicates an increase in signal strength.

A gain multiplier of zero means a broken audio circuit. Gain multipliers of less than zero are inverted polarity, with the absolute value relative to 1 being what determines if the signal is of greater or lesser intensity.

Of course, audio humans are more used to gain expressed in decibels. A gain multiplier of 1 is 0 dB, where the input signal (the reference) is equal to the output. Gain multipliers greater than 1 have positive decibel values, and negative dB values are assigned to multipliers less than 1. “Negative infinity” gain is a multiplier of 0.


The apparent gain as referenced by the pertinent microphone(s) is what can also be referred to as “loop gain.” The more the reproduced sonic event “gets back into” the mic, the higher that loop gain appears to be. The loop gain is applied at every iteration through the loop, which each iteration taking some amount of time to occur. If the time for a sonic event to be reproduced and arrive back at the capsule is short, then feedback will build aggressively when the loop gain is positive, but also drop quickly when the loop gain is negative.

Loop gain, as you might expect, increases with greater electronic gain. It also increases as a mic’s polar pattern becomes wider, because the mic has greater sensitivity at any given arrival angle. Closer proximity to a source of reproduced sound also increases apparent gain, due to the apparent intensity of a sound source being higher at shorter distances. Greater room reflectivity is another source of higher loop gain; More of the reproduced sound is being redirected towards the capsule. Lastly, a frequency in phase with itself through the loop will have greater apparent gain than if it’s out of phase.

This is why it’s much, much harder to run monitor world in a small, “live” space than in a large, nicely damped space – or outside. It’s also why a large, reflective object (like a guitar) can suddenly put a system into feedback when all the angles become just right. The sound coming from the monitor hits the guitar, and then gets bounced directly into the most sensitive part of the mic’s polar pattern.

Dragon Taming

With all that on the table, then, how do you get control over such a wild beast?

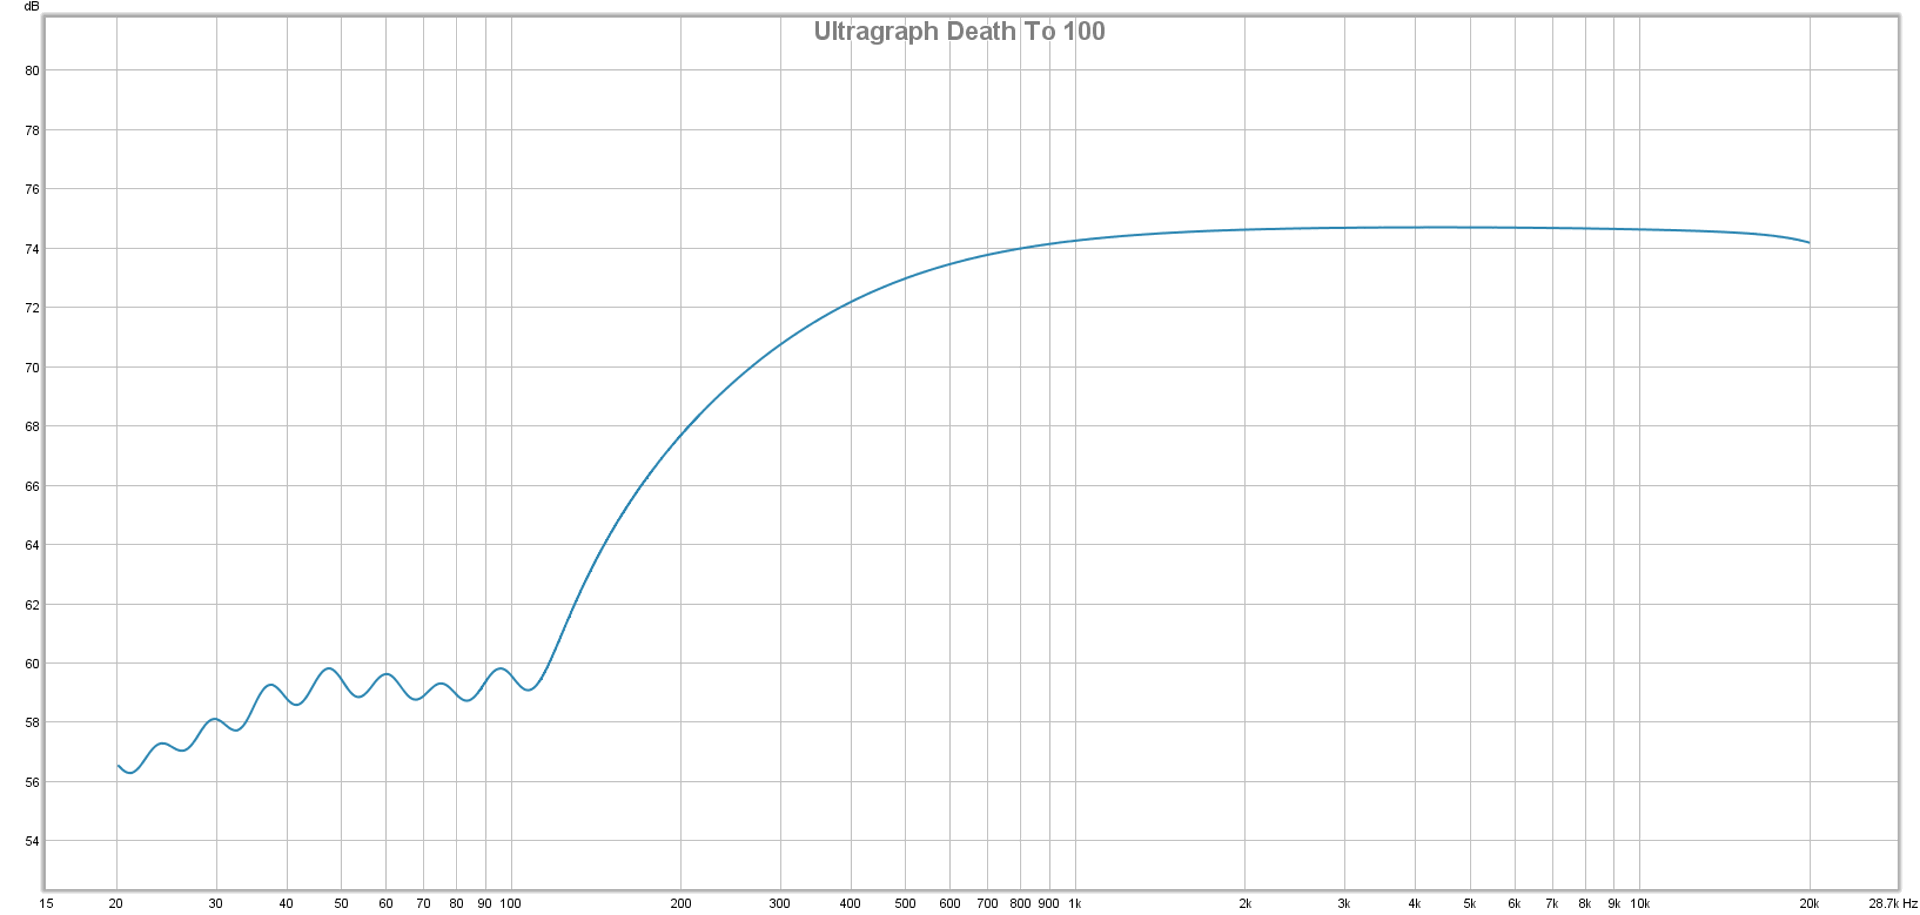
Obviously, reducing the system’s drive level will help. Pulling the preamp or send level down until the loop gain becomes negative is very effective – and this is a big reason for bands to work WITH each other. Bands that avoid being “too loud for themselves” have fewer incidences of channels being run “hot.” Increasing the distance from the main PA to the microphones is also a good idea (within reason and practicality), as is an overall setup where the low-sensitivity areas of microphone polar patterns are pointed at any and all loudspeakers. In that same vein, using mics with tighter polar patterns can offer a major advantage, as long as the musicians can use those mics effectively. Adding heavy drape to a reflective room may be an option in some cases.

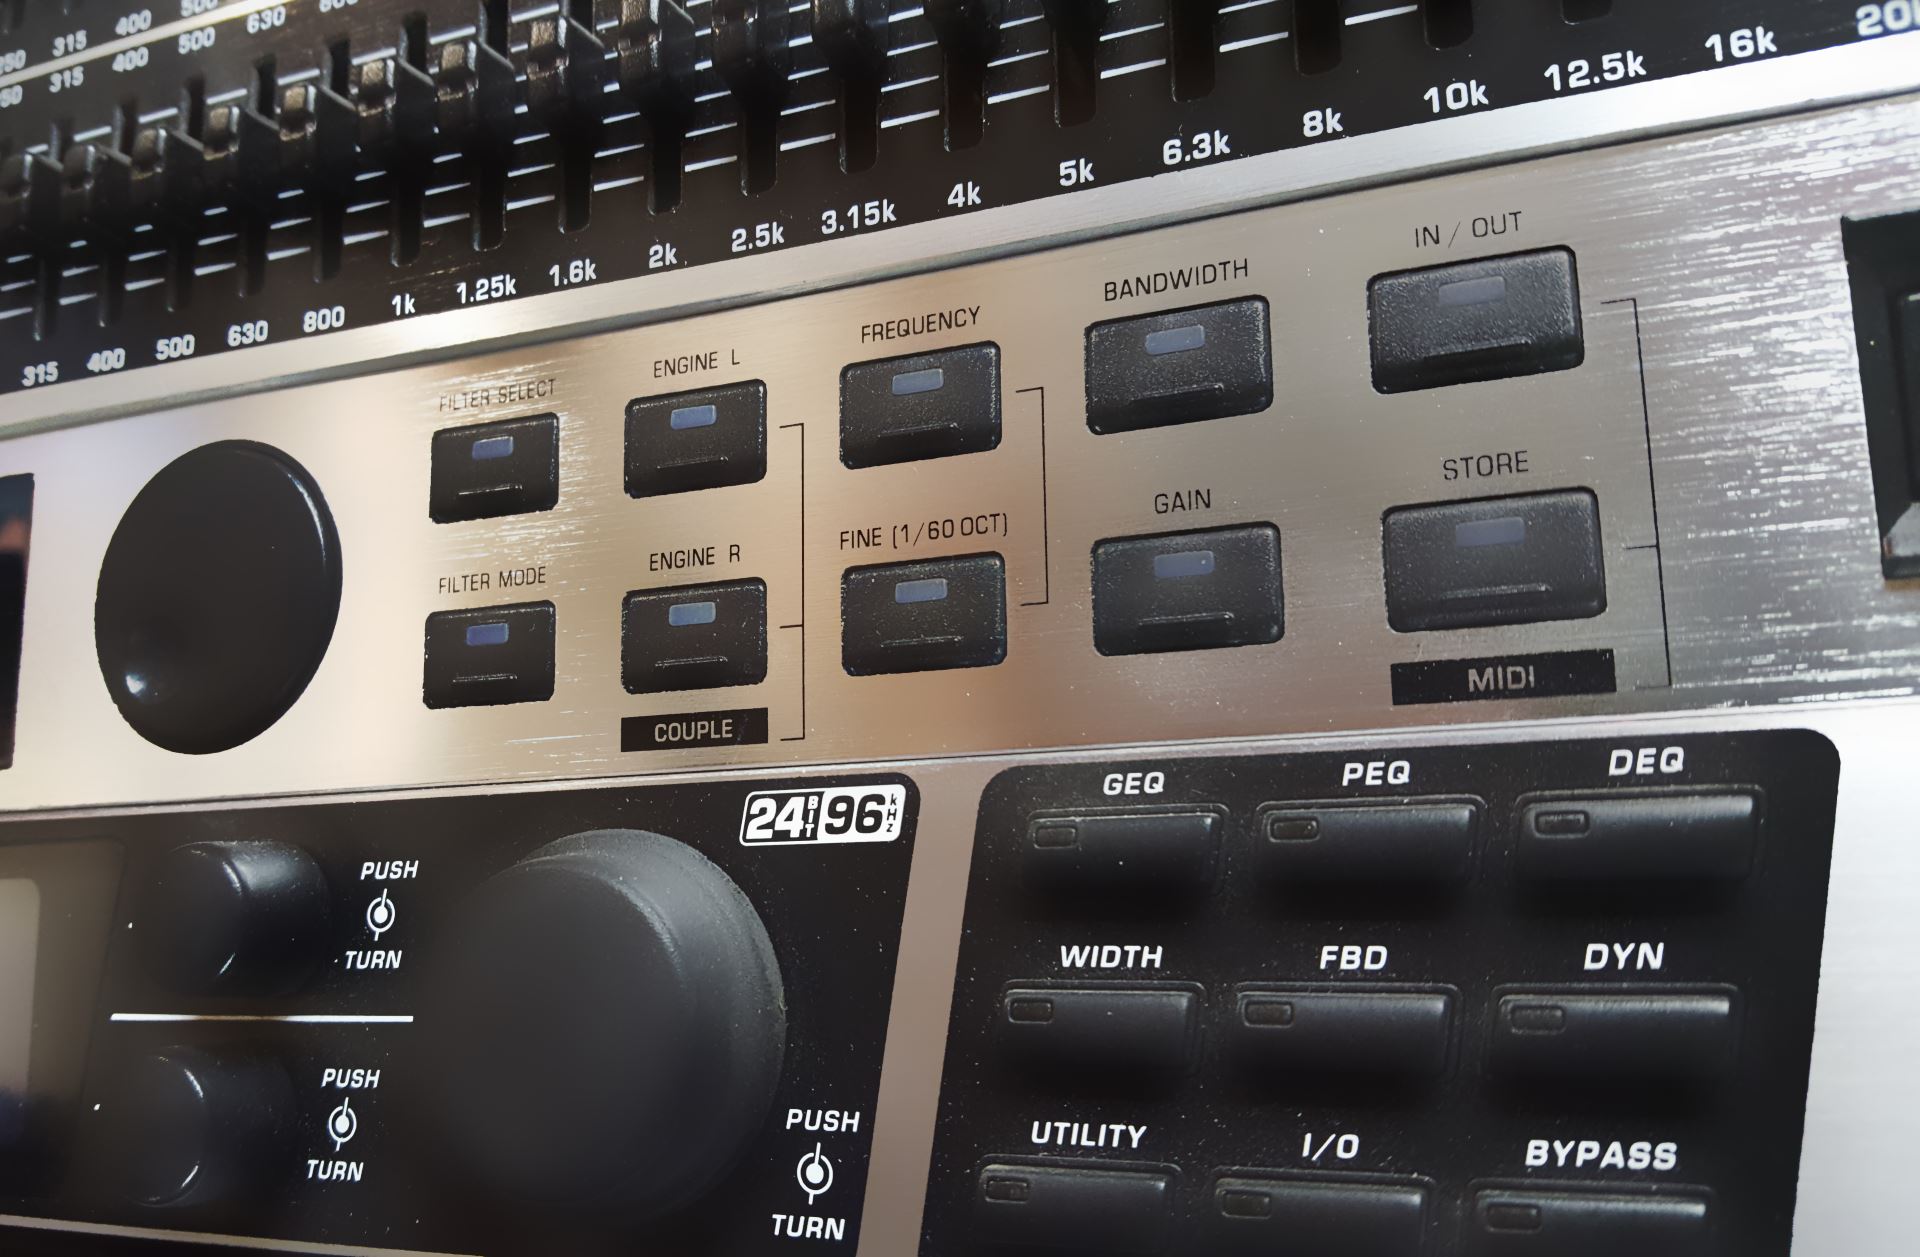
Of course, when all of that’s been done and you still need more level than your feedback monster will let you have, it’s probably time to break out the EQ.

Equalization can be effective with many feedback situations, due to loop gain commonly being notably NOT equal at all frequencies. In almost any situation that you will encounter in real-life, one frequency will end up having the highest loop gain at any particular moment. That frequency, then, will be the one that “rings.”

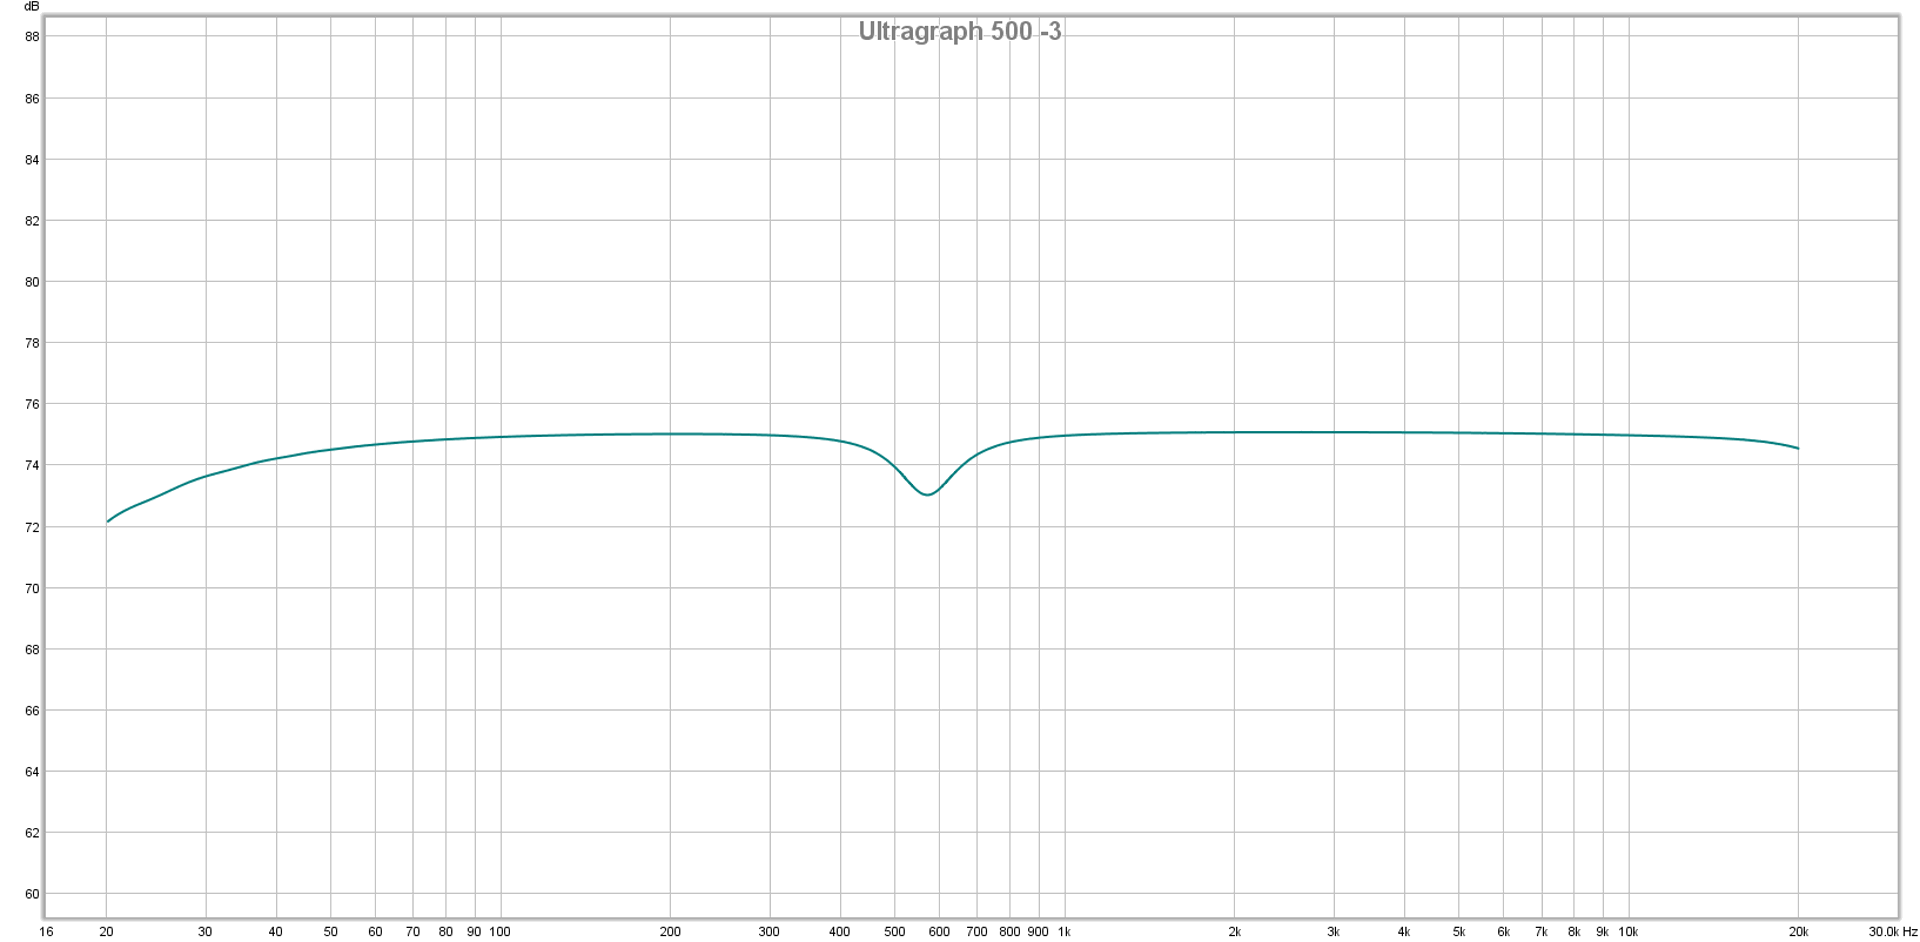
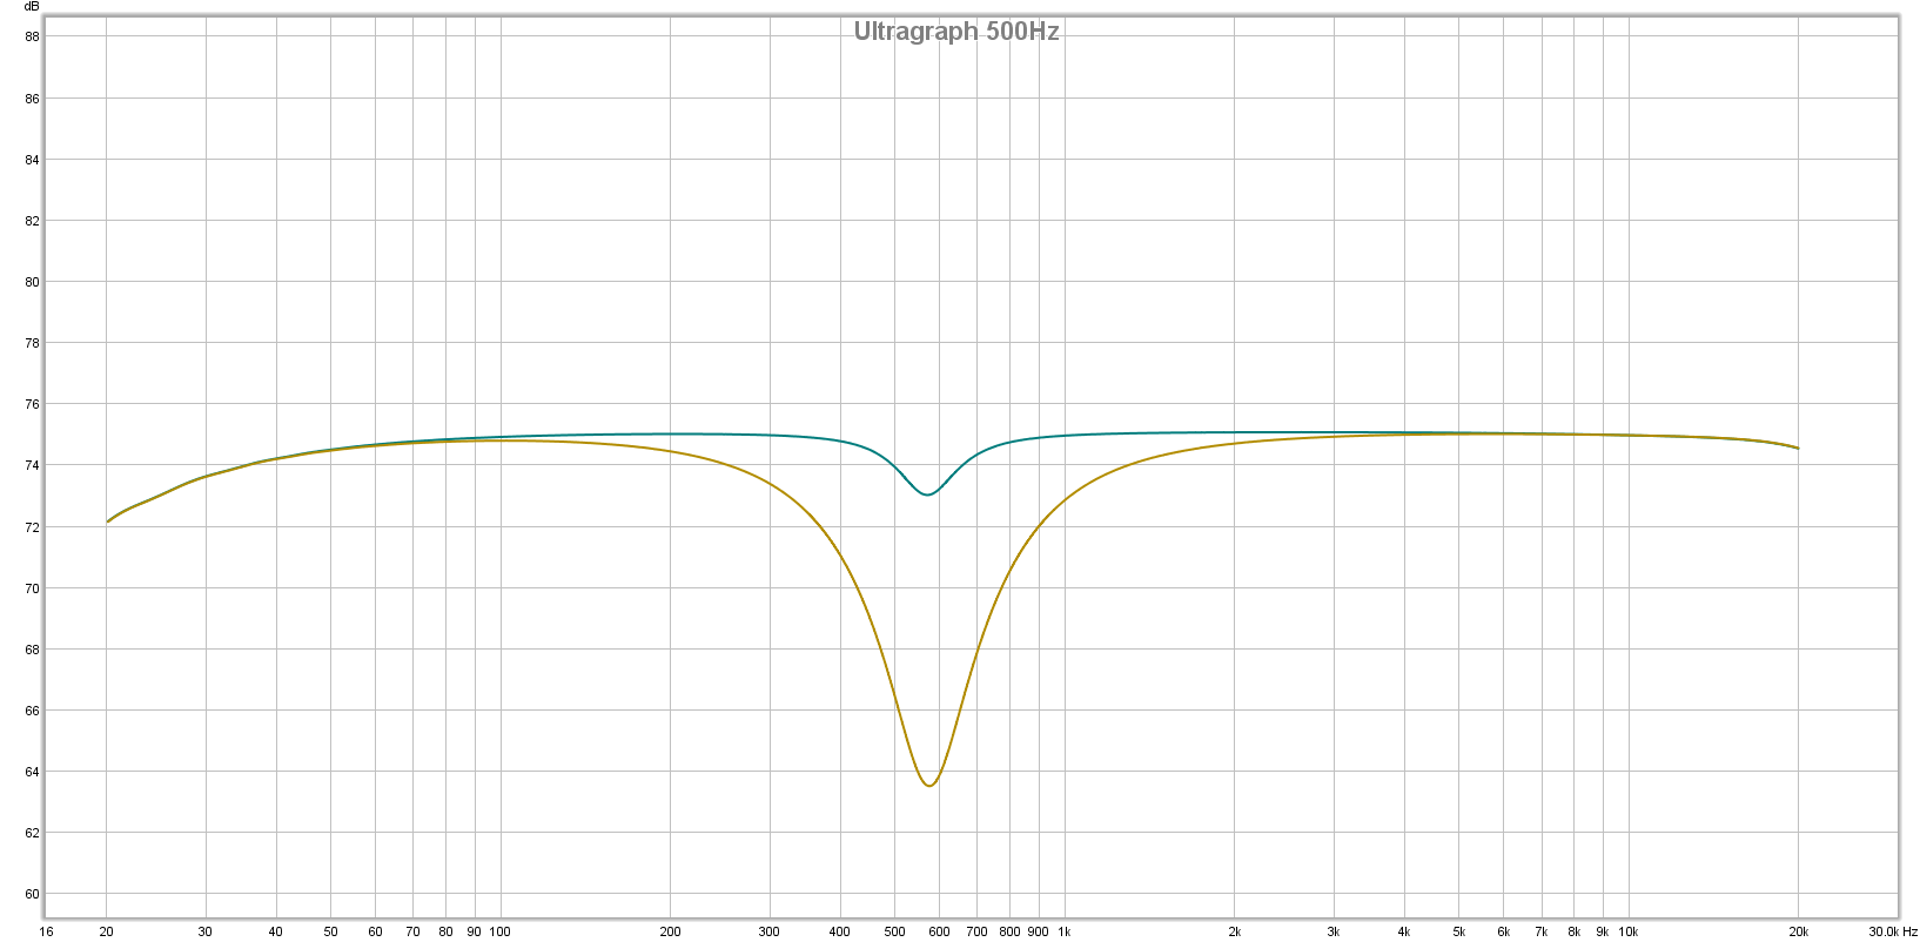
The utility of EQ is that you can reduce a system’s electronic gain in a selected bandwidth. Preamp levels, fader levels, and send levels are all full-bandwidth controls – but if only a small part of the audible spectrum is responsible for your troubles, it’s much better to address that problem specifically. Equalizers offering smaller bandwidths allow you to make cuts in problem areas without wrecking everything else. At the same time, very narrow filters can be hard to place effectively, and a change in phase over time can push a feedback frequency out of the filter’s effective area.

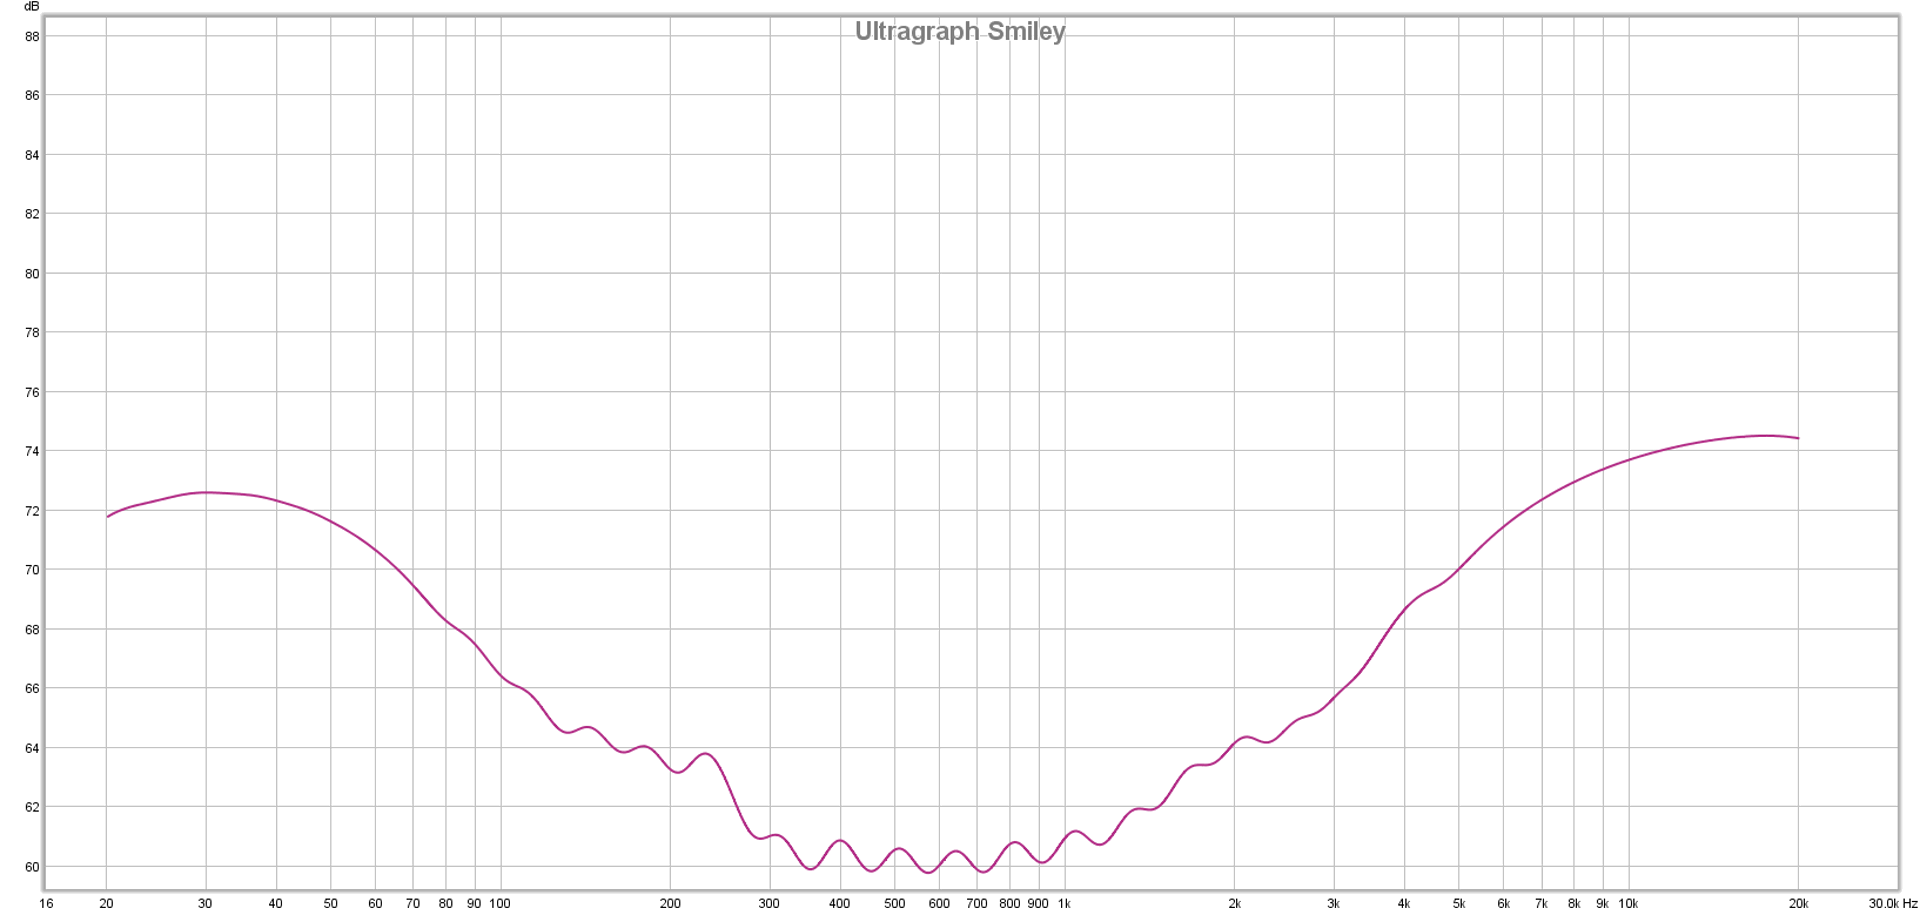
EQ as a feedback management device – like everything else – is an exercise in tradeoffs. You might be able to pull off some real “magic” in terms of system stability at high gain, but the mics might sound terrible afterwards. You can easily end up applying so many filters that reducing a full-bandwidth control’s level would do basically the same thing.

In general, doing as much as possible to tame your feedback dragon before the EQ gets involved is a very good idea. You can then use equalization to tamp down a couple of problem spots, and be ready to go.