Tag Archives: Gear

I’ve Never Disliked The Sound Of A Console

There are plenty of controls I didn’t like, though…

Please Remember:

The opinions expressed are mine only. These opinions do not necessarily reflect anybody else’s opinions. I do not own, operate, manage, or represent any band, venue, or company that I talk about, unless explicitly noted.

Want to use this image for something else? Great! Click it for the link to a high-res or resolution-independent version.

I’ve talked about this before, but it’s on my mind again.

As of today, I’ve clocked nearly 24 years of involvement in live audio. In that time, I’ve had hands-on time with mixers by Ramsa, Peavey, JBL, Behringer, Soundcraft, A&H, Yamaha, Tascam, Avid, Solid State Logic, Amek, Neve, and…ah…and…at least one more that I can’t remember for some reason. Some of them were worth tens of dollars. Some of them were worth tens or even hundreds of thousands of dollars. Some of them were analog. Some of them were digital.

I never once had a problem with how any of them “sounded.” I have never been in a situation with a real band in a real room and said to myself, “Gee, this would sound so much better if I had a [consoleName].”

I’ve disliked control layouts, though. I’ve wondered why the big, fancy, industry darling didn’t have conveniences that a console costing less than 1/10th of it had. I’ve encountered fixed-width midrange EQs that were metaphorical equivalents to carving a turkey with a tractor-trailer hauling 17 tons of other, very alive and extremely enraged turkeys bent on world domination HUMANS, YOUR HUBRIS WILL END YOU! WE ARE COMING! GOBBLEGOBBLEGOBBLE!

Sorry, what were we talking about?

Yes, I’ve encountered some consoles that sounded terrible because an internal connection had worked loose, or a button contact was grunged up. When everything was working, though, all the mixers in my experience have passed audio just as well as anything else. Then, that audio hit outboard processing, loudspeakers, and acoustical environments, and all bets were off. There are plenty of people who might ask, “What console do we need to buy to make this place sound better?” and I might answer:

“Forget the console. You need a bulldozer, municipal construction permits, an architecture firm, and a bunch of money to build a room that’s actually suited to live music.”

I can not recall a single instance in my life where I disliked the sound of a show and could confidently attribute that dislike to a deficiency in the basic audio-handling properties of a mixing desk. Operators, input/ output transduction, and environmental factors are sonic influencers possessing orders of magnitude more significance.
Comparisons Of Some Powered Loudspeakers

Let’s measure some boxes!

Please Remember:

The opinions expressed are mine only. These opinions do not necessarily reflect anybody else’s opinions. I do not own, operate, manage, or represent any band, venue, or company that I talk about, unless explicitly noted.

Want to use this image for something else? Great! Click it for the link to a high-res or resolution-independent version.

Over time, I’ve become more and more interested in how different products compare to each other in an objective sense. This is one reason why I put together the The Great, Quantitative, Live-Mic Shootout. What I’m especially intrigued about right now is loudspeakers – especially those that come packaged with their own internal amplification and DSP. Being able to quantify value for money in regards to these units seems like a nifty exercise, especially as there seems to be a significant amount of performance available at relatively low cost.

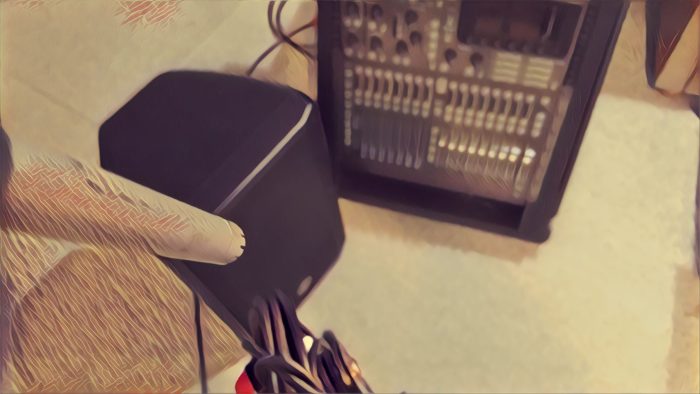
Over time, I’ve used a variety of powered loudspeakers in my work, and I have on hand a few different models. That’s why I tested what I tested – they were conveniently within reach!

Testing Notes

1) The measurement mic and loudspeaker under test were set up to mimic a situation where the listener was using the loudspeaker as a stage monitor.

2) A 1-second, looping, logarithmic sweep was used to determine the drive level where the loudspeaker’s electronics reached maximum output (meaning that a peak/ limit/ clip indicator clearly illuminated for roughly half a second).

3) Measurements underwent 1/6th octave smoothing for the sake of readability.

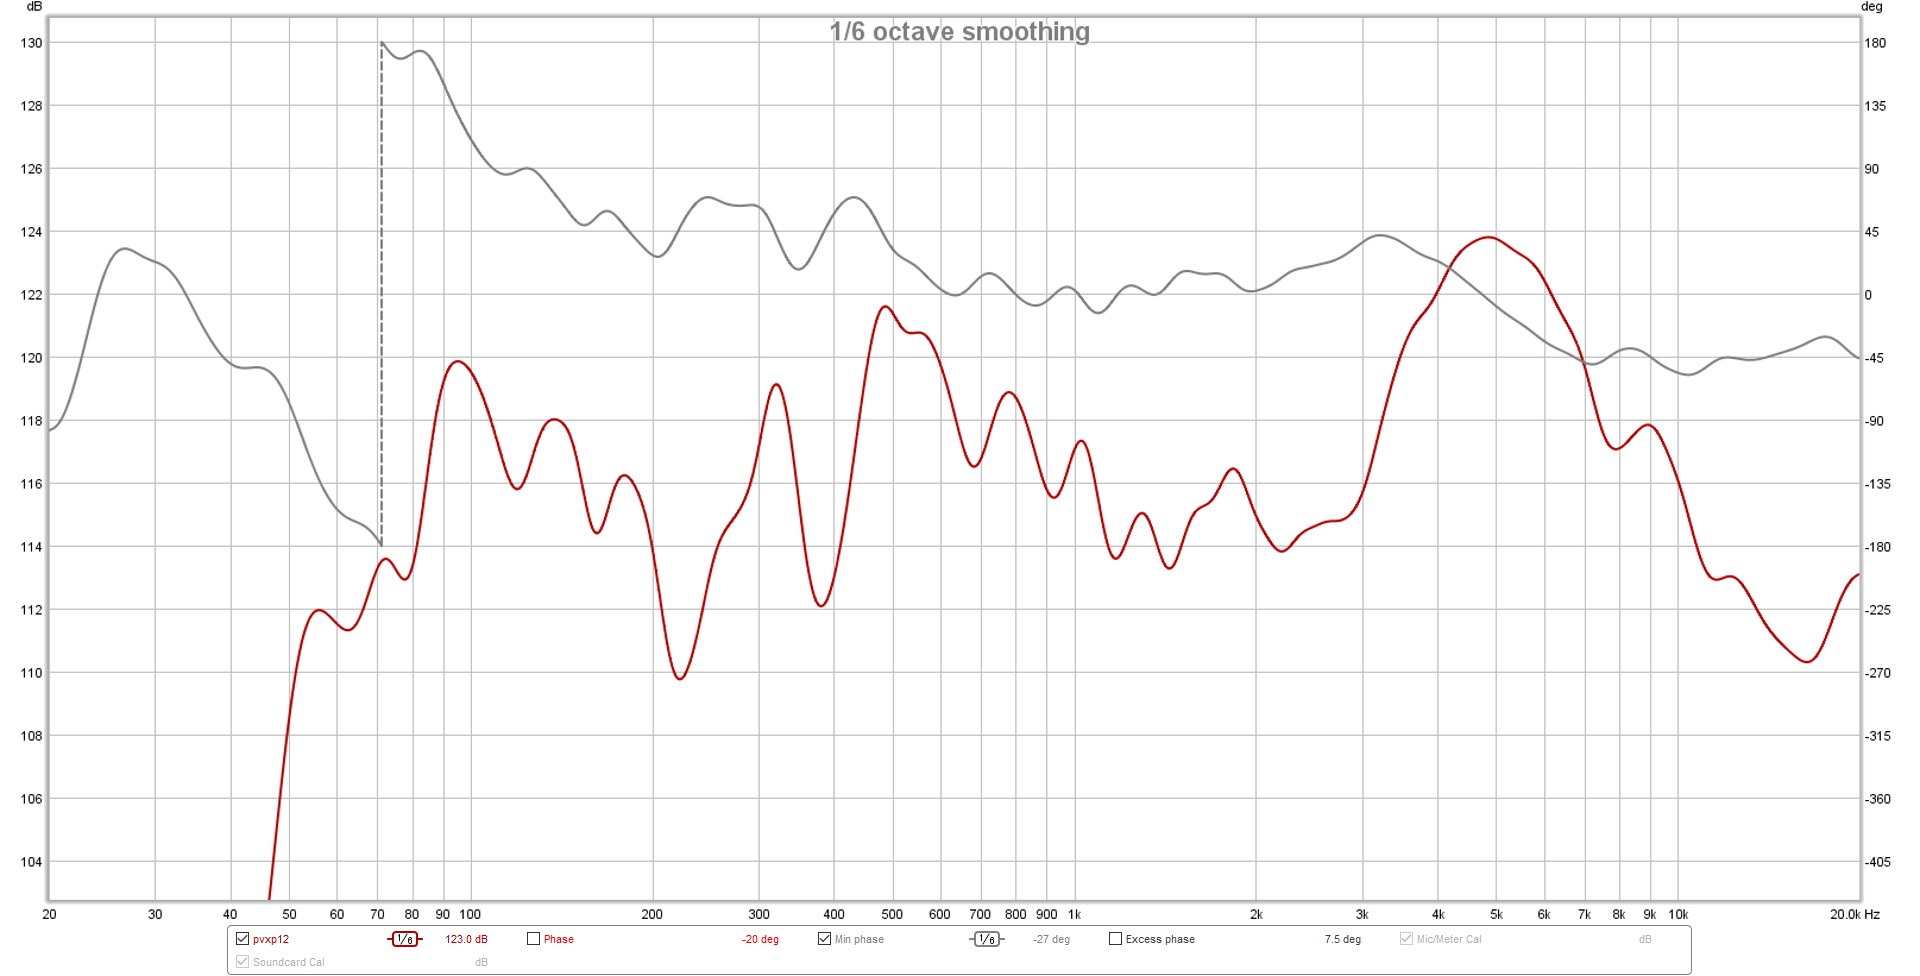
4) These comparisons are mostly concerned with a “music-critical band,” which I define as the range from 75 Hz to 10,000 Hz. This definition is based on the idea that the information required for both creating music live and enjoying reproduced sound is mostly contained within that passband.

5) “Volume” is the number of cubic inches contained within a rectangular prism just large enough to enclose the loudspeaker. (In other words, how big of a box just fits around the loudspeaker.)

6) “Flatness Deviation” is the difference in SPL between the lowest recorded level and highest recorded level in the music-critical band. A lower flatness deviation number indicates greater accuracy.

6) Similarly to #5, “Phase Flatness Deviation” is the difference between the highest phase and lowest phase degrees recorded in the music-critical band. (The phase trace is a generated, minimum-phase graph).

8) Distortion is the measured THD % at 1 kHz.

9) When available, in-box processing was set to be as minimal as possible (i.e., flat EQ).

Test Results And Comments (In Order Of Price)

Alto TS312

Acquisition Cost: $299
Volume: 4565 in^3
Mass: 36 lbs
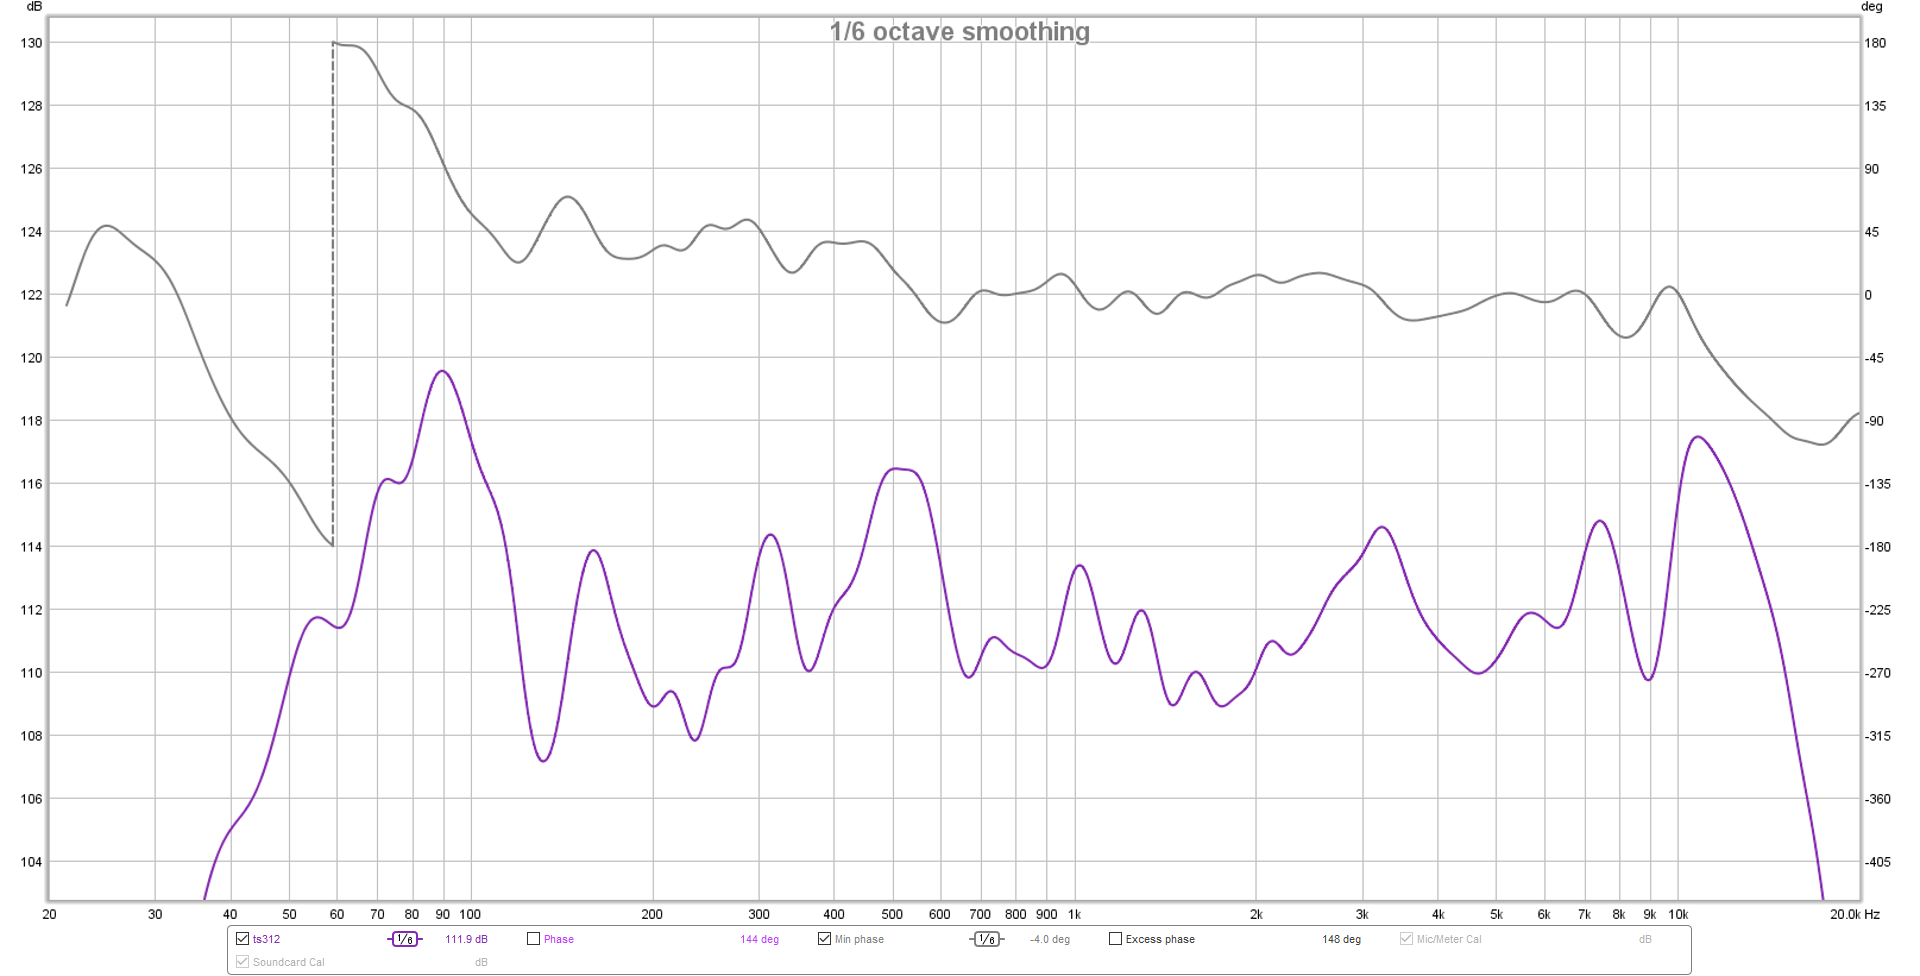
Magnitude And Phase:
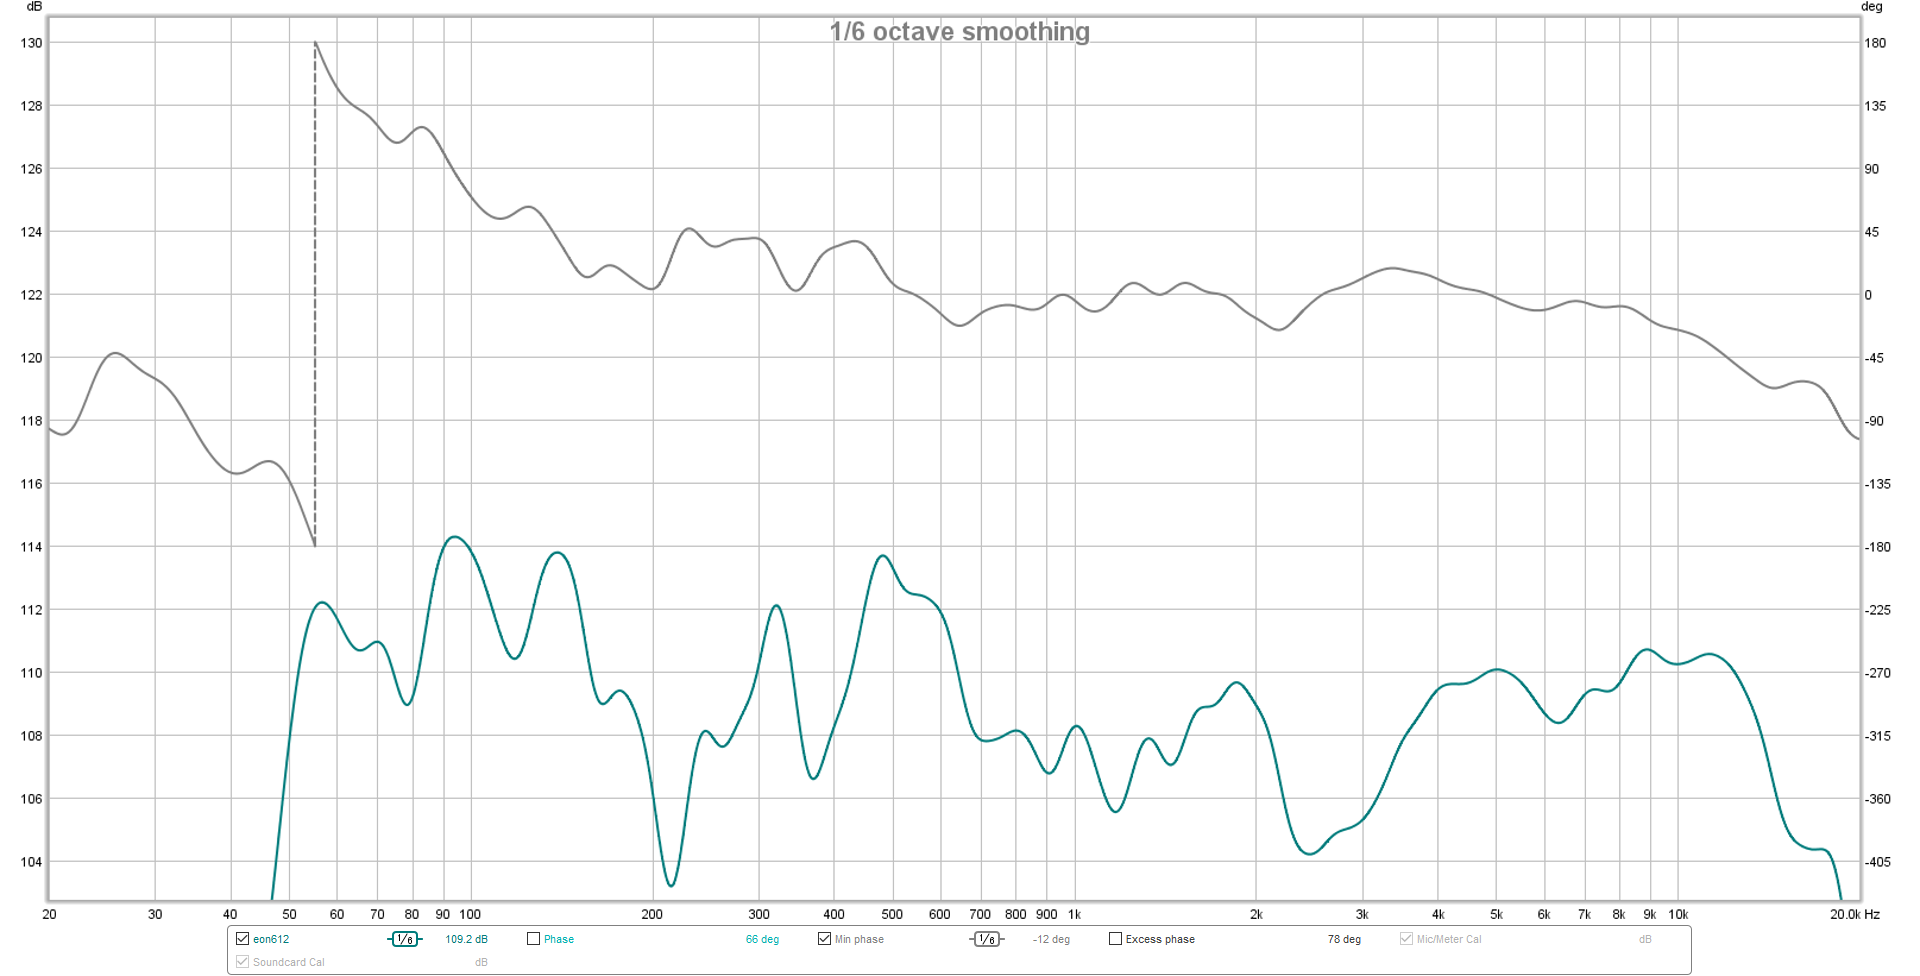
Flatness Deviation: 12 dB
Phase Flatness Deviation: 166 degrees
Peak SPL: 119.6 dB
Distortion @ 1 kHz: 1.1%
Comments: Good bang vs. buck ratio. Highly compact, competitive weight. Surprisingly decent performer, with respectable output and distortion characteristics. Lacks the “super-tuned” flatness of a Yamaha DBR, and not as clean as the JBL Eon. Simplified back panel lacks features, but also is hard to set incorrectly. Would have liked a “thru” option, but the push-button ability to lift signal ground is nice to have.

Peavey PVXP12

Acquisition Cost: $399
Volume: 5917 in^3
Mass: 43 lbs
Magnitude And Phase:
Flatness Deviation: 14 dB
Phase Flatness Deviation: 230 degrees
Peak SPL: 123.8 dB
Distortion @ 1 kHz: 1.61%
Comments: High output at limit, but the manufacturer allows for rather more distortion compared to other products. Not factory-tuned quite as flat as other boxes, with an output peak that reads well as a “single number” performance metric…but also sits in a frequency range that tends to be irritating at high volume and troublesome for feedback. The enclosure is hefty and bulky in comparison to similar offerings.

JBL Eon 612

Acquisition Cost: $449
Volume: 4970 in^3
Mass: 33 lbs
Magnitude And Phase:
Flatness Deviation: 11 dB
Phase Flatness Deviation: 145 degrees
Peak SPL: 114.3 dB
Distortion @ 1 kHz: 0.596%
Comments: Relatively low output, but also tuned to a more more flat solution than some (and with rather lower distortion). Has some compactness and weight advantages. Lots of digital bells and whistles, but the utility of the features varies widely across different user needs. (For instance, I would prefer trading more power and an even flatter tuning for the Bluetooth control connectivity.) Not particularly enamored of the “boot-up” time required for all the electronics to register as ready for operation.

Yamaha DBR 12

Acquisition Cost: $499
Volume: 4805 in^3
Mass: 34.8 lbs
Magnitude And Phase:
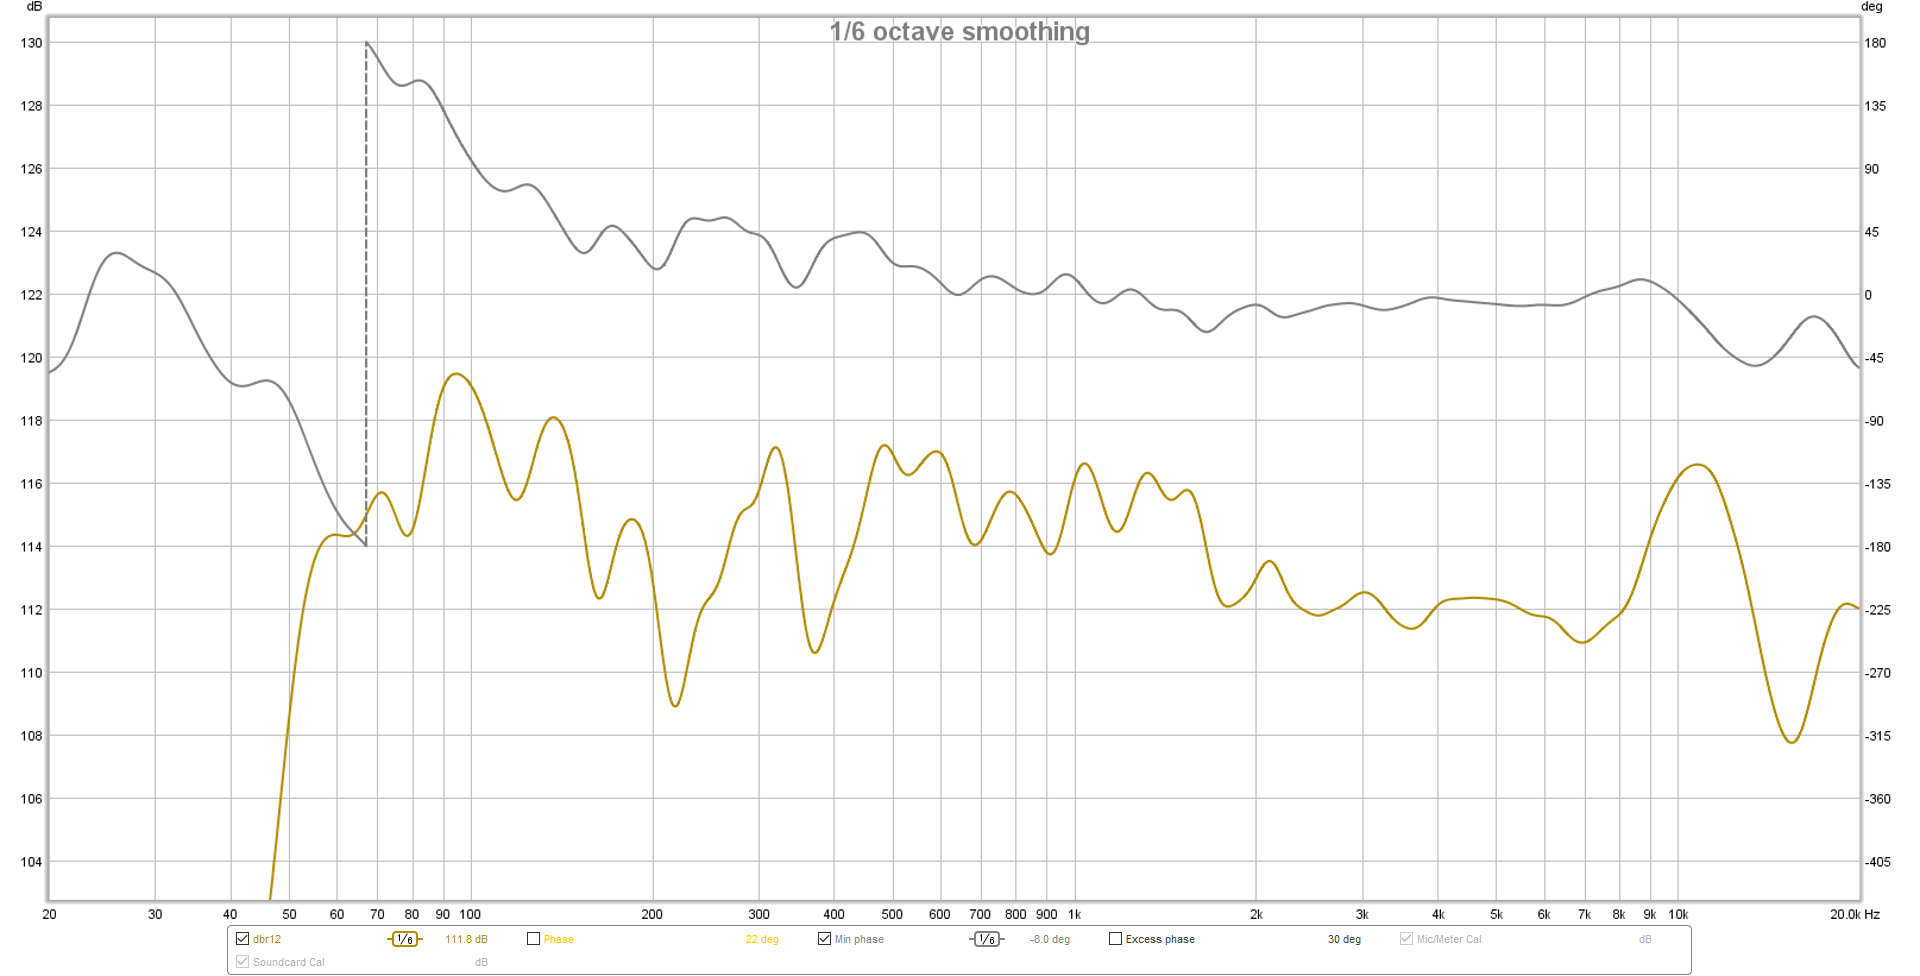
Flatness Deviation: 10.6 dB
Phase Flatness Deviation: 180 degrees
Peak SPL: 119.5 dB
Distortion @ 1 kHz: 0.606%
Comments: Good output at low distortion. Compact box in comparison to others. Competitive in terms of weight. Slightly more expensive than other offerings, commensurate with its improved performance. Measures very well in the “intelligibility zone” of its frequency response. Very pleased with the simple and robust selector switches for most operations.


The Compression Factor

Don’t forget that “accidental” dynamics processing is a big part of guitar tone.

Please Remember:

The opinions expressed are mine only. These opinions do not necessarily reflect anybody else’s opinions. I do not own, operate, manage, or represent any band, venue, or company that I talk about, unless explicitly noted.

Want to use this image for something else? Great! Click it for the link to a high-res or resolution-independent version.

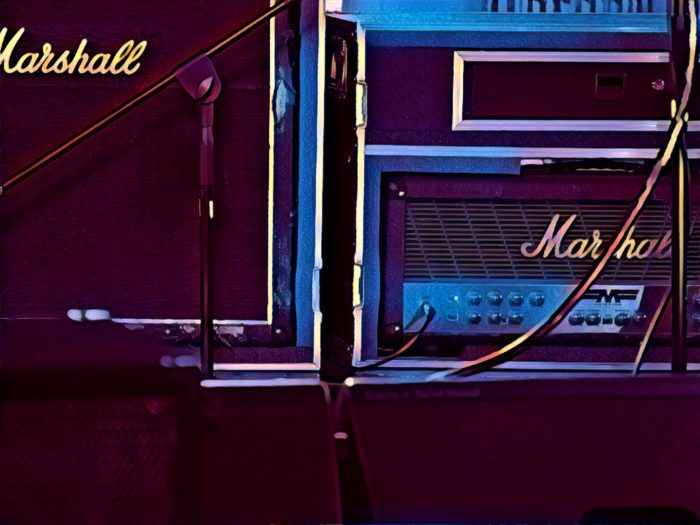
Not so long ago, I was watching a YouTube video of Eddie Van Halen playing a guitar solo. I was struck by something as I took in the performance: Eddie’s guitar tone wasn’t very heavily distorted, but it was MASSIVE. The instrument sounded about fifty feet tall, with a tremendous amount of perceived power behind even the highest notes.

I realized in those moments that I’ve tended to forget a very important component of the quest for “ultimate guitar-tone bliss.” That component is dynamics; To be more specific, compression, and what it does to the sound of a guitar.

We certainly can’t ignore purely tonal components. Harmonic distortion – however it’s precipitated – is key to the signature sounds of rock and roll six-strings. At the same time, distortion doesn’t occur in a vacuum (though it may occur in vacuum tubes…sorry, I had to). When an audio circuit, or something pretending to be an audio circuit distorts, there is a necessary dynamic element involved. Some device is unable to produce output voltage that fully tracks the input voltage. Insufficient voltage can be swung at an output, and the device clips at its maximum. The audio doodad in question becomes a brickwall limiter with hyperfast attack and release, where the threshold is the maximum voltage the device can deliver.

When that comes into play, there are a good number of non-distortion related elements that become critical. Sounds that would be lost against an aggressive pick attack are smashed into clear audibility. Indeed, the guitar “gets more sustain,” because what would normally drop into the environmental noise floor is now running much hotter, where it’s easy to hear. Notes that would jump ahead of others in a chord are now rather closer to their counterparts, affecting our perception of how that chord is voiced…even if only in subtle ways.

My point in all this is to remind myself, and others, that tone is more than just the magnitude response of the amp and cabinet. It’s more than the proportion of generated harmonics to the original signal. The natural compression, or lack thereof, inside the totality of a guitar circuit has profound consequences.

And, as a parting idea, I wonder what would happen if a guitarist intentionally experimented with more consciously separating the compression aspect from the distortion. That is, if they started by playing around with compression and limiting that operated very cleanly, and then gradually added harmonic distortion components on top of it all – post the dynamics. If anybody does some experiments in that area, please do record it and put it on social media. I’d be interested to hear what you come up with, in any case.


Tuning A VerTec System

You can do a lot by simply treating it like everything else you’ve worked on.

Please Remember:

The opinions expressed are mine only. These opinions do not necessarily reflect anybody else’s opinions. I do not own, operate, manage, or represent any band, venue, or company that I talk about, unless explicitly noted.

Want to use this image for something else? Great! Click it for the link to a high-res or resolution-independent version.

I’m sorry that I haven’t been around much lately – I’ve been busy. Very busy. So busy that I’ve been saying “No” to things a lot.

One element of my busyness has been being turned loose on a VERY classy room in Park City. For the moment, I won’t name it here, although you may have heard of it. (Not naming it here might be a little ridiculous, actually. Anybody can get on my Facebook page and see what I’m doing. Well, anyway…) It’s a little too big to classify as a small venue in my own personal taxonomy, but hey, as we’re all learning, many of the lessons in this business scale up and down.

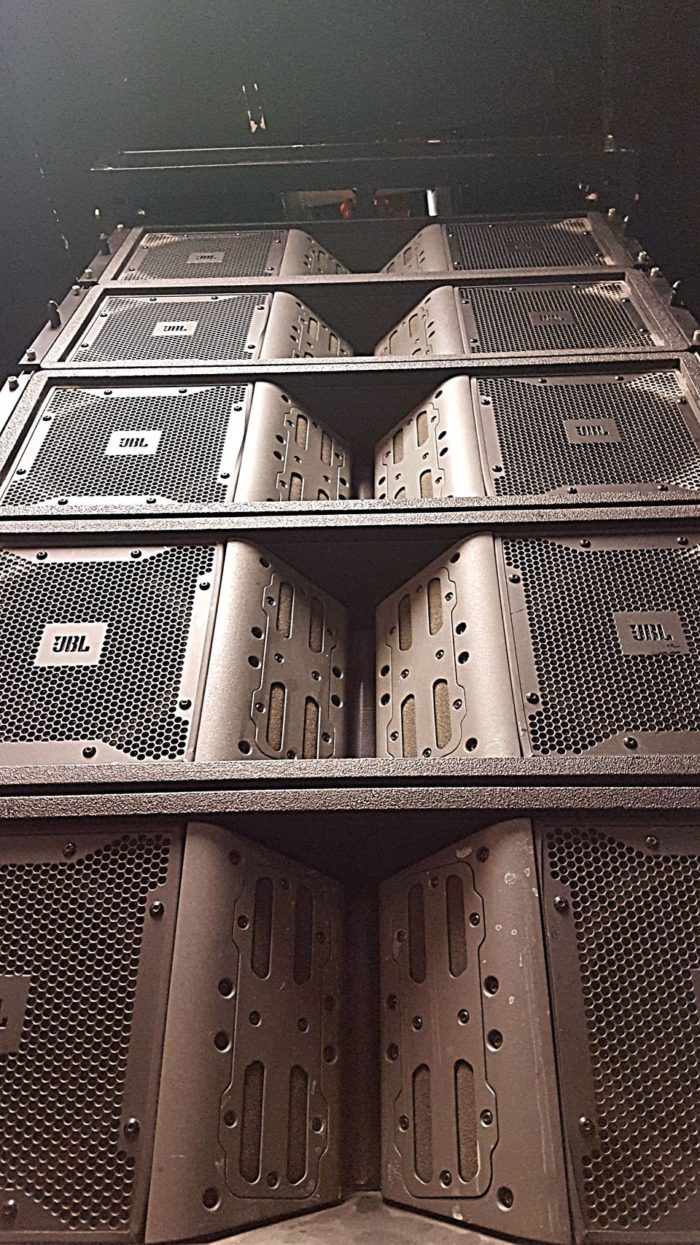
A task I was allowed to undertake was re-tuning the installed VerTec system. Some big complaints about it were an overabundance of “honk” and “boom,” and the hope was that I could do something to alleviate those problems. I believe I have mostly succeeded in making the rig better, and it was most definitely not an exotic process. I slapped a measurement mic in front of the FOH mix position, ran Room EQ Wizard, and got to work. The measurement traces confirmed what could be heard: The system was very heavy on the midrange, with some troublesome peaks in the subwoofer zone. After a bit of doing, we are where we are now, which is a much flatter place.

The main key, I can say, was to get over my own intimidation. VerTec, or really any similar system, looks hairy because of all the boxes involved. The thing to remember, though, is that for any given coverage zone the boxes are meant to combine into one big source. If you’re going to fret over something, fret over each overall zone of coverage, not the individual array elements. Pick your battles. As Bob McCarthy might say, decide what to tune for and ignore the rest. In my case, I had it pretty easy, because I chose to tune for the main room and not worry specifically about the boxes angled to hit people standing near the hangs. I didn’t have any outfills, infills, or other such coverage areas to consider.

A barrier that I encountered was that we’re locked out of part of the system management processor. With that being the case, I didn’t have the ability to adjust individual bandpass input or output levels. I did have EQ access, though, so that’s what I did all my work with. Was that an ideal situation? No, but what I’ve discovered over the years is that getting the basic magnitude response of a system to behave is the primary battle. I’m not saying other things don’t matter here. I’m not saying that adjusting bandpass gain by way of an EQ isn’t a kludge. I’m not recommending that, but I am saying that you might have to do it sometime, and it won’t ruin your life. Do what you can with the tools you have.

In the end, even with an imperfect approach, the system’s listenability has improved. We seem to be getting compliments on the sound in the room at a regular pace now. I’m certainly looking forward to next spring, when I plan to do another tuning that will start with tweaking amplifier gains first, but for now we seem to be in business.


The Pro-Audio Guide For People Who Know Nothing About Pro-Audio, Part 6

I believe in life after the console.

Please Remember:

The opinions expressed are mine only. These opinions do not necessarily reflect anybody else’s opinions. I do not own, operate, manage, or represent any band, venue, or company that I talk about, unless explicitly noted.

Want to use this image for something else? Great! Click it for the link to a high-res or resolution-independent version.

“The point of loudspeaker management is to make final, overall adjustments to console output so that devices which actually create acoustical output (speakers, that is) can be used most effectively.”


The rest of this article is available – free! – right here.


130 dB Disbelief

It’s hard for me to believe that 130 dB is possible from some loudspeaker designs.

Please Remember:

The opinions expressed are mine only. These opinions do not necessarily reflect anybody else’s opinions. I do not own, operate, manage, or represent any band, venue, or company that I talk about, unless explicitly noted.

Want to use this image for something else? Great! Click it for the link to a high-res or resolution-independent version.

When a manufacturer claims that a loudspeaker system (say, a two-way arrangement in a single, vented enclosure) can create a 130 dB SPL peak at 1 meter with a 1000 watt peak power input, I’m a skeptic. Or rather, I should say that I’m a skeptic about how useful that 130 dB actually is.

What I’m getting at is this: A 1000 watt input is 30 dB above the 1 watt input level. Getting a direct-radiating cone driver to give you 100+ dB SPL of sensitivity in a consistent way is challenging (thought I will not say it’s impossible). There are, of course, plenty of drivers available that will get you over that mark of 100 dB @ 1 watt/ 1 meter, BUT, only with the caveat that the 100+ dB sensitivity zone is confined to a “smallish” peak around 2 kHz. The nice, smooth part of the response that doesn’t need to be tamed is probably between 95 – 97 dB. If you’re lucky, that zone might be just south of 100 dB.

When it comes to useful output, what really matters is what a driver can do with minimal variation across the bandpass it’s meant to reproduce. Peaks in different frequency ranges aren’t helpful for real work – although they do let you claim a higher peak-output number.

My disbelief, then, is rooted in the idea that any “affordable by mortals” loudspeaker model is probably not using an ultra-high performance, super-custom-built cone driver for the low-frequency bandpass. Sure, it might not be a driver that you can get off the shelf, but it’s tough for me to have faith that the very upper edge of loudspeaker performance is being tickled by whatever got bolted into the enclosure.

Now…I could be very wrong about this. In fact, I would prefer to be wrong, because I will always desire an affordable speaker that takes up no space, has no weight, and is infinitely loud from 20 Hz to 20,000 Hz. Anything that gets closer to that impossible goal is a box I can welcome. At the same time, I prefer (and encourage) pessimism when reading manufacturer ratings. Sure, they say the box can make 130 dB peaks, but under what circumstances? Only at 2 kHz? Only when combined with room reflections?

If the numbers you claim are difficult to achieve, I’m going to need more than your word to accept them.


The Pro-Audio Guide For People Who Know Nothing About Pro-Audio, Part 5

Buses are what put the “mixing” in mixing consoles.

Please Remember:

The opinions expressed are mine only. These opinions do not necessarily reflect anybody else’s opinions. I do not own, operate, manage, or represent any band, venue, or company that I talk about, unless explicitly noted.

Want to use this image for something else? Great! Click it for the link to a high-res or resolution-independent version.

“The most common destination for a channel’s signal is a bus. Buses are really what make a mixer a mixer: They’re signal lines meant to carry and combine a number of individual channel signals fed into them.”


I wrote this article for Schwilly Family Musicians. The rest of it is available for free, right here.


Regarding Electronic Drums

Electronic drums can be great, if you take the time to make them great.

Please Remember:

The opinions expressed are mine only. These opinions do not necessarily reflect anybody else’s opinions. I do not own, operate, manage, or represent any band, venue, or company that I talk about, unless explicitly noted.

Want to use this image for something else? Great! Click it for the link to a high-res or resolution-independent version.

A question I was asked recently was about electronic instruments – “E Drums” in particular. The query was about how to do them well in a live setup. I’ve worked with bands that make use of electronic percussion, sometimes as an add-on, and sometimes as a core instrument. In either situation, there are a number of particulars that come together to make the sonics an effective part of the ensemble, and a workable element in the sound reinforcement equation.

Tell The Sound People What’s Coming

As usual, homework and communication are key. I’ve always had decent experiences with electronic drums/ sample pads/ whatever when everybody did their advance work: People told me what was coming, how many inputs were needed, what kinds of sounds to look out for, and brought both working gear AND a working knowledge of that gear to the gig. More difficult situations have arisen when musicians have surprised me with extra needs: “Well, yeah, we need two lines for the trigger pads, but we’ve also got this other unit that needs two more DIs, so…” Particularly a multi-band or full-on festival situation, information about those additional inputs would have been really good to have before we were setting up. It’s also tough when a piece of equipment has chronic problems, but it’s brought along to a mission-critical situation anyway in hopes that “It’ll hold together.” (Often, it doesn’t hold together and we waste time scrambling. Or it fails at a critical moment and really embarrasses you.)

Carefully Integrate Your Proportions

I know I say this a lot, but I’m going to say it again. If it sounded right in rehearsal, it has a fighting chance of sounding right at the show. If not – who knows?

Especially when it comes to blending triggered sounds with acoustic drums, getting the balance correct during practice is crucial. Even more crucial is being sure that the balance can be recreated live. An important example is found in the case of bands that want to blend an earth-shattering synth kick with loud, traditional drums. That’s a very difficult thing to do, unless you have a truly enormous PA system available. Anybody who has heard real drums in a real room knows that they can make as much noise as an entire small-venue PA rig, given a little effort on the part of the drummer. Drowning that special accent in a tidal wave of other racket is very easy. The folks who learn to play so that the accent has the room to actually do something are the successful ones. The people who expect a normal-sized audio system to somehow make 130+ dB at 35 Hz are the disappointed ones.

Corollary: If you want your electronic drums to sound massive, you need to figure out how “big” they can reasonably be, and make everything else significantly “smaller” than that. Meditate upon this.

If It Won’t Work Without [x], Bring [x]

You should always be able to be fully self-contained with electronic percussion. That is, if a certain amount and character of sound is absolutely necessary for your e-drums to work out, you need to have the option of providing that support yourself. This is another important reason to carefully advance the show; If you don’t, you may get a nasty surprise when the provided PA can’t do the job.

If The Blend Is Mission-Critical, Do It Yourself

With e-drums, I do like to be able to get separate outputs for kick, snare, a submix of toms, and a submix of cymbals/ FX/ and other percussion sounds. Just like with regular drums, its handy to be able to make some decisions about what’s right for the room. At the same time, I’m 100% onboard with getting a premix of everything, especially if you need a very specific balance. In the case of a lot of diverse sounds, where they don’t necessarily come together to function as one large instrument, it’s far better for you to build your own mix and hand it off to me. With a complicated blend, it doesn’t make sense to input a ton of lines and then struggle to put it all back together.

None of this information is really world-changing, but that’s the reality: There’s no shortcut, and no mystical knob of mix perfecting. Good communication and “gettin’ it right at home” are what pay the dividends.


Micing A Saw

Contact transducers are really nifty, but take some doing to use.

Please Remember:

The opinions expressed are mine only. These opinions do not necessarily reflect anybody else’s opinions. I do not own, operate, manage, or represent any band, venue, or company that I talk about, unless explicitly noted.

Want to use this image for something else? Great! Click it for the link to a high-res or resolution-independent version.

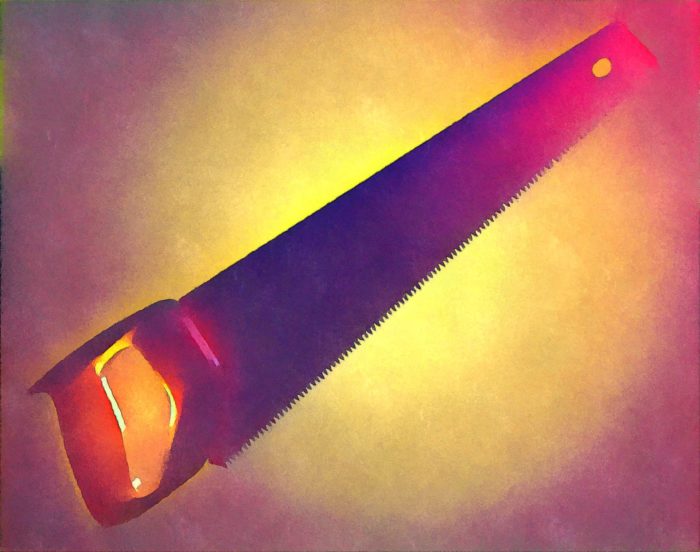
You may eventually be asked to transduce the noises produced by a saw. I’m not talking about sound effects for film, here. I’m talking about music. A handsaw with a sufficiently manipulable blade can be played very effectively with a violin bow. The resulting emanations are what I would call “a wood-shop Theremin.”

I have effectively captured these sonic events with regular microphones. As with anything else, a unit that basically sounds like the thing it’s pointed at will generally be fine. The troublesome element really is that saws don’t have the kind of body that creates a lot of output. Their resulting lack of SPL can pose a challenge when they’re put into an ensemble, because almost anything else is going to be much, much louder.

As a result of the above, I have, (for years) wanted to try using a contact transducer on a musical saw. I finally got my chance a couple of weeks ago. I was very pleased with the outcome, because I could actually hear some of what the saw was doing in the context of a very busy band.

The key to the whole thing was a Dean Markley Artist Transducer. It’s essentially a gussied-up piezo, with the element potted in some kind of polymer that sits in a wooden surround. The bottom of the pickup has that poster-tack Silly Putty applied, so you can temporarily stick the thing to a surface. As with any piezo-based transducer, you’ll want to connect it through an active DI box; The ultra-high impedance of the op-amp will stop you from loading down the pickup.

Contact micing lives and dies on placement, even more so than regular microphones. Parking the transducer in a bad spot can get you very strange results, but there’s more to the story: The pickup’s physical contact changes the vibrational behavior of the surface that it’s connected to. As such, you want to find a spot where you’ll get good transfer of the instrument’s movement, while avoiding a placement that dampens that same vibration. With a saw, that means that you’ll probably want to search for a place that’s as close to the handle as possible. This serves the dual purpose of keeping the transducer and cable out of the way, while also allowing the blade to move freely.

You will also want to make sure that you have the ability to DRASTICALLY reduce the high-frequency output of the saw channel. (A freely sweepable low-pass filter is the best case.) I’m starting to form a theory that vibrating surfaces and air create a sort of acoustical inductor – a device that impedes high-frequency output. Take away the transition to air-carried waves, and a lot of information that you’re not used to hearing comes into play. The bow scraping against the blade is hard to hear with traditional micing, but a contact mic really brings that sound through. We ended up rolling the filter down rather far…like, 1 kHz far, before a result was created that wasn’t too jarring.

All of this takes some work and planning, certainly, but the end result of much, much, MUCH improved gain-before-feedback can be tremendously helpful. Consider getting a contact transducer for your box-of-goodies. It might prove to be a highly handy tool one day.


Graphic Content

Transfer functions of various reasonable and unreasonable graphic EQ settings.

Please Remember:

The opinions expressed are mine only. These opinions do not necessarily reflect anybody else’s opinions. I do not own, operate, manage, or represent any band, venue, or company that I talk about, unless explicitly noted.

Want to use this image for something else? Great! Click it for the link to a high-res or resolution-independent version.

An aphorism that I firmly believe goes like this: “If you can hear it, you can measure it.” Of course, there’s another twist to that – the one that reminds you that it’s possible to measure things you can’t hear.

The graphic equalizer, though still recognizable, is losing a bit of its commonality as an outboard device. With digital consoles invading en masse, making landings up and down the treasure-laden coasts of live audio, racks and racks of separate EQ devices are being virtualized inside computer-driven mix platforms. At the same time, hardware graphics are still a real thing that exists…and I would wager that most of us haven’t seen a transfer function of common uses (and abuses) of these units, which happen whether you’ve got a physical object or a digital representation of one.

So – let me dig up a spare Behringer Ultragraph Pro, and let’s graph a graphic. (An important note: Any measurement that you do is a measurement of EXACTLY that setup. Some parts of this exercise will be generally applicable, but please be aware that what we’re measuring is a specific Behringer EQ and not all graphic EQs in the world.)

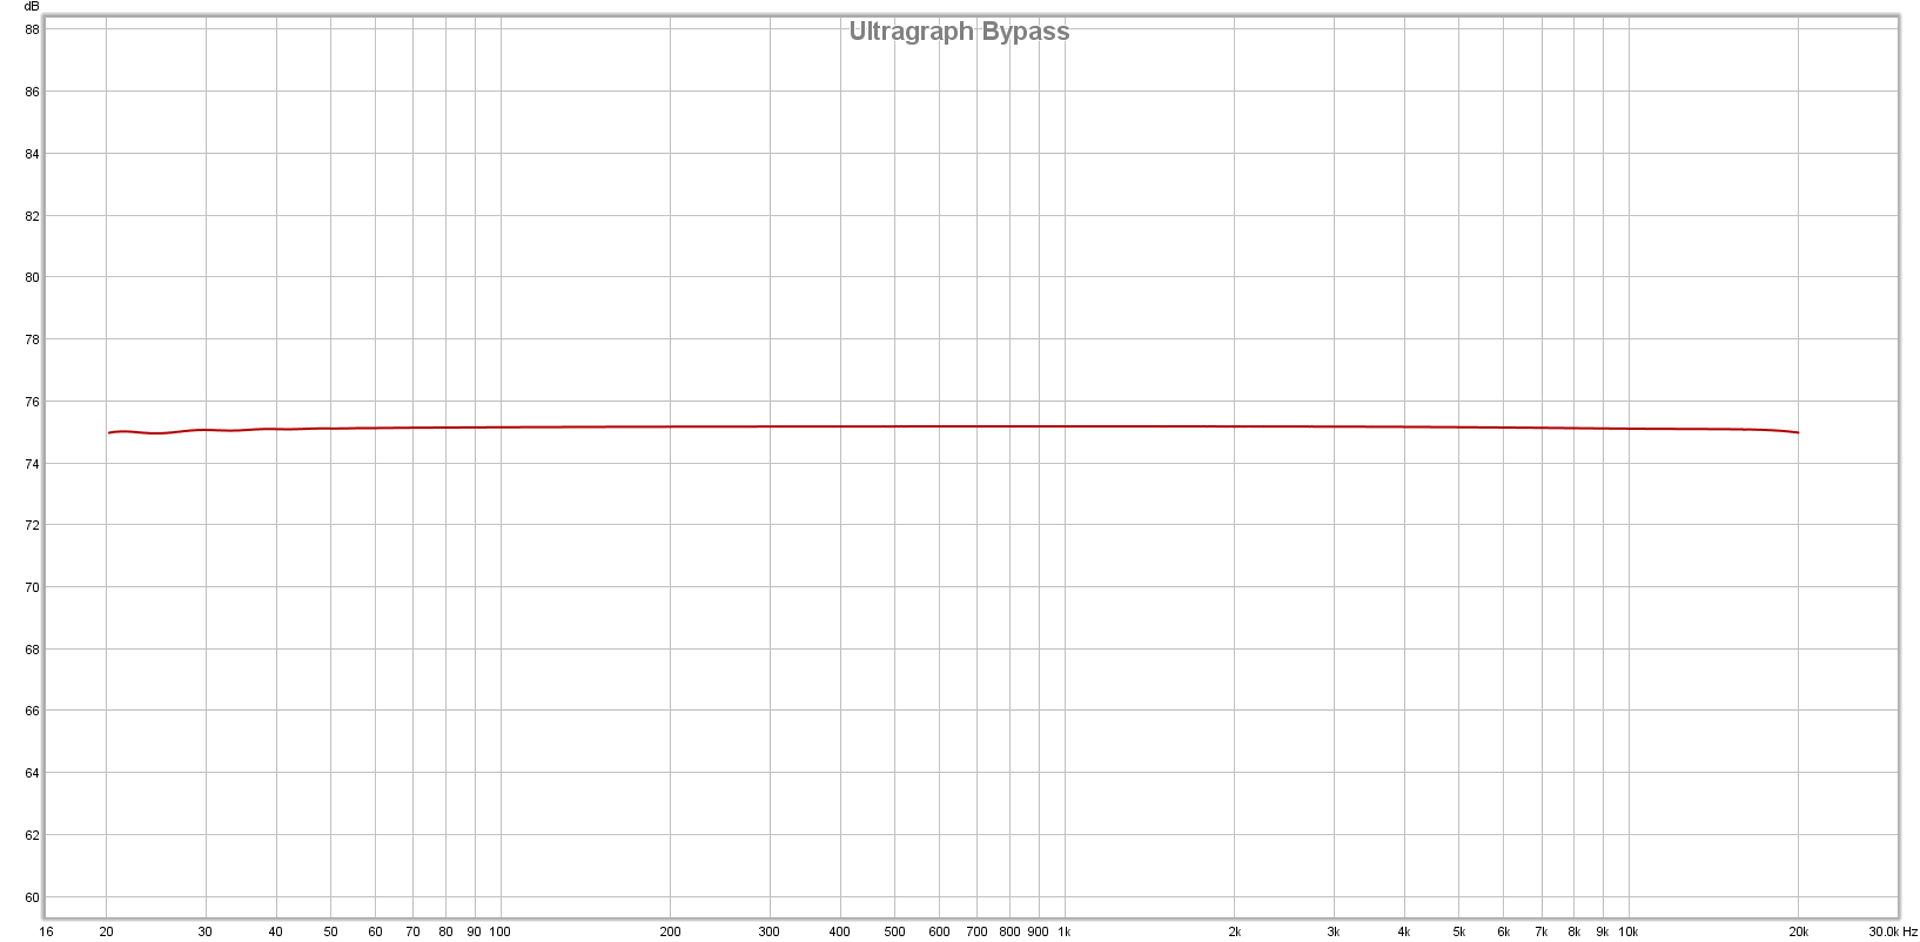
The first thing to look at is the “flat” state. When you set the processing to “out,” is it really out?

In this case, very much so. The trace is laser flat, with +/- 0.2 dB of change across the entire audible spectrum. It’s indistinguishable from a “straight wire” measurement of my audio interface.

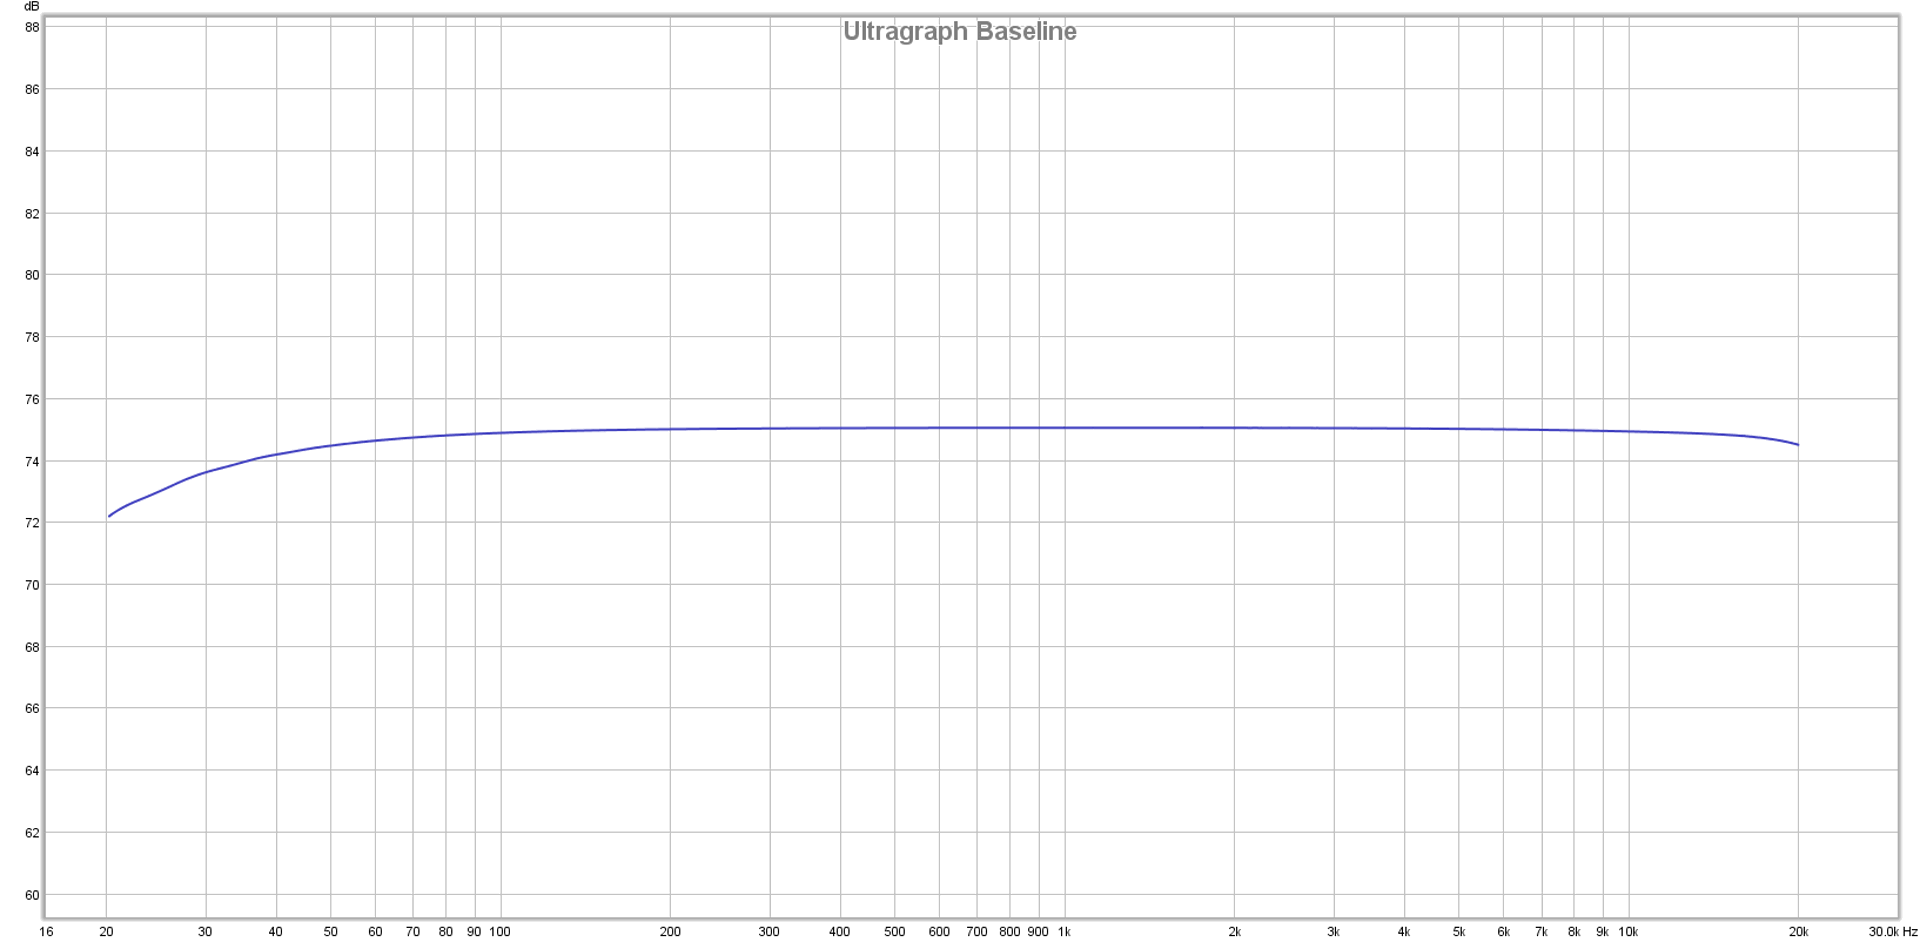
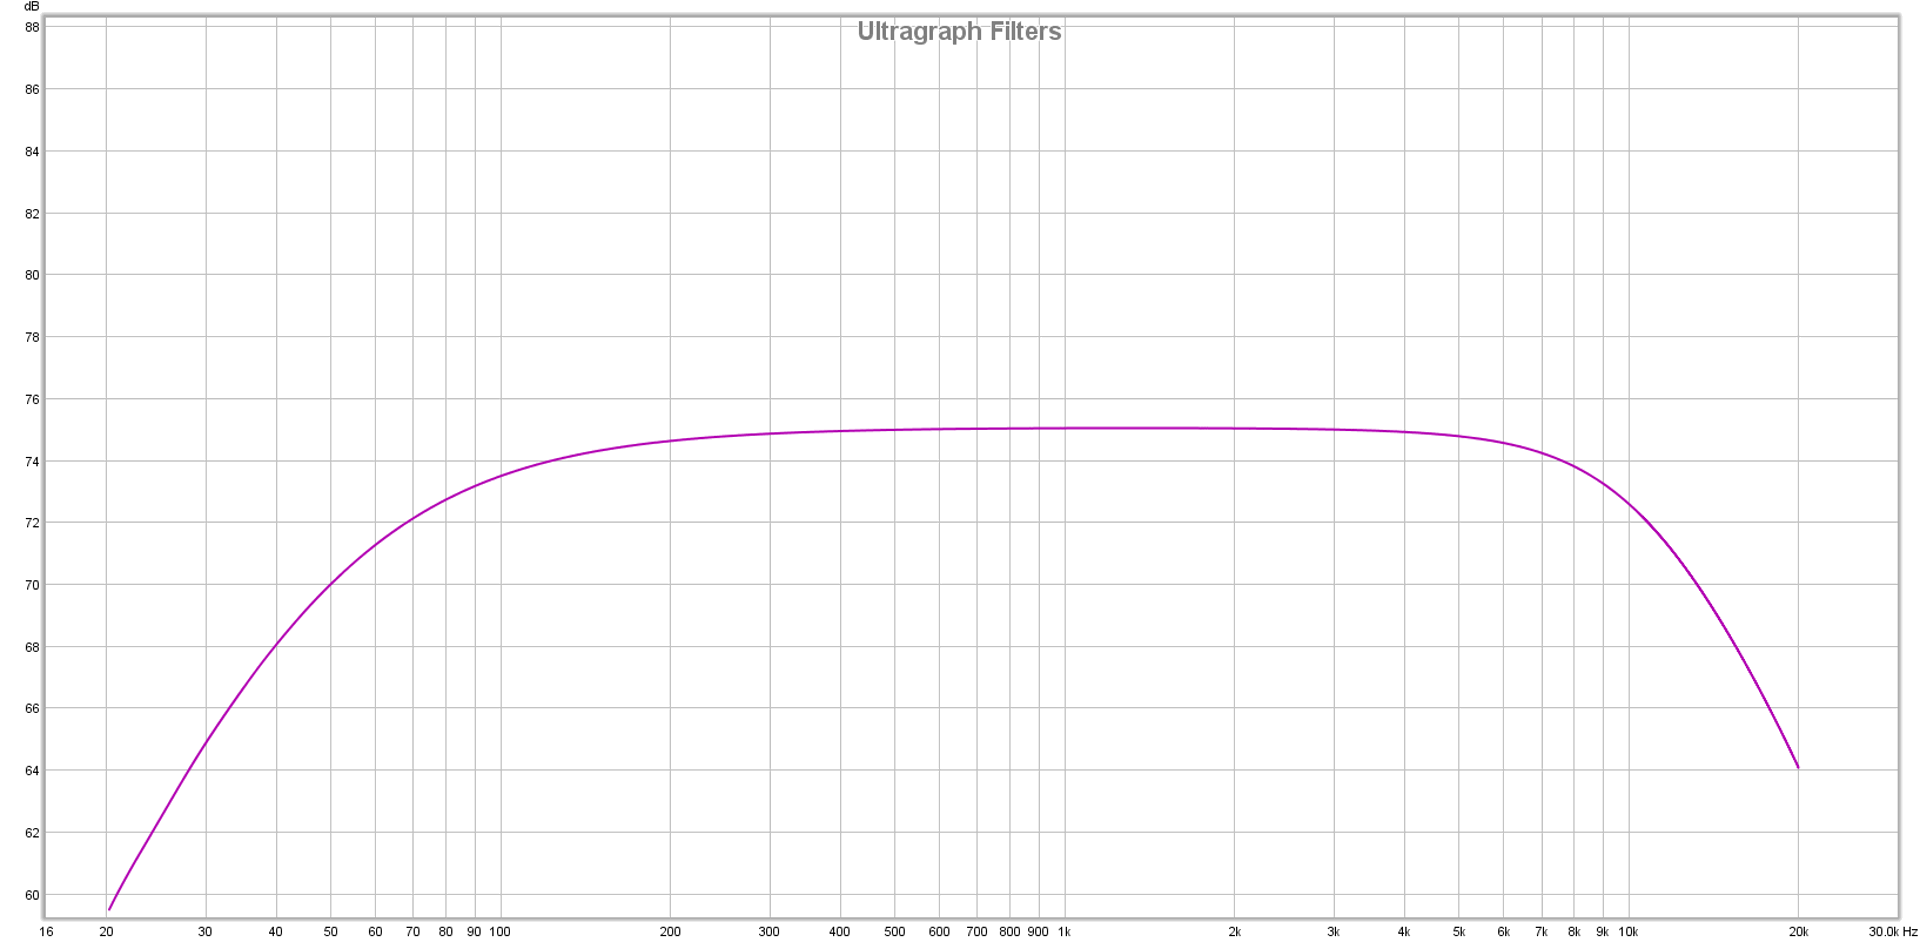
Now, we’ll allow audio to flow through the unit’s filtering, but with the high and low-pass filters swept to their maximums, and all the graph filters set to 0 dB.

The low and high-pass filters are still definitely having an effect in the audible range, though a minimal one. Half a decibel down at 45 Hz isn’t nothing, but it’s also pretty hard to hear.

What happens when the filters are swept to 75 Hz and 10 kHz?

The 3dB points are about where the labeling on the knobs tells you it should be (with a little bit of overshoot), and the filters roll off pretty gently (about 6 dB per octave).

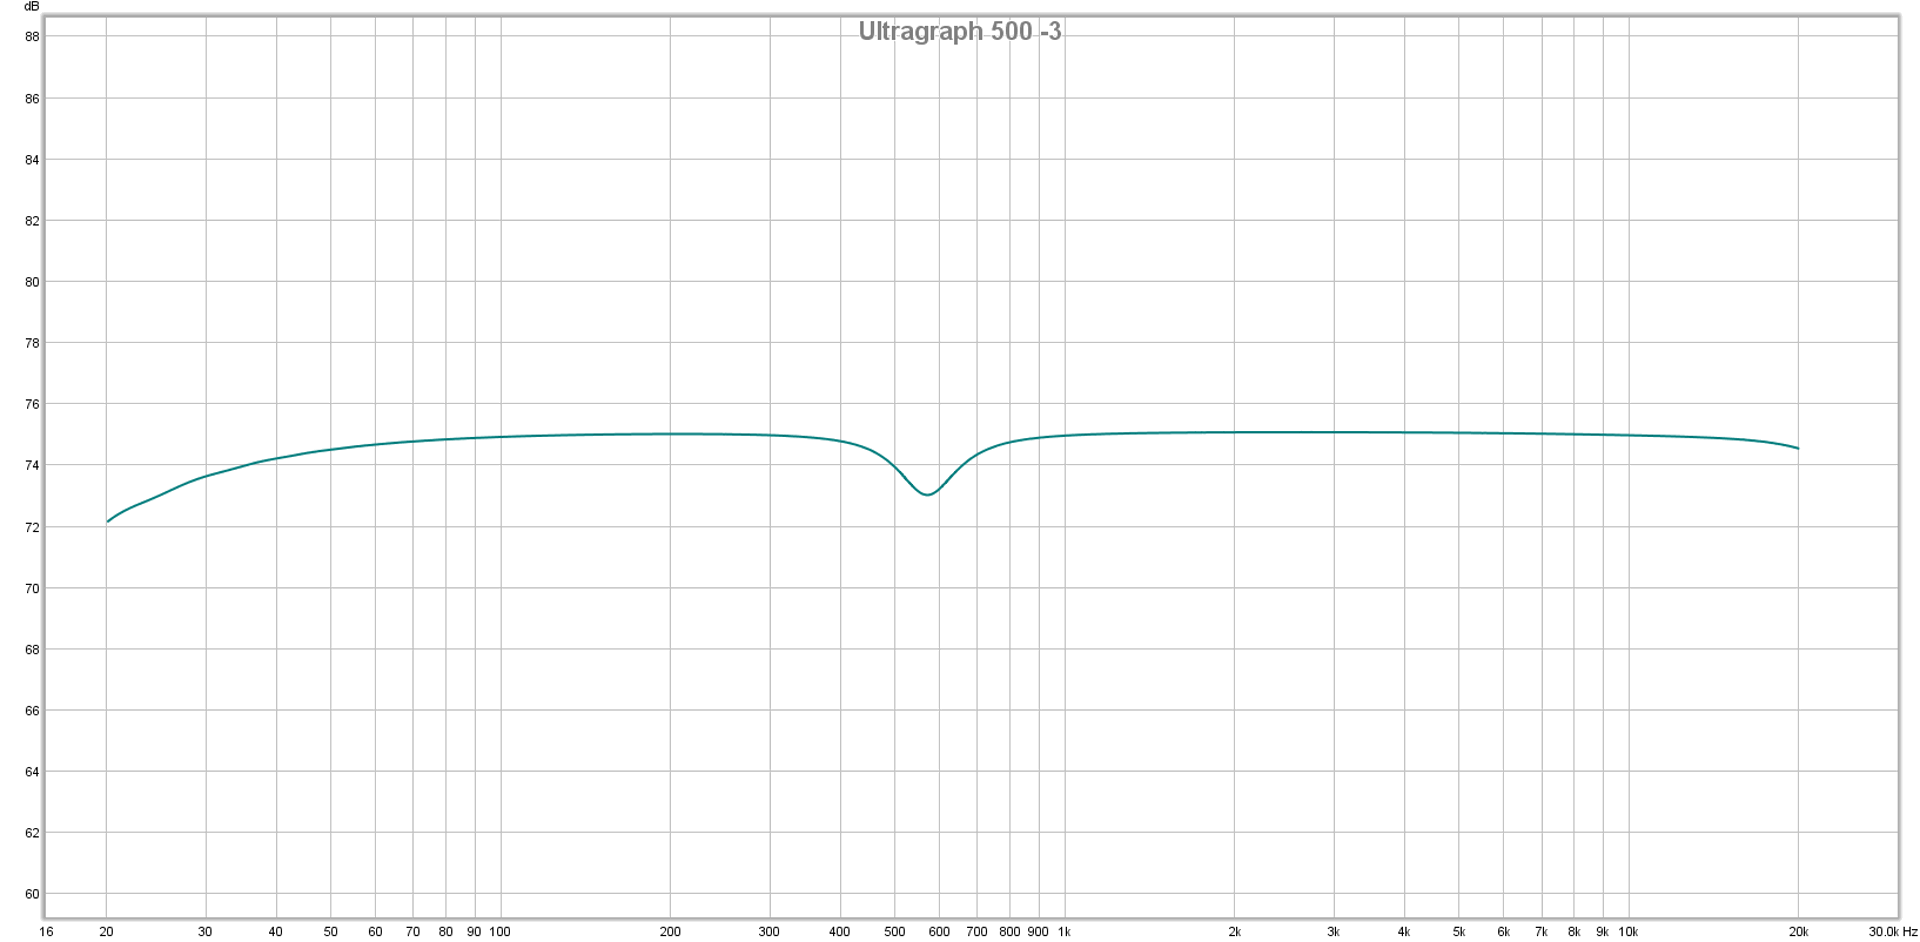
Let’s sweep the filters out again, and make a small cut at 500 Hz.

Interestingly, the filter doesn’t seem to be located exactly where the faceplate says it should be – it’s about 40% of a third-octave space away from the indicated frequency center, if the trace is accurate in itself.

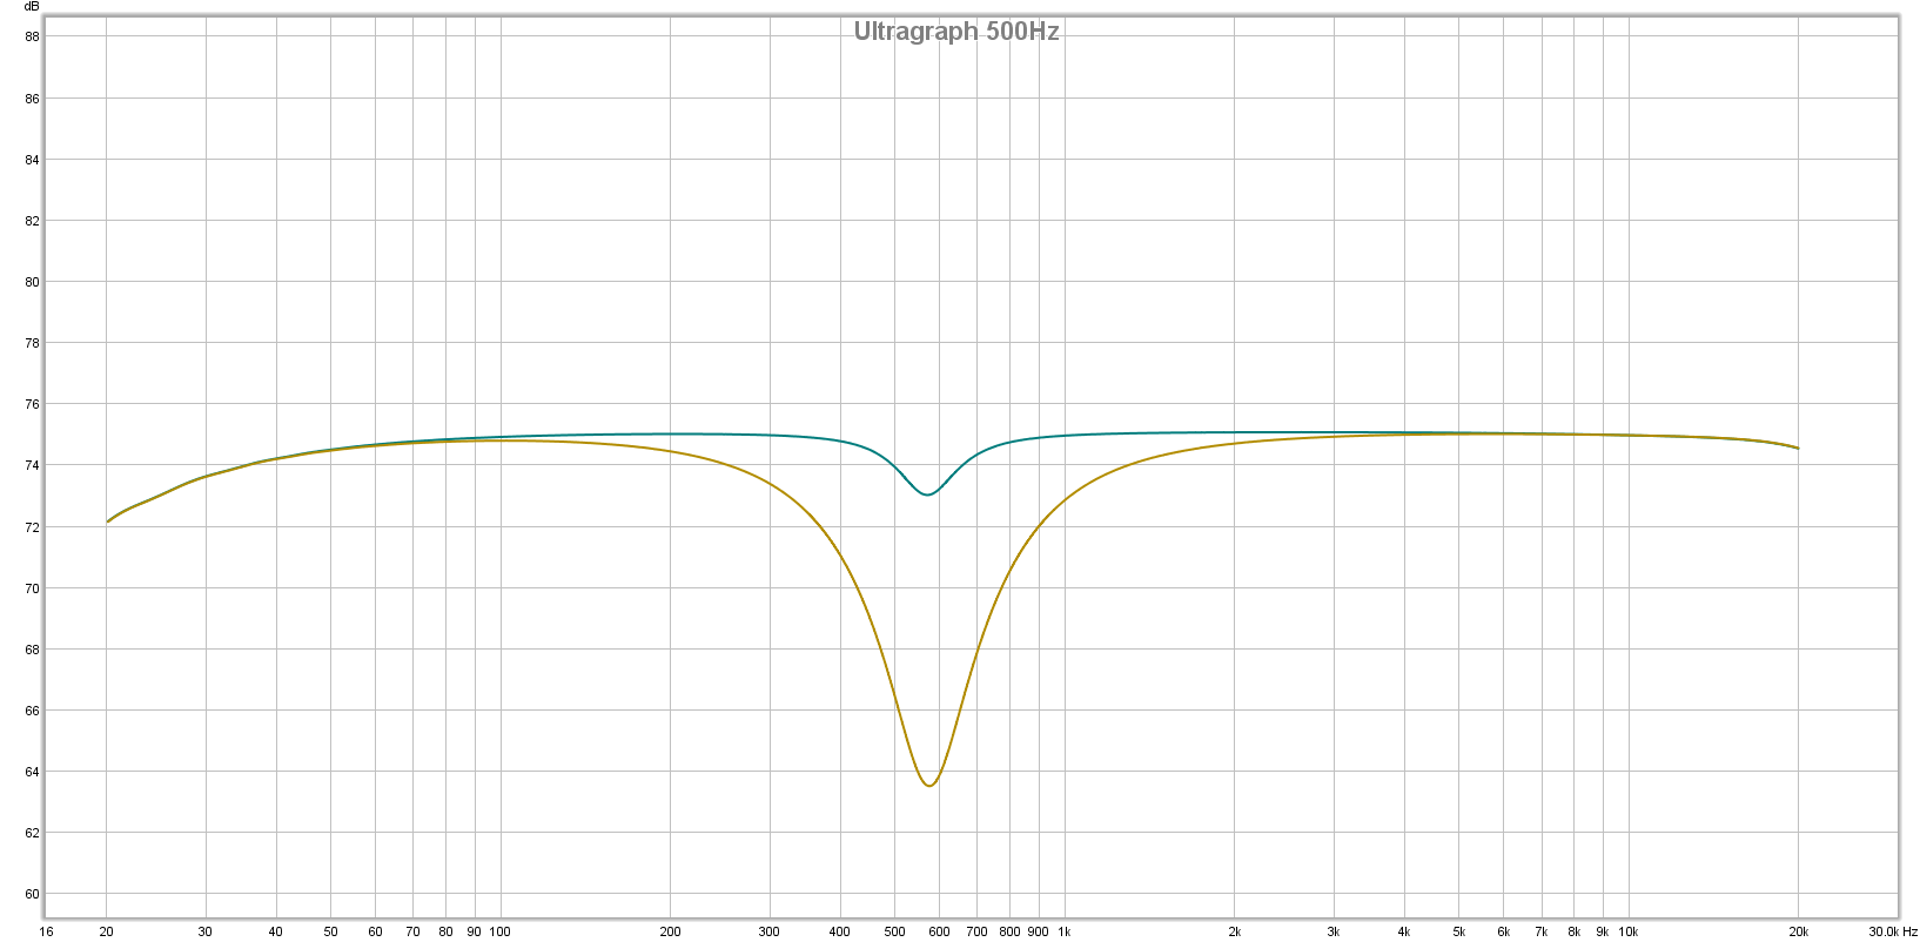
What if we drop the 500 Hz filter all the way down, and superimpose the new trace on the old one?

The filter might look a bit wider than what you expected, with easily measurable effects happening at a full octave below the selected frequency. Even so, that’s pretty selective compared to lots of wide-ranging, “ultra musical” EQ implementations you might run into.

What happens when we yank down two filters that are right next to each other?

There’s an interesting ripple between the cuts, amounting to a little bit less than 1 dB.

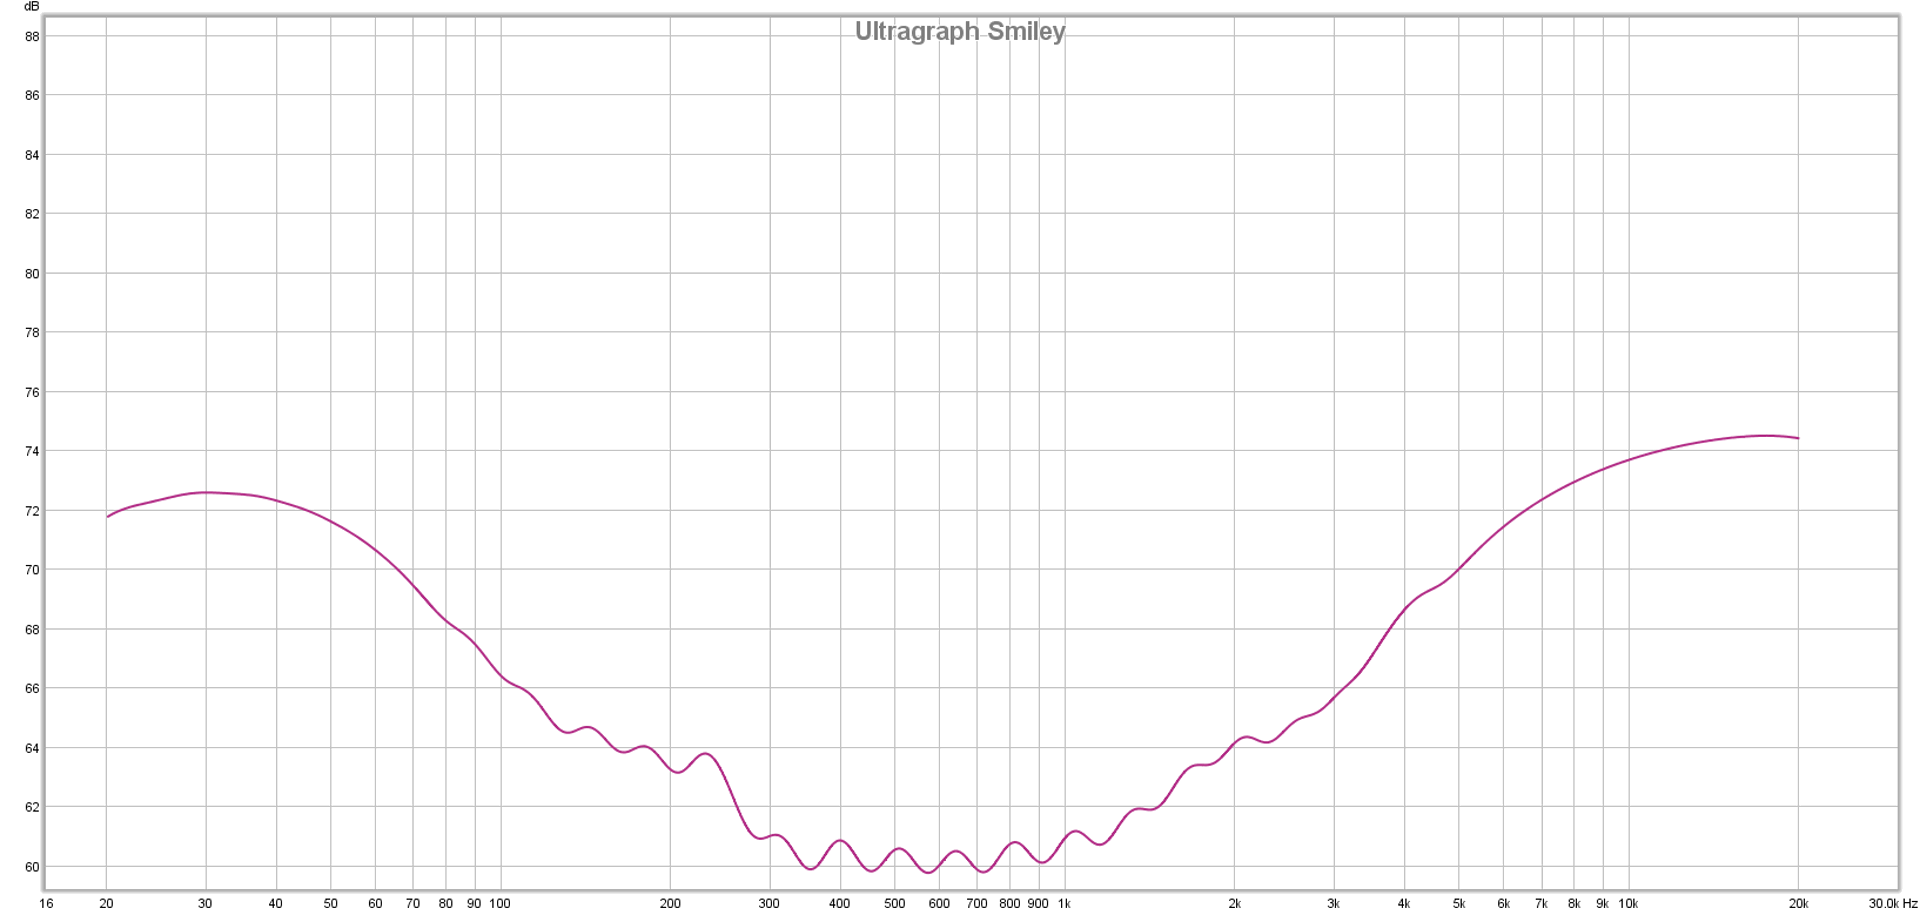
How about one of the classic graphic EQ abuses? Here’s a smiley-face curve:

Want to destroy all semblance of headroom in an audio system? It’s easy! Just kill the level of the frequency range that’s easiest to hear and most efficient to reproduce, then complain that the system has no power. No problem! :Rolls Eyes:

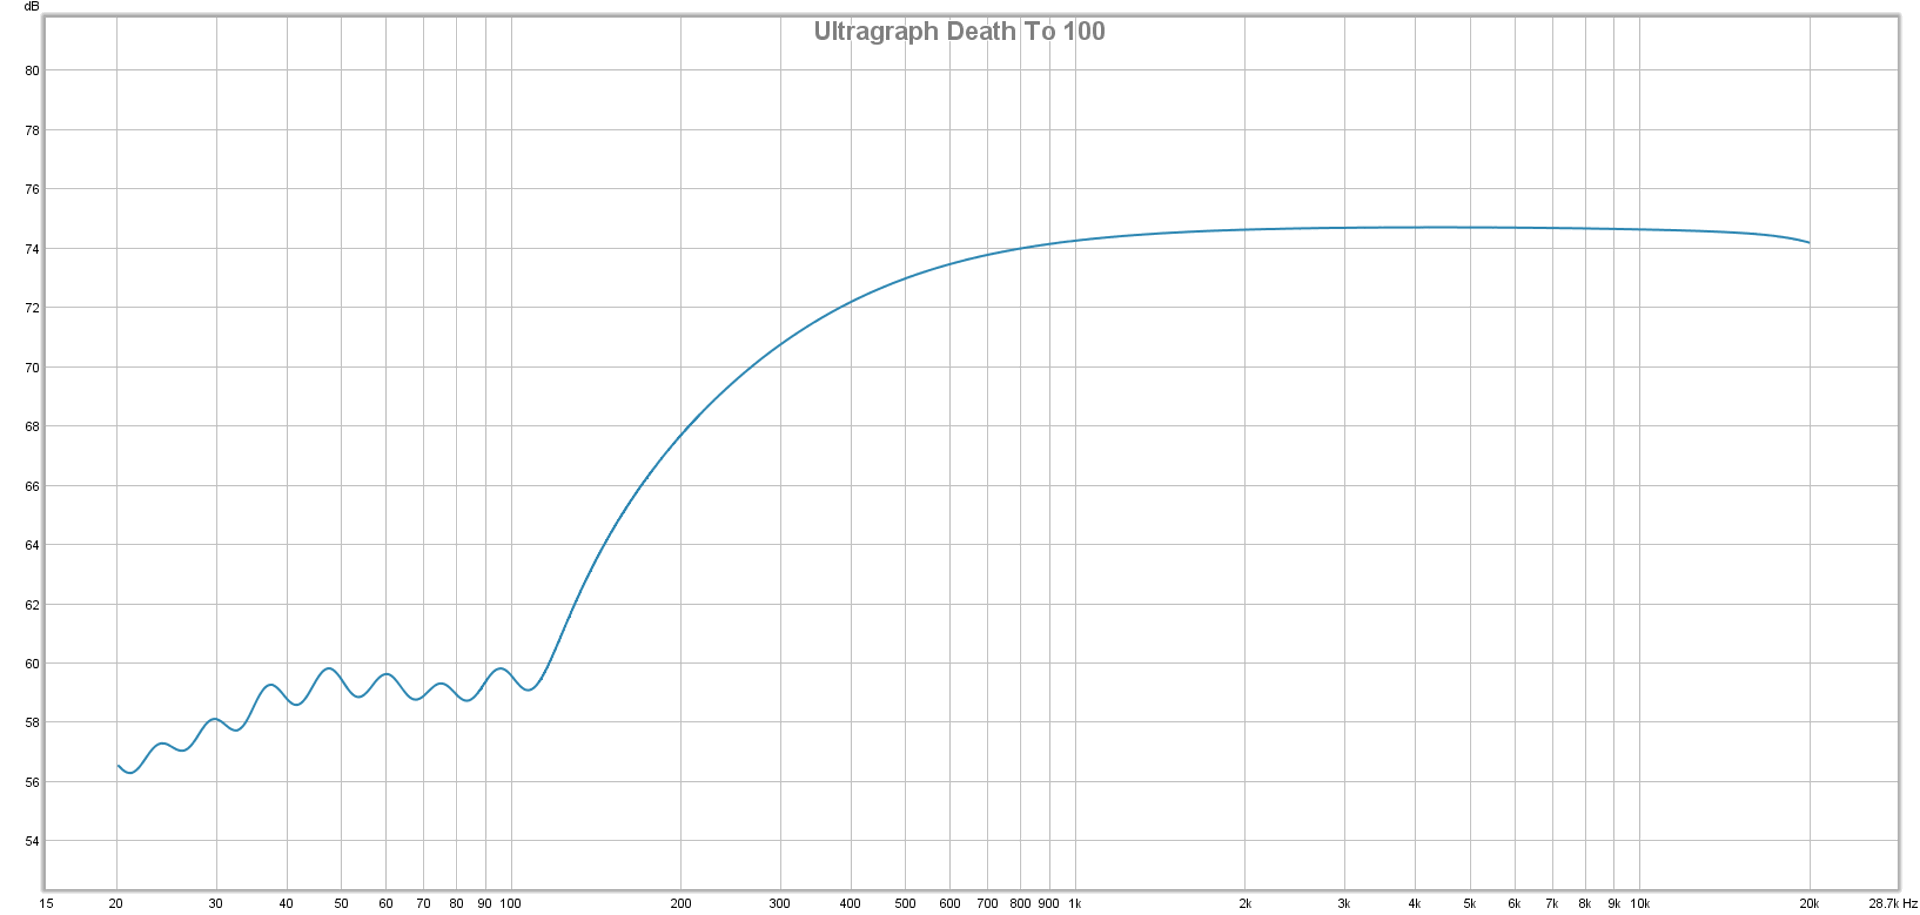
Here’s another EQ abuse, alternately called “Death To 100” or “I Was Too Cheap To Buy A Crossover:”

It could be worse, true, but…really? It’s not a true substitute for having the correct tool in the first place.