Tag Archives: Homebrew

The Lessons Of El Ridiculoso

Loudspeaker experiments are very educational.

Please Remember:

The opinions expressed are mine only. These opinions do not necessarily reflect anybody else’s opinions. I do not own, operate, manage, or represent any band, venue, or company that I talk about, unless explicitly noted.

Want to use this image for something else? Great! Click it for the link to a high-res or resolution-independent version.

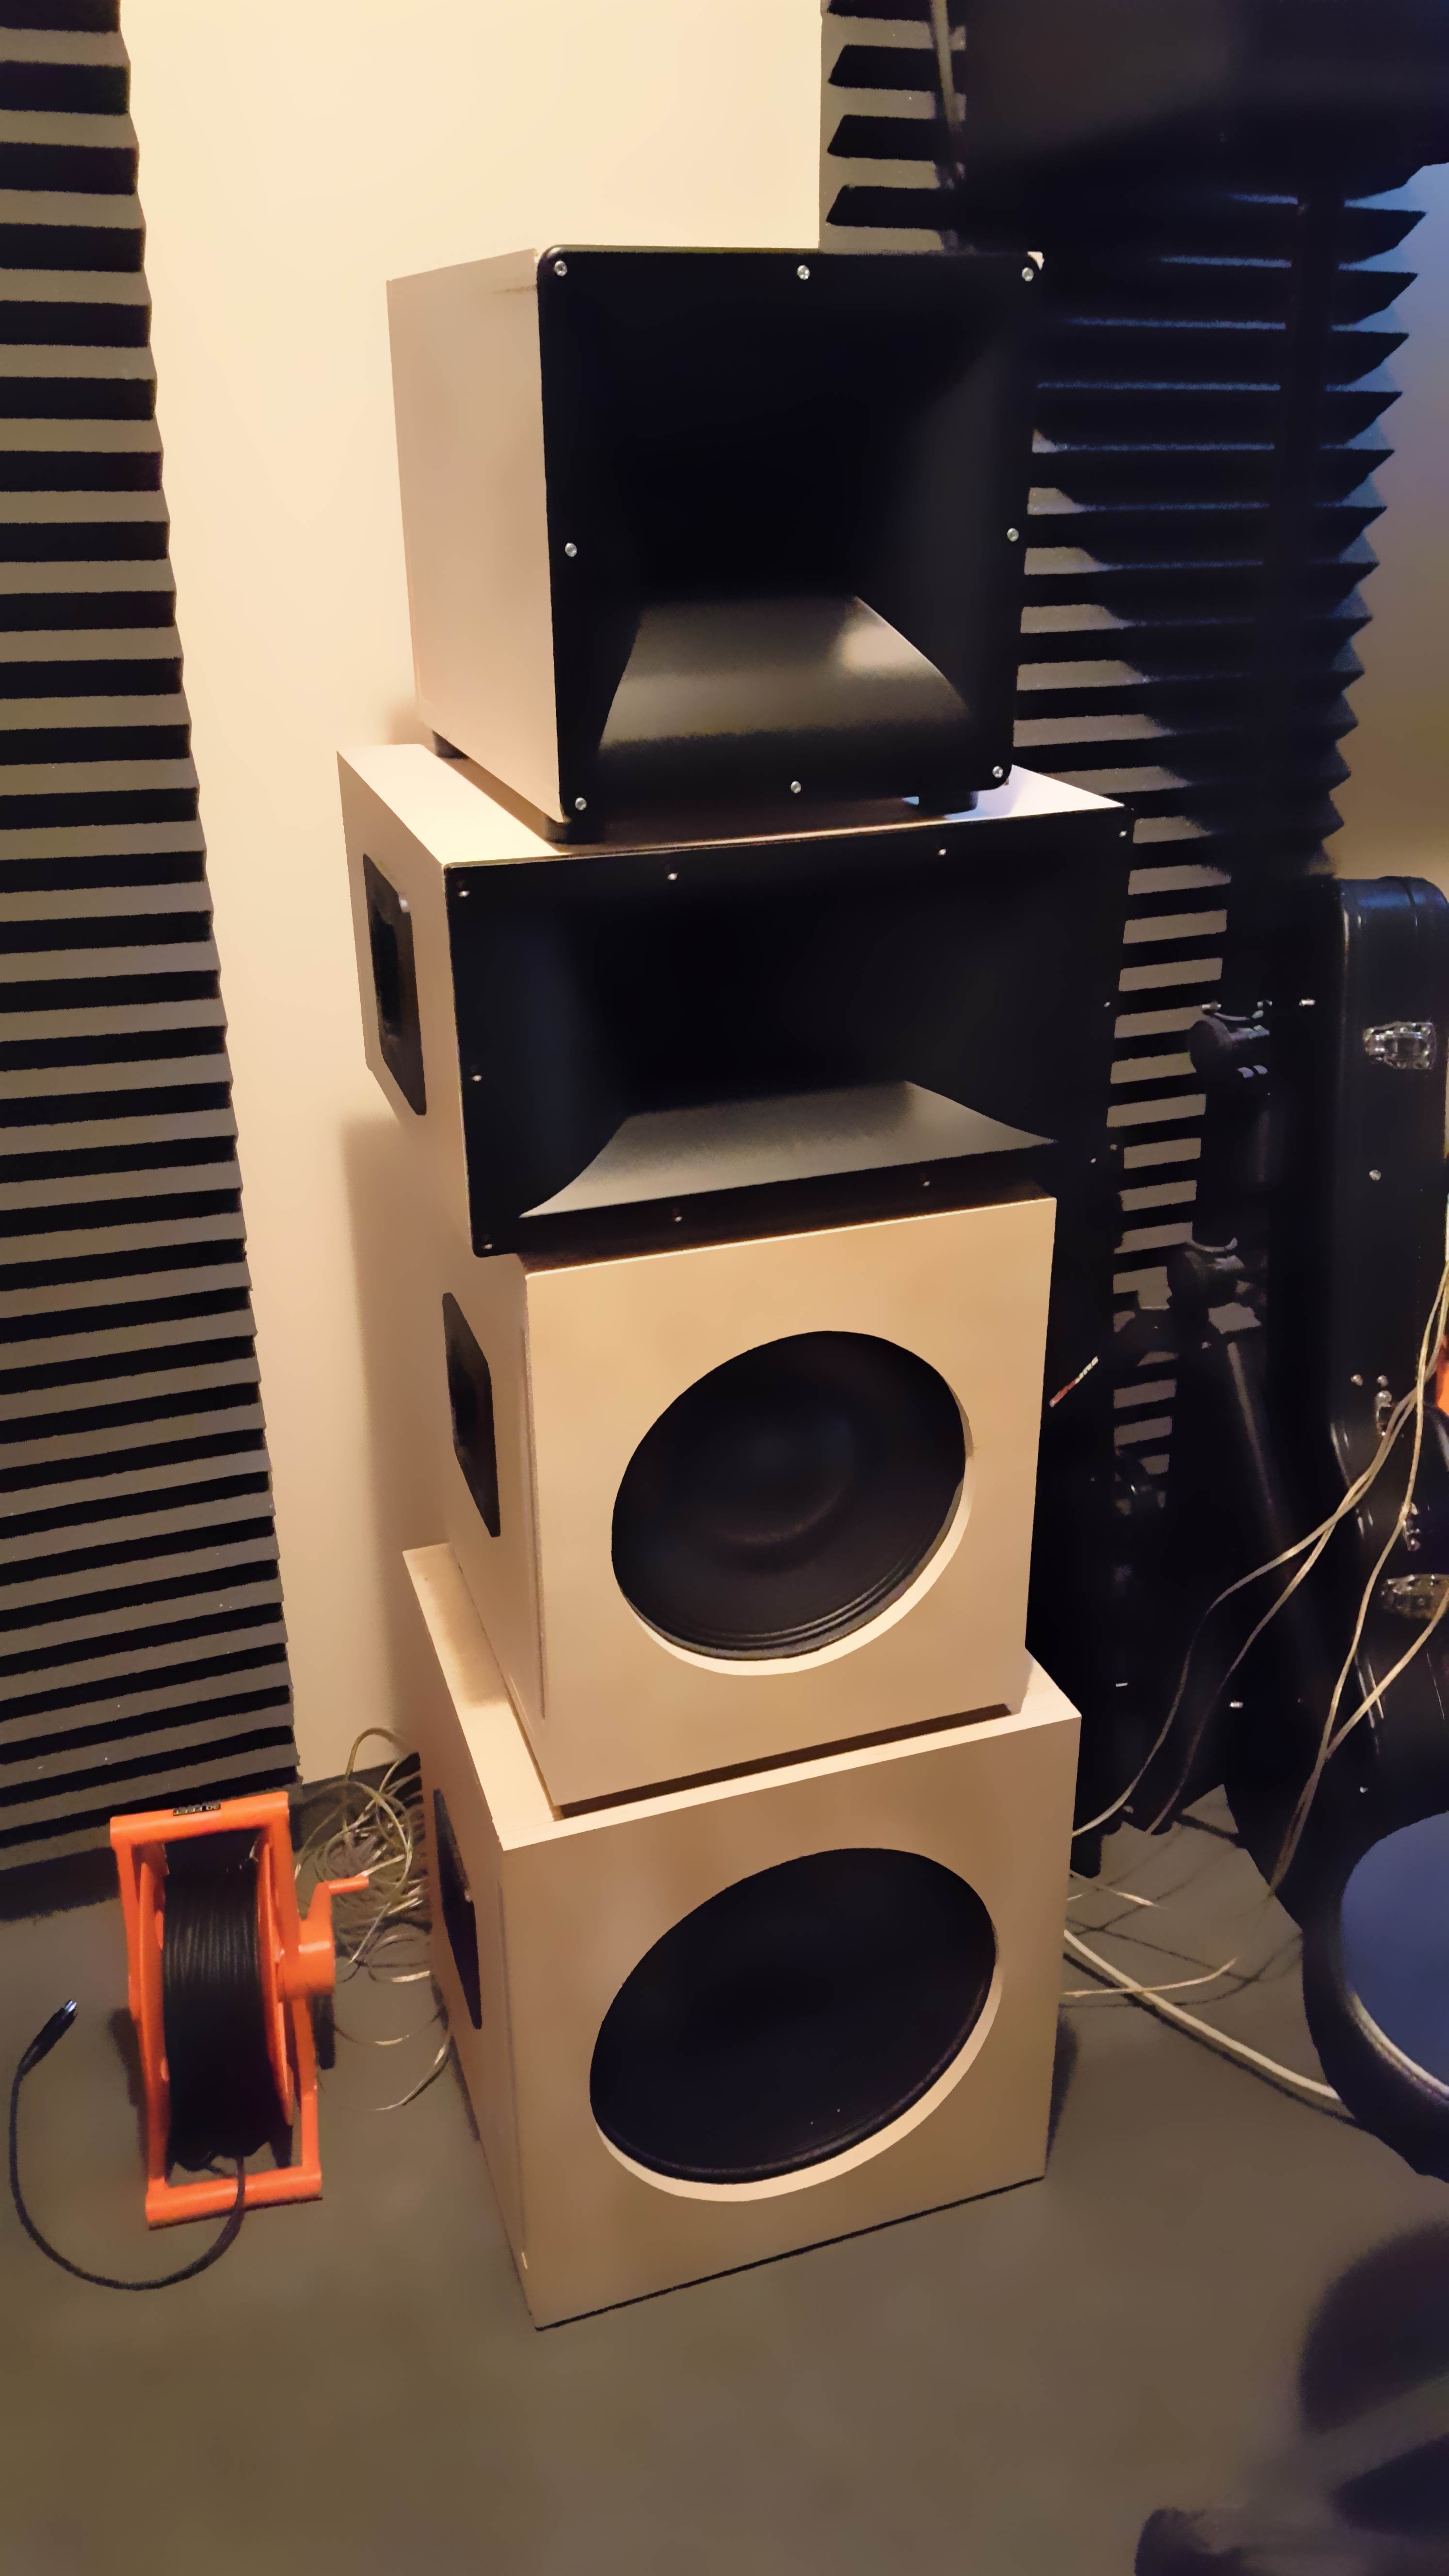
El Ridiculoso is an idea that’s been bumping around in my head – conceptualized in various morphologies – for years. With the help of the extravagantly cool Mario Caliguiri, who does custom woodworking out here in the high desert, the idea is now incarnated.

Inwoodnated.

Inwoodnated is a real word, because I made it up. All words are made up.

Anyway…

El Ridiculoso is a quad-amped monstrosity meant to go “pretty loud” (but not insanely loud) with 2300 watts of peak input creating about 131 dB of peak, 1 meter SPL. It is very definitely NOT meant to play down low. The conveniently-sized, sealed box for the 15″ driver starts rolling off somewhere around 75 Hz, and really, El Ridiculoso is supposed to be used with subwoofers carrying everything up to 100 Hz anyway. (Sealed boxes are easier to build, and generally pretty forgiving. You can “fudge” the internal volume a bit and still have the whole driver-and-box system work pretty well.)

A few days ago, I got to hook amplifiers up to the boxes and hear them make noise. I found the experience to be rather educational in a few areas.

If You Tune It By Ear You Will Probably Get It Wrong

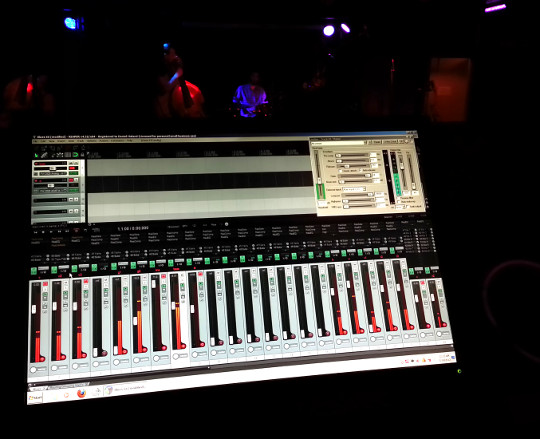
I set up an X32 mixing console to act as a four-way crossover: You downmix two channels to the main bus, and then send the main bus to matrices 1-4. (The matrices have crossover filters available to them if you have the right firmware upgrade in place.) Because I wouldn’t be working with subwoofers for the test run, I started off by putting the 15’s high-pass at 75 Hz, with the low-pass at 400 Hz. The 12 handled 400 – 1600, the big horn did 1600 – 6400, and the smaller horn took everything above that.

And, of course, I started out by playing music and pushing the different bandpass levels around.

I ended up with an overall sound that was reasonably pleasing, but somewhat tubby (or resonant) at certain bass frequencies. I wondered if the 15’s box was booming for some reason – maybe it was acting like a drum?

In any case, I decided it was time to do some measuring for a real, honest-to-goodness magnitude line-up of the boxes. As I started running sweeps and making adjustments, one thing became VERY clear: Tuning the system by ear had sent me way off course. In some cases, 10+ dB off course. (!)

A Basic Bandpass Magnitude Alignment Fixes A Lot

When you’ve missed the mark as far as I had, information that should blend nicely with other information…doesn’t. You get things like overpowering bass notes, because the crucial midrange just isn’t there to balance it all out. I was actually pretty stunned at just how much better the stack sounded with all the boxes in basically the right place, volume-wise. The music I was playing suddenly started to have the tonal characteristics I’d grown used to from listening at home.

This was without any corrective EQ, which is what I worked on next.

Going through and getting a fine-detail equalization solution certainly changed things, but the difference was not nearly as pronounced as what had happened before. This surprised me as well. I had expected that applying the “make-em-really-flat” solution would result in a massive change in clarity, but really, we were most of the way there already.

Large Horns Make Large Noise

I discovered rather quickly that sitting with my head right up against the 2″ driver-exit horn was unpleasant. The amount of noise that thing can make is impressive. The matrix feed to that bandpass ended up being 12 dB down from everything else, and I still preferred being across the room. I’ve known for years – at an academic level – that 2″ exit compression drivers are used when you need to tear faces off, but this was the first time that I even got a whiff of what they’re really capable of.

Awesome But Impractical

Playing with El Ridiculoso is a great treat, but I can’t imagine getting three more built for regular gigs. For a start, they’re relatively complicated to set up, because all the bandpasses are in separate enclosures…and there are four bandpasses per speaker system. Big-boy loudspeakers might have three bandpasses, but they package them all into a single cabinet. Plus, you usually get one Speakon connector which you can use to mate all your power channels to all your drivers in one click. El Ridiculoso needs four separate connections to work.

Add to that the need for subwoofers in many cases, and now you’ve got a five-way system. Then you have to add all the amplifiers necessary, and all the crossovers/ system management, which results in a pretty hefty drive rack or two. Then you have to add all the speaker cable. You end up spending a lot of money, and a lot of weight, just to make the things work.

And, the only way to get them up in the air is scaffolding, or stacking them on a big pile of subs.

In the end, a compact, ultra-engineered box from a major manufacturer really has the advantage. El Ridiculoso sure does have a lot of “cool factor” as an exotic idea, but a good, solid, self-powered biamp unit will go just about as loud and require far less care and feeding to be day-to-day useful.

This doesn’t mean I’m sad about the experiment. I knew from the beginning that I wasn’t going to design a better mousetrap than every speaker manufacturer on the planet. What I wanted is what I got: A different implementation that I could use to get more hands-on understanding of how these things work.


Case Study: Creating A Virtual Guitar Rig In An Emergency

Distortion + filtering = something that can pass as a guitar amplifier in an emergency.

Please Remember:

The opinions expressed are mine only. These opinions do not necessarily reflect anybody else’s opinions. I do not own, operate, manage, or represent any band, venue, or company that I talk about, unless explicitly noted.

Want to use this image for something else? Great! Click it for the link to a high-res or resolution-independent version.

The Video

The Script

Imagine the scene: You’re setting up a band that has exactly one player with an electric guitar. They get to the gig, and suddenly discover a problem: The power supply for their setup has been left at home. Nobody has a spare, because it’s a specialized power supply – and nobody else plays an electric guitar anyway. The musician in question has no way to get a guitar sound without their rig.

At all.

As in, what they have that you can work with is a guitar and a cable. That’s it.

So, what do you do?

Well, in the worst-case scenario, you just find a direct box, run the guitar completely dry, and limp through it all as best you can.

But that’s not your only option. If you’re willing to get a little creative, you can do better than just having everybody grit their teeth and suffer. To get creative, you need to be able to take their guitar rig apart and put it back together again.

Metaphorically, I mean. You can put the screwdriver away.

What I’m getting at is this question: If you break the guitar rig into signal-processing blocks, what does each block do?

When it comes right down to it, a super-simple guitar amp amounts to three things: Some amount of distortion (including no distortion at all), tone controls, and an output filter stack.
The first two parts might make sense, but what’s that third bit?

The output filtering is either an actual loudspeaker, or something that simulates a loudspeaker for a direct feed. If you remove a speaker’s conversion of electricity to sound pressure waves, what’s left over is essentially a non-adjustable equalizer. Take a look at this frequency-response plot for a 12″ guitar speaker by Eminence: It’s basically a 100 Hz to 5 kHz bandpass filter with some extra bumps and dips.

It’s a fair point to note that different guitar amps and amp sims may have these different blocks happening in different orders. Some might forget about the tone-control block entirely. Some might have additional processing available.

Now then.

The first thing to do is to find an active DI, if you can. Active DI boxes have very high input impedances, which (in short) means that just about any guitar pickup will drive that input without a problem.

Next, if you’re as lucky as I am, you have at your disposal a digital console with a guitar-amp simulation effect. The simulator puts all the processing I talked about into a handy package that gets inserted into a channel.

What if you’re not so lucky, though?

The first component is distortion. If you can’t get distortion that’s basically agreeable, you should skip it entirely. If you must generate your own clipping, your best bet is to find some analog device that you can drive hard. Overloading a digital device almost always sounds terrible, unless that digital device is meant to simulate some other type of circuit.
For instance, if you can dig up an analog mini-mixer, you can drive the snot out of both the input and output sides to get a good bit of crunch. (You can also use far less gain on either or both ends, if you prefer.)

Of course, the result of that sounds pretty terrible. The distortion products are unfiltered, so there’s a huge amount of information up in the high reaches of the audible spectrum. To fix that, let’s put some guitar-speaker-esque filtering across the whole business. A high and low-pass filter, plus a parametric boost in the high mids will help us recreate what a 12″ driver might do.
Now that we’ve done that, we can add another parametric filter to act as our tone control.

And there we go! It may not be the greatest guitar sound ever created, but this is an emergency and it’s better than nothing.

There is one more wrinkle, though, and that’s monitoring. Under normal circumstances, our personal monitoring network gets its signals just after each channel’s head amp. Usually that’s great, because nothing I do with a channel that’s post the mic pre ends up directly affecting the monitors. In this case, however, it was important for me to switch the “monitor pick point” on the guitar channel to a spot that was post all my channel processing – but still pre-fader.

In your case, this may not be a problem at all.

But what if it is, and you don’t have very much flexibility in picking where your monitor sends come from?

If you’re in a real bind, you could switch the monitor send on the guitar channel to be post-fader. Set the fader at a point you can live with, and then assign the channel output to an otherwise unused subgroup. Put the subgroup through the main mix, and use the subgroup fader as your main-mix level control for the guitar. You’ll still be able to tweak the level of the guitar in the mix, but the monitor mixes won’t be directly affected if you do.


Why I Think Steam Machines Are Cool

My audio-human mind races when thinking of high-performance, compact, affordable machines.

Please Remember:

The opinions expressed are mine only. These opinions do not necessarily reflect anybody else’s opinions. I do not own, operate, manage, or represent any band, venue, or company that I talk about, unless explicitly noted.

steamWant to use this image for something else? Great! Click it for the link to a high-res or resolution-independent version.

“Wait,” you’re thinking, “I thought this site was about live shows. Steam Machines are gaming devices.”

You’re right about that. What you have to remember (or just become aware of), is that I have a strange sort of DIY streak. It’s why I assembled my own live-audio console from “off the shelf” products. I really, really, REALLY like the idea of doing powerful things with concert sound via unorthodox means. An unorthodox idea that keeps bubbling up in my head is that of a hyper-customizable, hyper-expandable audio mix rig. It could be pretty much any size a user wanted, using pretty much whatever audio hardware a user wanted, and grow as needed. Also, it wouldn’t be too expensive. (About $900 per 16X16 channel “block.”)

When I look at the basic idea of the Valve Steam Machine, I see a device that has the potential to be a core part of the implementation.

But let’s be careful: I’m not saying that Steam Machines can do what I want right now. I’m not saying that there aren’t major pitfalls, or even dealbreakers to be encountered. I fully expect that there are enormous problems to solve. Just the question of how each machine’s audio processing could be conveniently user-controlled is definitely non-trivial. I’m just saying that a possibility is there.

Why is that possibility there?

The Box Is Prebuilt

The thing with prebuilt devices is that it’s easier for them to be small. A manufacturer building a large number of units can get custom parts that support a compact form factor, put it all together, and then ship it to you.

Of course, when it comes to PCs, you can certainly assemble a small-box rig by hand. However, when we’re talking about using multiple machines, the appeal of hand-building multiple boxes drops rapidly. So, it’s a pretty nice idea that a compact but high(er) performance computing device can be gotten for little effort.

The System Is Meant For Gaming

Gaming might seem like mere frivolity, but these days, it’s a high-performance activity. We normally think of that high-performance as being located primarily in the graphics subsystem – and for good reason. However, I also think a game-capable system could be great for audio. I have this notion because games are so reliant on audio behaving well.

Take a game like a modern shooter. A lot of stuff is going on: Enemy AI, calculation of where bullets should go, tracking of who’s shooting at who, collision detection, input management, the knowing of where all the players are and where they’re going, and so on. Along with that, the sound has to work correctly. When anybody pulls a trigger, a sound with appropriate gain and filtering has to play. That sound also has to play at exactly the right time. It’s not enough for it to just happen arbitrarily after the “calling” event occurs. Well-timed sounds have to play for almost anything that happens. A player walks around, or a projectile strikes an object, or a vehicle moves, or a player contacts some phsyics-enabled entity, or…

You get the idea.

My notion is that, if the hardware and OS of a Steam Machine are already geared specifically to make this kind of thing happen, then getting pro-audio to work similarly isn’t a totally alien application. It might not be directly supported, of course, but at least the basic device itself isn’t in the way.

The System Is Customizable

My understanding of Steam Machines is that they’re meant to be pretty open and “user hackable.” This excites me because of the potential for re-purposing. Maybe an off-the-shelf Steam Machine doesn’t play nicely with pro-audio hardware? Okay…maybe there’s a way to take the box’s good foundation and rebuild the upper layers. In theory, a whole other OS could be runnable on one of these computers, and a troublesome piece of hardware might be replaceable (or just plain removable).


I acknowledge that all of this is off in the “weird and theoretical” range. My wider goal in pointing it out is to say that, sometimes, you can grab a thing that was intended for a different application and put it to work on an interesting task. The most necessary component seems to be imagination.


Experiments Are For Discovery

Don’t do experiments to save money. Do experiments to learn things and get maximum ownership.

Please Remember:

The opinions expressed are mine only. These opinions do not necessarily reflect anybody else’s opinions. I do not own, operate, manage, or represent any band, venue, or company that I talk about, unless explicitly noted.

If you yourself aren’t crazy enough to want to build your own amplifier, or construct your own loudspeaker, I’m betting that you know somebody who does. Hey, you know me, and I built my own digital mixing console. That’s pretty “out there” for most audio folks.

The reason people get these bats in their belfries is because building things is fascinating. You get to figure out what actually makes audio gear work – you get a hands-on trip through the actual tradeoffs that industry designers have to handle.

That’s the point of doing experiments: Learning something.

I’ve seen something unfortunate surrounding these endeavors, though. There’s a tendency for people to get into these projects solely for the purpose of trying to save money. When they discover (in one way or another) that doing an experiment is highly likely to actually cost more than buying a finished project, they bail out. Any excitement they had is completely wrecked.

It’s sad, really.

Makin’ Sawdust

It’s pretty easy for folks to get taken in by websites promising that you can build a superior loudspeaker for less than what it costs to buy one outright. The problem with the assertion is that it forces a lot of assumptions onto both the builder and the project:

  • It assumes that the builder knows how to use the necessary tools.
  • It assumes that the builder has the tools handy, or can obtain them for little cost.
  • It assumes that the tradeoffs made in the project design to allow for inexpensive components are well-understood by the builder.

On that last point, there’s one site for speaker enclosure plans that repeatedly touts how the designs outperform far more expensive models. The thing is that the supplied designs DO outperform their commercial counterparts – but only in one area. The DIY speakers are great if you want to get the maximum per-watt output available from inexpensive drivers, but not so great if you want deep LF (low frequency) extension and consistent overall response.

Once you couple the above with having to buy your own tools and deal with your own construction mistakes, you’ve pretty much burned any monetary advantage you might have had. There’s also the whole problem of how amplification and processing costs have dropped like a rock…as long as those components have been engineered into the actual speaker enclosure. If not, you have to provide that externally, which further drives up the cost of your homebrew project.

Now, sure, you might be able to find a sweet-spot where you can build a box with higher-end parts at a good price. If you’re not trying to maximize profit, and you’re willing to ignore the effective cost of your own labor, then you just might manage to save a few bucks in some way. It’s all just a game of moving the numbers around, though, where you can conveniently sweep certain costs under the perceptual rug.

That’s why “doing it cheaper” shouldn’t be the goal. The goal should be to have fun, learn something about woodworking, get a feel for what works and doesn’t in loudspeaker design, and ultimately have something in your hands where you can say, “I MADE this.” That’s where the real value is – and that value is far in excess of the few bucks you might save if you get lucky.

Console Yourself

Get it? “Console” yourself? It’s a play on…anyway.

In a purely “cash” sense, I did effectively save some money by building my own mixing system. To get fundamentally equivalent functionality and I/O, I would have had to spend about $1000 more than what the build cost. However, it’s important to point out that other, no less important expenses had already been made.

I already knew about the construction, care, and feeding of DAW computers.

I already knew enough about computers in general to be my own tech support.

I already knew enough about signal flow that I could effectively set up my own console configuration.

I already had enough overall experience to know what I wanted, and be able to actually leverage the advantages of the system.

I already had a spare console if something went wrong.

The value of all that goes beyond $1000. Several times over.

Again, though, that’s not the point of building your own digital console. The point is that you get to have a rig that’s truly yours – that you’re responsible for. You get to pick the compromises that you’re willing or not willing to make. You get to be the “proud parent.” You get to discover what it’s actually like to run a system with a custom front-end.

There was a time when pro-audio gear was something that you essentially had to construct yourself. It wasn’t a commoditized industry like it is now. These days, though, economies of scale make it vastly cheaper to buy things off the shelf when compared to doing your own build.

As a result, you shouldn’t do DIY experiments to save money. You should do them because they’re awesome.


UI Setup For A Custom Console

When setting up your own console layout, usability and easy access are key considerations.

Please Remember:

The opinions expressed are mine only. These opinions do not necessarily reflect anybody else’s opinions. I do not own, operate, manage, or represent any band, venue, or company that I talk about, unless explicitly noted.

This video is an overview of the major tips, tricks, and tactics involved in setting up a software console interface for live-audio. Building your own console layout from scratch can be a bit challenging, but it also allows you a LOT of freedom.

Also, if you’re using Reaper (or have software that allows custom track icons), you can download my “number” icons here.


Why I Left SAC

I switched to Reaper from SAC because I wanted more flexibility to define my own workflow.

Please Remember:

The opinions expressed are mine only. These opinions do not necessarily reflect anybody else’s opinions. I do not own, operate, manage, or represent any band, venue, or company that I talk about, unless explicitly noted.

If you know me, you know that I’m a HUGE fan of my custom-built digital console. It has routing flexibility like nothing else I’ve ever worked with, is far less subject to the whims of manufacturers, and generally lets me do things that are difficult or even impossible with other setups.

What you may not know is that I didn’t always use Reaper as the main software package. I started off with SAC. I was actually very happy with SAC for a while, but the “bloom came off the rose” after a few frustrations popped up.

Don’t Get Me Wrong! SAC Is Rad

I won’t lie. I’m going to be pretty tough on SAC in this article.

The point isn’t to bash the program though.

Software Audio Console is a really neat, purpose-built labor of love. If nothing else, it shows that a reliable, live-sound-capable console can be run on a general-purpose computing platform. It has some great features and concepts, not the least of which is the “separate monitor console for each performer” workflow. That feature, coupled with integrated remote-control support, can potentially be VERY killer for the tech that works for professional bands who carry their own production. (Set everybody up with a remote, let ’em mix their own monitors, you run FOH, and life is dandy. Well, until one of the players causes a massive feedback spike. Anyway…)

SAC is efficient. SAC’s overall control scheme is great for live-audio, most of the time. SAC is stable and trouble free. SAC has very usable snapshot management. Using ASIO4All as a separate driver, I was able to use SAC for live mixing and Reaper for recording, with Reaper effectively running in the background.

SAC is a good piece of software.

If there’s any problem with SAC, it’s that the program is overly influenced by its developer’s (Bob Lentini) personal preferences and workflow. If you want something markedly different, you’re out of luck.

It Started With An EQ

I’m a massive fan of Reaper’s native EQ plug. The only thing it’s missing is variable slope for the high and low pass filters. I honestly don’t know why anyone would want to buy an expensive, annoyingly copy-protected EQ plugin when Reaper’s EQ is so powerful.

Yup. I’m a bit of a fanboy. Not everyone may share my opinion.

Anyway.

Wanting to use Reaper’s EQ with SAC is what quickly revealed a “blind spot” with SAC’s workflow. I found out that adding FX to a channel was a bit clumsy. I also found out that manipulating FX on a channel was almost horrific.

To instantiate FX on a SAC channel, you have to find the FX control, click on it to get the channel FX chain to pop up, then use an un-filterable list of all available FX to find the one you want, click “Add,” and hope that you’ve gotten the chain order right.

If you didn’t get the order of the chain right, you have to de-instantiate one of the plugs and try again.

In Reaper, plugin instantiation can happen by clicking the insert stack, picking a plug from a filterable and customizable list, and…that’s it. If you got the plugin in the wrong spot, you can just drag it into the right one.

That may not seem like a huge difference, but the annoyance factor of SAC’s clumsiness accumulates greatly over time.

On the live-manipulation side, Reaper is leaps and bounds ahead. If I need to tweak an EQ on the fly (which happens every show, many times), all I have to do is click on the EQ plug in the stack. Immediately, the EQ pops its UI into view, and I can get to work.

In SAC, on the other hand, I have to (again) find the FX control, click to open the channel FX list, find the EQ, then double-click on it in the list to get the GUI to display. A few extra clicks might not seem like much, but this truly becomes a very awkward slog in a big hurry. In fairness, SAC does have a channel EQ that is VERY much more immediate, but what that ended up forcing me to do was to run my beloved plug as a “basic” EQ, and use the channel EQ for everything else. I’m not bothered by complexity, but unnecessary complexity IS something that I dislike.

There’s also SAC’s stubborn refusal to recognize that drag-and-drop is totally “a thing” now. In Reaper, I can drag plugins and sends between channels. In SAC, you can’t drag anything to any other channel. You can drag channels into a different order, but it’s not simple to do. (Some more unnecessary complexity). In general, dragging things around and multiselecting in Reaper works exactly as you would expect, whereas SAC tends to be VERY finicky about where your mouse cursor is and what modifier key you’re using.

Artificial Scarcity and Workflow Lock-In

In a number of ways, SAC aims to provide a “crossover experience” to techs who are used to physical consoles. This is absolutely fine if it’s what you want, but going this route has a tendency to reduce flexibility. This loss of flexibility mostly comes from arbitrary limitations.

Most of these limitations have enough cushion to not be a problem. SAC’s channel count is limited to 72, which should be WAY more than enough for most of us in small-venue situations. With a SAC-specific workflow, six aux sends and returns are a lot more than I usually need, as are 16 groups and eight outputs.

The problem, though, is that you’re forced to adopt the workflow. Want to use a workflow that would require more than six sends? Tough. Want to use more than eight physical outputs on a single console? Too bad.

Again, there’s no issue if you’re fine with being married to the intended use-strategy. However, if you’re like me, you may discover that having a whole bunch of limited-output-count subconsoles is unwieldy when compared to a single, essentially unlimited console. You might discover that much more immediate channel processing access trumps other considerations. It’s a matter of personal preference, and the thing with SAC is that your personal preference really isn’t a priority. The developer has chosen pretty much everything for you, and if that’s mostly (but not exactly) what you want, you just have to be willing to go along.

Another “sort-of” artificial scarcity issue with SAC is that it’s built on the idea that multi-core audio processing is either unnecessary or a bad idea. The developer has (at least in the past) been adamant that multi-thread scheduling and management adds too much overhead for it all to be worth it. I’m sure that this position is backed up with factual and practical considerations, but here’s my problem: Multi-core computers are here to stay, and they offer a ton of available horsepower. Simply choosing to ignore all that power strikes me as unhelpful. I have no doubt that some systems become unreliable when trying to multiprocess audio in a pseudo-realtime fashion – but I’d prefer to at least have the option to try. Reaper let’s me enable multiprocessing for audio, and then make my own decision. SAC does no such thing. (My guess is that the sheer force of multi-core systems can muscle past the scheduling issues, but that’s only a guess.)

Where artificial scarcity REALLY reared its head was when I decided to try migrating from my favorite EQ to the “outboard” EQ plug included with SAC. I was happily getting it instantiated in all the places I wanted it when, suddenly, a dialog box opened and informed me that no more instances were available.

The host machine wasn’t even close to being overloaded.

I may just be one of those “danged entitled young people,” but it doesn’t compute for me that I should have to buy a “pro” version of a plugin just to use more than an arbitrary number of instances. It’s included with the software! I’ve already paid for the right to use it, so what’s the problem with me using 32 instances instead of 24?

I’m sorry, but I don’t get it.

There’s also the whole issue that SAC doesn’t offer native functionality for recording. Sure, I understand that the focus of the program is live mixing. Like the EQ plugin, though, I get really put-off by the idea that I HAVE to use a special link that only works with SAW Studio (which is spendy, and has to be purchased separately) in order to get “native” recording functionality.

Push Comes To Shove

In the end, that last point above was what got me to go over to Reaper. I though, “If I’m going to run this whole program in the background anyway, why not try just using it for everything?”

The results have been wonderful. I’m able to access critical functionality – especially for plugins – much faster than I ever could in SAC. I can pretty much lay out my Reaper console in any way that makes sense to me. I can have as many sends as I please, and those sends can be returned into any channel I please. I can chain plugins with all kinds of unconventional signal flows. I can have as many physical outputs on one console as the rig can handle.

In Reaper, I have much more freedom to do things my own way, and I like that.

As I’ve said before, SAC gets a lot of things right. In fact, I’ve customized certain parts of Reaper to have a SAC-esque feel.

It’s just that Reaper has the edge in doing what I want to do, instead of just doing what a single developer thinks it should do.


A Homebrew Upward Expander

You can make an upward expander with two signal lines, a gate, and a summing bus.

Please Remember:

The opinions expressed are mine only. These opinions do not necessarily reflect anybody else’s opinions. I do not own, operate, manage, or represent any band, venue, or company that I talk about, unless explicitly noted.

On Twitter, I was having a conversation with @GibsonGirl5775 about gates and expanders. Expanders are the complementary process to compressors – they act to increase dynamic range, whereas compressors reduce dynamic range. A gate is just an “extreme” expander, because it expands signals all the way down to silence.

“Down” being key.

I had begun the conversation by mentioning that the version of Logic that I had (way back when) included an UPWARD expander, and that I kinda missed that plugin. Upward expanders can have a markedly different sound than a gate, because they are very well suited for gentle expansion versus full gating. You set your threshold, attack, and release as normal, but then you also get a “ratio” control. The ratio is similar to what you find with a compressor, except it works in reverse. For every dB that a signal EXCEEDS the threshold, some specified amount of gain is ADDED to the signal.

I don’t see a lot of upward expanders out there. Hey, I don’t even see many expanders, period. Full gates are very common. (The software that I use, Reaper, has a gate that you can transform into an expander by simply adding in some “dry” signal.) The nifty thing about expanders is that you don’t completely lose a signal when it drops below the threshold. This means that you can keep certain subtleties of the processed sound – albeit at a lower volume.

Anyway.

The Twitter conversation got me thinking: “If the Reaper gate allows me to make an expander by adding dry signal to the gated signal, can’t there be a way to make an upward expander as well?”

The answer is “yes, pretty much.”

It turns out that, with a bit of signal routing and a bog-standard gate, pretty much anybody can “hack” an upward expander together. The result isn’t exactly the same as a true upward expander, because the gain addition is a fixed amount and not directly ratio driven. Still, the similarity is fairly close.

Essentially, what we’re doing is parallel gating, as opposed to parallel or “New York” compression.

The cool thing is that this trick can work everywhere. You can do it on an analog console, or in the digital realm. All you need is a signal, a summing bus, and a way to send that signal down two channels that are connected to that summing bus. An aux send returned into a channel can serve well as a split.

The setup works like this:

  • Your original signal is split into two paths – “dry” and “processed.”
  • You gate the processed path to taste. You also apply post-gate positive gain of some amount.
  • Both signal paths are fed into a bus.

Here’s a diagram:

To give you an example of how this sounds, here’s an unprocessed original signal of kick and snare, followed by a processed version of the same thing. (The “double-hits” you hear at times are kick-beater bounces and snare ghost-notes. The gate output is right on time, I promise.)

“Dry”

“Processed”

Figuring out where upward expansion is more handy than downward expansion is up to you. Like I said before, I kinda miss the option of an honest-to-goodness upward expander. However, I also have to admit that having an upward expander has become mostly just a curiosity. I’ve become plenty comfortable with downward expanders, and so I’m not suffering for lack of toys.

I’ll close by saying that I think there’s a more generalized upshot to all this, which is probably the most important element:

Audio processing is just a bunch of basic operations being strung together – Gain, time, level detection, summation, etc. If you don’t have the exact processing you need in an “already boxed up” fashion, you can often construct something very like what you want. You just have to figure out how the pre-built device puts the pieces together.


You Should Try A Custom-Built Digital Console. Or Not.

Custom-made digital consoles have incredible power, but they aren’t for everybody.

Please Remember:

The opinions expressed are mine only. These opinions do not necessarily reflect anybody else’s opinions. I do not own, operate, manage, or represent any band, venue, or company that I talk about, unless explicitly noted.

I’ve been a huge fan of digital consoles since about 2001. Back when I was studying at The Conservatory of Recording Arts and Sciences, it took one day in the digital studio to convince me that digital was the way to go. At the time, that room had two TMD-4000 consoles cascaded together. The functionality of those two consoles rivaled that of the much, much, much, much, much, much, (am I going to say, “much,” again? YES!), much more expensive SSL 4056 in the “A” room next door.

Now, I’m not here to argue about sonics. Having heard audio in both the digital room and Studio A, I can tell you that things sounded “just fine” in both places. Some folks might want to make a huge deal out of which consoles seem to sound better than other consoles. That’s not what I’m here to do. What I’m talking about here is functionality – the kinds of nifty tricks that different consoles can pull off.

Anyway, my first digital console was a DM-24. I now have two of them, actually.

I dropped the first one on concrete during an event load-in.

That DM-24 still works pretty well, surprisingly.

The Next Step

Fast-forward to 2011. I’m working at Fats Grill, and I’m tired of lugging my original, slightly-dinged-by-concrete DM-24 in and out of the place every week. (This was before I got my hands on the other DM, because it hadn’t been decommissioned yet. That’s another story.) It was time to get another console, but I couldn’t find anything I really liked at a price that I could justify.

Mostly, it was The Floyd Show’s fault.

This isn’t actually a tangent. Stick with me, folks.

See, we had featured the band, and the show had gone really well, but I had to submix a good chunk of their inputs. My DM was configured to act as both FOH and a virtual monitor console (more on that in another post), so I only had 15 channels that I could work with “natively” – with full, individual routing, and all that.

I wanted to be able to do the entire Floyd Show natively, on one console. I also wanted to keep full, virtual monitor console functionality. If I could do that, I figured that I could do the same for any other band that came through.

There were consoles in my price range with all the necessary analog inputs, but not enough actual channels or routing wizardry to do the virtual monitor thing. I also wasn’t fond of their overall implementation.

The single or cascaded console solutions that would do what I wanted were more than I could justify spending.

What’s a guy to do?

As it turns out, the next step in the “more bang for the buck” digital progression is to build your own console, using off-the-shelf audio interfaces and preamps. General computing platforms (like Windows) run on hardware that’s now powerful enough to stay responsive while handling lots of audio processing. That same hardware and software can also be made plenty reliable enough to function in a mission-critical environment like sound reinforcement.

The Magic

I ended up building a 24-input, 24-output rig, which originally ran Software Audio Console. I’ve since switched to Reaper, with some custom setup work to make the software more friendly to live work. (The “why” of that switch will be yet another post). On this kind of rig, the functionality available to an audio tech is extensive:

  • You can have independent FOH and monitor consoles in one box. The monitor console can be completely independent of FOH – aside from your preamp gains – or you can make it dependent on FOH processing by making some routing changes. You could even make the monitor console dependent on only part of the FOH processing stack, if you’re willing to do some fancier routing.
  • You could conceivably have multiple monitor consoles, configured independently. You could have multiple FOH consoles if you so desired. The only limit is how much processing the computer platform can do at an acceptable latency.
  • You can have as many monitor sends, mix feeds, and cue buses as you have physical outputs available.
  • Any regular channel on the console can have sends or be configured as a bus receive. Any channel. If you need full matrix output functionality, all you have to do is add the appropriate sends to the appropriate channels that are receiving other channels and feeding an output. If you need another bus, you just add one.
  • Since all your console outputs and buses can be regular channels, you can insert any processing on those channels that you please. None of this, “you can’t have that kind of EQ in that context because the engineering team didn’t think it was really important” stuff.
  • Drag and drop is available for all kinds of things. If you want to copy an EQ configuration to another channel, you just grab the EQ plug that’s setup properly, plop it into the target channel’s stack, delete the old EQ, and drag the new EQ to the proper spot. You can do the same for sends.
  • The channel processing stack is incredibly configurable. If you want an EQ to come before a compressor, you can make that happen. If you change your mind, you can reorder the channel processing stack by drag and drop. If you want to have a special EQ that wasn’t part of the main audio chain, but instead does something wild with a parametric filter and then passes its output to a gate key or compressor sidechain, you can do that. You can have two extreme EQ setups that process in parallel. You can have a delay and reverb on a single channel that process in parallel, so that You don’t have to use two buses to address them.
  • For channel processing, you can use any plugin you want – as long as you don’t add noticeable latency to the system of course. The “native” plugs that come with Reaper are killer, by the way:
    • The gate has a key input, hysteresis, and can be made into an expander with a simple adjustment to a “dry signal” control.
    • The compressor has a sidechain input, and also has a “dry signal” control, which means you can do parallel compression right in a single channel.
    • The EQ has as many bands of EQ as you want. It includes peaking, shelving, notch, bandpass, and hi/ low pass filters.
  • You can have permanent groups for channel faders and mutes, or you can get a temporary group by just multi-selecting what you want. (In fact, I use the temporary grouping a lot more than the assigned group functions.)
  • You can save as many mixes and projects as the host computer can hold, with any system-legal filename that you want, in any hierarchy that you want.
  • You can set up a VNC-based remote control system, as long as doing so doesn’t overload the system’s ability to process.
  • Since the whole thing is driven by an audio interface, you can always swap for another one if the current unit has an issue, or you want to try something different.
  • If you want more I/O, all you have to do is get an interface with more I/O, or cascade the current unit if that’s supported. You’re not tied to a manufacturer’s choice as to how much connectivity to include.
  • If you want a control surface, you can add one. You have all kinds of choices, from cheap to extravagant.
  • If the basic controls break, mice, trackballs and keyboards are only slightly more expensive than dirt. In the same vein, as long as you have a pointing device and keyboard attached, you effectively have a fallback control surface if the fancy one has a problem.
  • If you want a better screen, you can get one. Or two. Or as many as your video card can support.
  • You can multitrack record any show at any time, at a moment’s notice. You can even record to max-quality OGG files, and save a lot of disk space without a huge loss in audio quality.
  • You could do an automated mix if you wanted, with a bit of planning and setup.

I’m sure that, somewhere, you can get a prebuilt digital console with all of this functionality. I just can’t think of anywhere that you can get it for less than $20,000 or so. If I remember correctly, the complete build price for the rig that I’ve just described is about $3000.

What To Be Careful Of

With everything I’ve laid out in the list above, you can probably tell that I’m pretty sold on this whole concept. Having all the functionality that my rig provides means that I can do all kinds of things that aren’t really expected in a small venue context – the most notable thing probably being that I have an independent monitor console, and lots of mixes to work with.

Even with all the positives, it’s important that I tell you about the risks and, shall we say, contraindications for putting together a rig like this:

  • This probably should not be your first mixing console. All the options and flexibility can be overwhelming for people who are just starting to learn the craft of live audio.
  • If big chunks of the terminology I’ve used above seem foreign to you, you should definitely do some homework before you try one of these rigs. Otherwise, you may be bewildered, or start doing things without knowing why you’re doing them.
  • If you don’t have a great grasp of how signal flows in a mix rig, this kind of setup isn’t the right choice. A lot of the system’s magic comes from being able to throw audio around in all kinds of ways, and you need to know exactly what you’re doing and why you’re doing it. (I would rate myself as having professional-level competence in terms of understanding signal flow, and I can still back myself into a corner when I forget to think things through.)
  • If your mix rig needs to be used by lots of different audio techs, especially BEs (Band Engineers), this kind of mix system is a bad choice. Very few people use them at the moment, and they’re not what most BEs expect when they roll up to a venue.
  • Rigs like this aren’t likely to be acceptable on riders anytime soon.
  • If you aren’t comfortable with digging around in computer hardware and software, you should think twice about diving into a rig like this.
  • If you don’t have any experience with installing DAW hardware and software, and what can go wrong with DAW setups, you should allow a lot of time for getting your rig running. Or, just get a traditional console.
  • If you aren’t keen on doing your own testing, this kind of system probably isn’t for you.
  • If you can’t get comfortable with the idea that there’s no support except for yourself and what you can find online, this idea is probably something to skip.
  • If you’re absolutely sold on working a lot of controls at the same time, you either need to attach and configure a really good control surface, or just get a regular console.
  • These rigs tend to be a bit slower to operate than traditional consoles, in terms of user interface. If you’re not okay with that, you either need to put in a good control surface, or just stick with what you’re fast on.
  • Even though you can save money overall on these systems, you need to spend dough on the important bits. USB interfaces are cheap, but getting decent latency out of them can be hard or even impossible. Firewire or PCI is the way to go.

With all that said, I just can’t help but be a bit giddy about how unconventional and powerful systems like these can be.

I’ll even help you build one, if you’re willing to throw some money my way. 🙂