Tag Archives: EQ

For The Love Of Mid

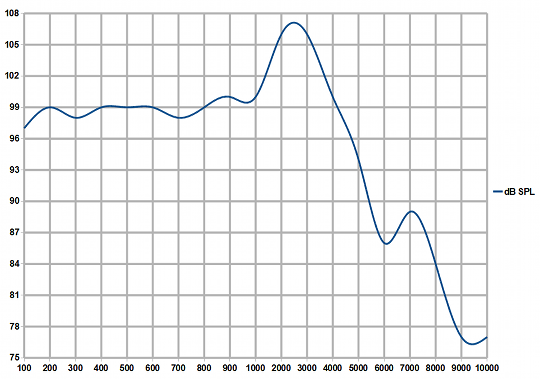
The material that’s critical for a mix is between about 200 Hz and 4000 Hz.

Please Remember:

The opinions expressed are mine only. These opinions do not necessarily reflect anybody else’s opinions. I do not own, operate, manage, or represent any band, venue, or company that I talk about, unless explicitly noted.

We’ve all seen and heard it, in some way. You know what I mean. The “smiley face” EQ. “Scoop” switches. The midrange all the way down – and, optionally, the bass and treble CRANKED.

“Hi-fi.”

“Bedroom tone.”

Heck, most of us have been practitioners of this very thing. When trying to make something sound impressive, polished, and big, ruthlessly carving out the midrange is like the Dark Side of The Force: Quick, easy, and seductive.

Also, really bad for you in the end.

What a mix (live, studio, monitors, stage-volume, anything) actually stands or falls on is the midrange. Sure, you want the top and bottom octave to be in the right place, but they really aren’t as critical as you may have been led to believe.

So, why do people de-emphasize the midrange so much?

Tough, Lonely, Unexciting Rooms

There are all kinds of contexts that drive scooped, sizzle-thump tones. Getting into every detail could make for a very long, barely readable article. I think that you can get a decent picture by generalizing, though:

Midrange is common, unexciting, and – due to its criticality – annoying when it’s wrong.

See, humans hear midrange better than almost anything else. We’re great at detecting and analyzing human speech, because our lives basically depend on it. Human speech is all about midrange, and expressive, detailed vocalization is one of the things that makes humans actually…you know…human. We grow up hearing midrange. We communicate using midrange. We hear midrange all the time, in every possible place, in all kinds of contexts.

Midrange? More like, mundane-range.

When we come across a sound-generating item that can do the bits of the audible spectrum that are outside the boring and everyday, we fall in love pretty fast. “Bass” and “air” are like candy to our common meal of mid. They’re impressive. Fun. Exciting. Everything that those pokey, old-hat mids aren’t.

So, there’s a strong temptation to emphasize the fun bits at the expense of the boring parts.

At the same time, our particular human genius for detecting problems and unnatural weirdness in the mids makes us intolerant. Our brains are also VERY good at synthesizing missing information, especially when a lot of the basic cues are still intact. If your stereo or amplified instrument are in a not-so-acoustically-nice room, a quick fix is to yank out as much of the troublesome midrange as you can. The music still sounds fine, because the mids are still audible enough for you to imagine whatever you’re missing as you revel in the sounds that are emphasized.

The success of this is further enhanced by being alone, which is what leads to “bedroom sound.” With nothing else “in the mix,” you can hear your instrument just fine – and it sounds GREAT! All the midrange problems are sucked out, and the impressive “body” and “top” ends are dialed way up.

Awesome sauce.

Until real-life intervenes, of course.

Midrange Makes Mixes Musical

In the context of modern music, especially in small venues, what you have is an assemblage of amplified sounds that coexist with a lot of acoustical goings-on. For example, take a typical rock band’s rehearsal space. You’re probably going to run into an un-miced drumkit, one or two guitar amps, and a bass rig. The guitar and bass players, through electronics, have very immediate and dramatic control over the timbre of their instruments. Within the limits of their instruments and amplifiers, they can dial up some wild and weird tones.

On the other hand, the drummer can’t go quite as crazy. Sure, there’s a lot of variation to be had from shellpack to shellpack, especially with different heads, tunings, sticks, and everything else, but the reality is that most acoustic drumkits impart a tremendous amount of midrange into the room. If nobody else has much midrange left over, then the kit is going to obliterate the tonal parts of the song arrangements…unless, of course, the guitar and bass rigs are much louder than the drums.

So, here’s the major thing:

Sufficient midrange content is the primary and essential component of a tonal instrument’s place in a mix.

The reality is that, for all the excitement and fun that low and high-frequency information give us, there is very little actual music that occurs far below 200 Hz, or far above 4 kHz. It’s not that there isn’t ANY musical information beyond those areas – of course there is – it’s just that it usually isn’t critical to the actual song.

(Yes, bass guitars produce lots of fundamentals that are around or below 100 Hz, but the reality is that we mostly end up listening to the harmonic content of what the bassist is doing. Seriously – find yourself some songs with prominent, melodic basslines. Load the files into a DAW and filter everything below 200 Hz. I’ll bet that you can still hear the bass-human doing their thing.)

If the midrange content of a given part is de-emphasized in a big way, there is a very good chance that the part will disappear in an ensemble context. The flipside is that allowing everybody to have their own piece of the mids means that you’re much likely to get a better mix…especially when you’re playing live in a small room, where the interplay between purely acoustical sounds and amplified tones can be either beautiful or horrific.

Practical Considerations

The biggest take-away from this is that everybody – guitar players, bassists, vocalists, monitor guys, FOH (Front Of House) humans, and anybody else that I’ve missed – should resist the urge to “kill the mids.”

I should know, because I’ve had my own “scooping” bite me. Killed-mid vocals sound great in FOH and monitor world, right up until they have to be matched up with an actual band. At that point, you have to get the vocals VERY loud to get audible lyrics, and that can lead harshness, feedback, and an audience that wants to not be in the seats anymore.

I once had vocals dialed up in the monitors that sounded “super-studio.” Very hi-fi. It would have been great, except that when the band actually started playing you could barely hear the vocals in the wedges. You’ve gotta let those boxes “bark” a little if people are going to hear themselves sing.

On the flipside, I once worked with a band where one of the guitar players had a serious fascination with HF content. Once the drummer was playing, all you could hear out of that guitar was basically “eeeeeeessshhhh.” He would play these super-fast solos, but you couldn’t hear what he was doing. His actual notes were dialed out so far that, even when he was painfully loud and clearly in front of everybody else’s volume, you still only had a sort of screechy, clicky hiss to listen to.

There’s even a “technologic-economic” side to the whole thing. Making lots of low end and high end are tough things to do with an amplifier or a PA system. Killing the midrange and cranking the ends means that you’re probably wasting a ton of internal headroom and power-stage output on material that might not even be audible. If you want that material to be audible, you need lots of power and lots of speakers – and that’s spendy. Want to get the most out of more affordable gear? Get the midrange in the right place as the first step, and then use what you’ve got left over for the top and bottom.

The mids can be tough to love at first, but it’s a worthwhile relationship.


Mixing A Live Album: Mastering

Time for the last layer of polish.

Please Remember:

The opinions expressed are mine only. These opinions do not necessarily reflect anybody else’s opinions. I do not own, operate, manage, or represent any band, venue, or company that I talk about, unless explicitly noted.


Mixing A Live Album: Drums

In a rock mix, you may find yourself “really turnin’ the knobs” when it comes to the drums.

Please Remember:

The opinions expressed are mine only. These opinions do not necessarily reflect anybody else’s opinions. I do not own, operate, manage, or represent any band, venue, or company that I talk about, unless explicitly noted.


The EV N/D 767a

A highly competent mic for a reasonable price.

Please Remember:

The opinions expressed are mine only. These opinions do not necessarily reflect anybody else’s opinions. I do not own, operate, manage, or represent any band, venue, or company that I talk about, unless explicitly noted.

This is what a 767a looks like with the “nose cone” removed.

Doug Wood (from the band Hostage and Woodshar Recording) tried to kill one of my 767a mics the other night.

Well, okay, he wasn’t doing it purposefully.

The mic stand had its boom almost fully extended, and the boom-angle was almost parallel to the floor. When you combine that situation with having the arm extended between two of the tripod legs (instead of along one of them), you’ve got a recipe for an unstable stand.

I think the whole shootin’ match went over about three times, with each occurrence sending a loud, dull “thop!” through the PA.

Hey, that’s what limiters are for. And reasonable powering.

I digress.

As he took action to very definitely secure the stand, Doug commented, “I haven’t dented your mic yet, but I’m working on it.”

So, yes, the N/D 767a can handle the inevitable accidents that occur on stage. That’s a point in its favor, but what else does the mic offer?

Sounds Good, Resists Feedback – If Used Properly

One of the first things I noticed about the N/D 767a is that it’s one of the few mics that sounds like the manufacturer got the “high end” right.

In my time, I’ve come across plenty of mics that sound dull, and I’ve come across plenty of mics that sound “overhyped.” The dull mics end up giving you that annoying, midrangey bark that just screams “old, worn out PA system from 1982.” The overhyped mics sound great when you’re standing alone on stage, sighting-in the monitor rig, but all that studio-quality top end stops being really useful when there’s an actual rock band in play. (There’s nothing inherently wrong with “air” in a vocal, but at high volume the air does little more than draw attention to itself.)

In contrast, the high-frequency component of an N/D 767a seems nicely smooth and natural, without any “FD&C Yellow #5,” as it were. This is important, because it allows the mic to have a clear and pleasing tonality without added feedback problems or “ess” sounds that cause windburn as they go by.

As a matter of course, I build an EQ preset for all my mics which is meant to “sound right in the solo bus.” Comparing presets is a sloppy metric – no argument there – but I can say that the N/D 767a is one of the least EQ’ed mics in my arsenal. To me, that says a lot about the mic being built well and voiced correctly.

These mics are designed to have a supercardioid pattern overall, and the overall implementation seems to resist feedback as well as other tight patterned mics I’ve encountered. Mounted on a stand with the correct orientation, or handheld by a competent vocalist, the 767 seems to be as trouble free as any other mic I’ve used. As with anything, you’ll need to do a requisite amount of “homework” when setting up. If you’re going to need to run at high gain, you’re also going to need to ring your monitor rig – no matter what mic you choose.

In a sense, one of the best compliments I can give these mics is that they just do what they’re supposed to do without a lot of fuss. With that being the case, there isn’t a whole lot of writing to do when it comes to the major positives of the 767a. You plug ’em in, you point ’em at something, they sound like that something, and off you go. In sound reinforcement, that’s what a mic is supposed to do.

Your Mileage May Vary

Currently, I’m convinced that there’s no such thing as the perfect mic for all situations. The N/D 767a works well across a range of applications, but there are some aspects of the unit that aren’t always ideal. It’s ironic that what amount to nitpicky concerns with the mic are what I have the most to talk about, but here we go anyway:

On the sound side, the mic’s pop-and-blast filtering seems to be just a little too “light” for a mic that people are going to be very – shall we say – personal with. The plosives and breath noise aren’t horrific by any means, but they still surprised me a bit at first. (To be fair, an appropriate-for-your-situation high-pass appears to help with this issue quite a bit, and now that I have some presets built for the mic, I don’t notice the problem much anymore.)

Tight patterned mics (supercardioid and “above”) are more finicky than their cardioid counterparts. As I said above, the feedback resistance on these units is what I would consider fit for varsity-level work. At the same time, though, that feedback resistance requires that the mic be in the correct orientation, and held the correct way. It’s my experience that tight pattern mics aren’t the right choice for people who want to combine high-gain monitoring with:

Turning every which way in a chaotic and unpredictable fashion.

And/ or working the mic at an inconsistent distance.

And/ or cupping the mic every now and then.

…and, of course, extreme practitioners of the above can’t be helped by any mic, so there’s that.

This restriction on application is by no means a failing of the 767a or any other similar mic, but it’s something to be aware of.

The physical construction of the units is nicely engineered, with everything fitting tightly. The XLR connector is what I would call “slightly recessed,” which necessitates a notch in the mic body so that the cable end can latch. This is hardly an issue in itself, but it becomes one when the internal assembly is rotated away from the notch. The XLRF on your cable will still mate with the mic’s pins, but the cable won’t latch. A good pull on the cable can result in the corresponding channel going silent – and in this case, the highly engineered construction becomes a hindrance. It would be a simple matter to rotate the internal assembly to match the notch if I could figure out how to do so without breaking the mic, but there’s only so much teardown that I’m confident in doing. N/D 767a mics just aren’t as user-serviceable as other stage transducers, and so they’re a little intimidating when you expose what internals you can.

Yeah, yeah, I should just Google for a teardown guide. I know.

Anyway.

My last nitpick is with the foam insert for the 767a’s grill. I can understand that there’s probably a good reason for it, but I also think that EV overcomplicated the whole thing. The actual insert is a small piece of foam that’s held in place by a tabbed, fabric ring. It doesn’t take very much to cause the ring to separate from the foam, and its easy to get the tabs bunched up. Getting the whole assembly back to factory stock is not a trivial thing. I’ve tried, and I can’t quite pull it off. This might not be a big issue for folks who rarely open their mic, but if you need to wash out your mic grills regularly, it’s a bit of a concern. The upside is that a “sorta fit” seems to work as well as an exact fit, but I just don’t see why over-engineering the pop-filter insert was so necessary.

Nitpicks Aside

The reason to go into detail about my little “dings” on these mics isn’t to discourage you from considering them. Rather, the point is to help you make an informed decision. I really like these mics, but I don’t want to give anybody the idea that they work miracles. No mic can do that, but you wouldn’t know it to read some of the reviews out there.

So…

I highly recommend the EV N/D 767a. They’ve earned a first-choice spot in my mic collection, and – in my opinion – they’re quite worth the small price premium over the industry standard. (You know, the thing with the model number of 58. I’m “Shure” you know what I mean.) To borrow the words of Yahtzee from Zero Punctuation, they aren’t perfect, but what is?

If you’re shopping for mics, put these on your short-list of contenders.


Mixing A Live Album: Bass

Making the bass guitar work is as much about the midrange as the low end.

Please Remember:

The opinions expressed are mine only. These opinions do not necessarily reflect anybody else’s opinions. I do not own, operate, manage, or represent any band, venue, or company that I talk about, unless explicitly noted.


Mixing A Live Album: Guitar

Sometimes, making something sound big means reducing dynamic range and narrowing the overall frequency response.

Please Remember:

The opinions expressed are mine only. These opinions do not necessarily reflect anybody else’s opinions. I do not own, operate, manage, or represent any band, venue, or company that I talk about, unless explicitly noted.


The Pros and Cons of Decoupling

Separating gear into its components gives you more control, but it also creates more work.

Please Remember:

The opinions expressed are mine only. These opinions do not necessarily reflect anybody else’s opinions. I do not own, operate, manage, or represent any band, venue, or company that I talk about, unless explicitly noted.

Question: If I gave you a mic pre, a parametric equalizer, a couple of splitter cables, an output selector box, and three volume pots, what could you make?

Answer: A basic channel strip.

Think about it – for all intents and purposes, the items listed above are the basic components necessary to construct an audio chain that behaves like a channel found on a simple console. What made them seem different is that they were packaged as single items, instead of all being attached to a circuit board.

They were decoupled from one another. Unbundled. Unboxed.

Decoupling pro-audio components can give you a lot of powerful choices, but it isn’t appropriate for everyone or every situation.

What The Heck Am I Talking About?

When I talk about “coupled” or “bundled” audio products, I’m referring to a device that houses multiple functions in one enclosure. Each function could theoretically be performed by a separate device in its own enclosure, but for various reasons the devices have been combined. For example:

  • “Powered” speakers, which stick an amplifier (and often, a lot of very carefully tweaked processing) into the loudspeaker enclosure. This is in contrast to “passive” speakers, which require amplification and processing from external products.
  • “Multiway” loudspeakers are even an example of bundling. Some people are happy to run entirely separate enclosures (and amps, and processing) for subs, low-mids, high-mids, and high-end. Lots of other folks are happy to combine everything above the subwoofers into one cabinet.
  • “Monolithic” mixing consoles, which put audio circuitry and/ or processing in the same case as the controls. I’m unaware of any analog console which ISN’T essentially monolithic out of sheer necessity. Some digital consoles, on the other hand, have DSP brains that are at least physically independent of the control surface.
  • System controllers, AKA loudspeaker management systems, are devices which combine equalizers, crossovers, and dynamics processors (amongst other things) into a single unit.

Each of these products presents you, as the buyer, with a choice. Accept the bundle offered, or decline it and construct your own solution. So – why pick one route over the other?

Conservation Of Responsibility

I don’t know if this is the biggest factor to consider when you’re thinking about whether to use a coupled or decoupled setup, but it’s the most generalized description that I could easily think of:

In a coupled solution, the manufacturer bears most of the responsibility for an effective configuration. In a decoupled solution, the responsibility shifts to the operator.

One of the best examples of this is the powered or “active” speaker, especially when the unit is biamped or triamped. The manufacturer of the speaker is the one who has to pick an appropriate amplifier for each driver. Not only that, but they have to include appropriate crossover processing at a minimum. Often, advanced driver-protection, driver-to-driver time alignment, and corrective EQ are “baked in” to the total solution.

If, on the other hand, you choose to go with passive speakers, you have to choose which of these functions are worth implementing, which products you’ll use to fulfill them, how to connect those products, and how to configure each unit.

The upshot is that there’s “conservation of responsibility,” in that the obligation of deciding how to put everything together is always present. Who actually gets most of that obligation depends on how much is packaged in one box. This is also true for the audio knowledge required when using the product(s). Audio gear that’s been bundled can reduce the knowledge demands for whoever is actually doing a show with that gear. Unbundled gear usually requires a more knowledgeable operator for maximum success.

Weight and Volume

Whenever you choose a bundled or decoupled solution to an audio-gear need, it’s helpful to have an awareness of the weight/ volume tradeoff that can occur (it doesn’t always happen):

All things being equal, “coupled” gear reduces the space required for deployment and transport, at the cost of each unit becoming heavier. Decoupled gear makes for lighter individual units, at the cost of more space being required for the entire system.

It’s important to notice that the above starts with “all things being equal.” In many cases, all things are not equal. For instance, if you replace a whole stack of PA management gear with a single Driverack processor, the weight AND volume of PA management equipment goes down. This is because all things aren’t equal – all the physical components of each piece aren’t included, because the functions are replicated in software.

In the same way, a powered speaker may not actually be as heavy as the passive version plus an amplifier, because the manufacturer will probably choose an amplification unit that allows for less weight (not to mention one that doesn’t require a hefty rackmount chassis).

Cost And Risk

Choosing coupled versus decoupled solutions in pro-audio influences both how much money you pay for things, and how many eggs you have in one basket:

Because of various “economies,” coupled products can sometimes be less expensive than their decoupled counterparts.

Powered speakers are another excellent example of this phenomenon. By the time you add up the cost of amplifiers, processing, speaker cable, and racks, creating equivalent functionality with a passive speaker enclosure can be more expensive than just buying a decent, pre-packaged, active box. If cost is a big factor for a production, coupled products can be a big help.

Because of tight, inter-component integration and dependence, the failure of one part of a coupled product can deprive you of the functionality of ALL parts of the product.

An example of this can be found with a loudspeaker management unit. All of the functionality of the unit (EQ, crossover, dynamics, etc) is tied to one power supply and one front-panel control setup. If either one of those is damaged or fails, everything “in the box” becomes unusable. In a decoupled system, the death of the crossover doesn’t deprive you of the use of the EQ. Bundled gear allows for each individual product to do more, but if there’s a problem you may lose ALL of that “doing more” in an instant. It’s just a risk that you have to be aware of.

Control Issues

The final point I want to make is in regards to the overall command that you have over coupled vs. decoupled audio systems:

Using decoupled products provides you with greater system flexibility and control than using bundled units.

I do want to be careful to point out that the above is NOT a value judgement. Greater control and flexibility are not an advantage unless you actually want them and will benefit from them. For instance, I’ve chosen to use a “decoupled” console, where the I/O, processing, and control all have some amount of separation. As a result, I have a ton of control over how the console behaves. If I don’t like some part of it, I can swap that part without losing my investment in the other parts. On the flipside, though, my console is not industry standard, it’s difficult to just “pick up and use,” and I have to be personally invested in making the whole thing work.

In the end, I definitely encourage audio enthusiasts to go for decoupled systems where it makes sense for them. For folks who just want things to work without much hassle, bundled gear is a great choice. I happen to use both kinds of pro-audio equipment, because I have to pick my battles. It all seems to be working out, so far.


Mixing A Live Album: Vocals

Polishing your recorded vocals involves a number of different processing steps.

Please Remember:

The opinions expressed are mine only. These opinions do not necessarily reflect anybody else’s opinions. I do not own, operate, manage, or represent any band, venue, or company that I talk about, unless explicitly noted.


Electric Guitar: Mic Or DI And Why?

Mic the cab if the specific sound made by the cab is “make or break.” Otherwise, you can go direct if you have the right tools.

Please Remember:

The opinions expressed are mine only. These opinions do not necessarily reflect anybody else’s opinions. I do not own, operate, manage, or represent any band, venue, or company that I talk about, unless explicitly noted.

Very reliable, but not the only valid technique.

So, my last article was precipitated by a question asked by Dee from The Black Smoke Gypsy Band. The group was debating whether to go direct with their electric guitars (in some way) or just mic the cabs. The question had inspired a bit of back and forth in the band, and Dee wanted to know what the right answer was.

Of course, I answered him with what I knew to be the most correct answer in pro-audio: “It depends.”

That’s also the most frustrating and infuriating answer.

The conversation didn’t stop there, though. A tech can’t just throw “It depends” at someone and walk off. You then have to talk about what might work for the questioner, and why.

Micing A Cab: Reliable and (Relatively) Simple

In my article about looking at electric guitar rigs as a kind of vocal (or any other acoustic instrument), I got at the idea that sticking a microphone in the area where “the noise comes out” is a simple and effective choice. All the questions of exactly how an instrument makes the sound it does are back-burnered. You just figure out where enough, decent-sounding level is present, and stick your transducer there.

A transducer is a device that converts one form of energy into another, corresponding form of energy. Mics transduce sound pressure waves into electrical signals. Speakers transduce electrical signals into sound pressure waves.

With the electric guitar as we have come to know it, the sound almost always comes out of a loudspeaker that’s mounted in a cabinet. That cabinet may also house an amplifier (a “combo”), or it might be part of a “stack” with a separate amplifier “head.” In any case, you don’t necessarily have to spend a lot of time philosophizing. The sound comes out of the speakers, so you mic the speakers.

Now, I don’t want to downplay the possible complexities of micing a guitar cab. Indeed, a lot of ink (and sometimes blood) has been spilled on all the intricacies that you can get into when micing a guitar rig:

Should you pick the best-sounding loudspeaker and put the mic up close?

If the mic is close to the cone, what area of the cone should it be closest to? (The dust cap area usually has more high-frequency information than the cone edges.) Should the mic diaphragm be parallel to the baffle? At an angle? Which mic should you use anyway? Should you use more than one mic? Should you try to time-align those mics, or should you pull one back slightly so that phase effects cancel out the frequencies you dislike?

…or, should you pull the mic back far enough to get the whole cab? (This rarely happens in small-venue work, but hey, you never know.)

Things can get very wooly.

For a sound reinforcement human, a lot of the time you end up making choices that are based on simple utility, and not “the very best sound possible, ever.” You close-mic a cone because you need maximum separation between the guitar and everything else making noise on stage. You pick the cone you do because you can get the mic stand in the right place easily, and because the mic setup will be the least in the way of the guitar player (and everybody else). You go for a placement that’s somewhere between the dust-cap crease and cone edge, figuring EQ will fix anything you don’t like.

Anyway.

Why mic a guitar cab? Why make that choice over other choices?

In the end, it comes down to this:

You should definitely use a mic for electric guitar if the specific sound produced by specific speakers in a specific cab is a crucial and non-replicable part of the guitar player’s sound.

See, electric guitar players can be incredibly choosy about their sound. Pretty much everything has an effect. There are folks who will spend days (if not more) trying to figure out which material for a pick has the best sound when used with their setup.

I’m dead serious.

In some cases, a critical, irreplaceable part of a guitar player’s sound is a certain brand and make of loudspeaker, with a certain amount of “miles” on it, with a certain amount of power flowing through it, that has been bolted into a specific kind of cabinet. If you were to even do something like replacing that speaker with a brand-new unit of the same model, their tone just wouldn’t be there.

You have to mic that. There’s no way around it. All other tricks and tactics are unacceptable.

However!

There are plenty of guitar players for whom this is not the case. There are lots of folks who like the sound of their cab just fine, but who aren’t “married” to its very specific effect on their overall sound.

So, to restate, you definitely want to mic an electric guitar rig if you are unable to get a sound that’s acceptable via some other method.

(Whether or not a guitar player having “their sound” is a good/ bad/ selfish/ team oriented/ stupid/ smart/ pleasant/ unpleasant/ crazy/ sane/ impossible/ doable thing in the context of the band in a particular venue is a whole other question, by the way.)

Going Direct: Might Be Easy, Might Be Hard

There’s a lot of mythology that goes around in guitar circles regarding the practice of going direct. It usually boils down to “going direct sucks.”

Horsefeathers.

If you want to hear a direct-in guitar that sounds good, just come on down to Fats Grill when Blues 66 is playing. Leroy’s guitar sound has a workable bottom end, a plenty-usable midrange growl (that I sometimes add to a bit, depending on the night), and a top end free of annoying hash and sizzle (that I sometimes low-pass anyway, again, depending on the night). He has no amp – just a POD HD…something…could be a 500.

It sounds like guitar to me, anyway. Nobody’s ever complained about it. The same thing was true for a band I used to work for, called Puddlestone. We ran the guitar processor through a cab-sim DI. It sounded fine. Great, even.

The point is that going direct with an electric guitar is entirely possible. You just have to use the right tools, and know which part of the signal chain you want to pull the line from.

So, where do you want to go to get that signal split?

When running an electric guitar direct to the console, you should take your signal at some point that is post the devices that have the greatest contribution to the essential components of the player’s sound.

This actually holds true for micing, because (as I said), the loudspeakers and cabinet may be an essential component of the player’s tone. If they are, then you have to get your signal “post” the loudspeaker. That means a mic.

In other situations, though, you have a number of different possibilities. For some folks, the essential components of their sound are created through processing. This processing may happen through stompboxes, or a rackmount processor, or both. When that’s the case, you need to take your split from a point that’s downstream of the processing chain, usually straight from the output of that process chain.

For other players, an essential component of their sound is the power amplification itself. There are coveted guitar amplifiers that produce a signature tone by driving, a power tube (or tubes) into saturation. If that saturation is an essential to the guitar player’s sound – not just a nice extra, but a critical piece of the puzzle – then you need to find a way to take a split from the output of the power amplification section. You can do this with a DI that has a 20+ dB PAD (Pre Attenuation Device) included, along with a parallel output to feed a cabinet. The parallel output is very important, because:

If you take a split from a point post the power amp, you must be very careful that an appropriate load is still being presented to the amplifier. Failure to do so can mean a costly repair.

Transformer-coupled amplifiers must have a minimum load present, and that load must be able to dissipate the power from the amplifier. Otherwise, the output transformer can be cooked by an internal arc, or other components can be wrecked by “flyback” voltage. When it comes to putting a DI on a power-amp output, you’re connecting a device that probably is NOT going to be seen as a proper load. Most modern, solid-state amplifiers don’t exhibit this behavior, because they don’t use output transformers, BUT ASSUME NOTHING.

When in doubt, parallel connect a suitable load to the amp.

Now – there’s one more thing about going direct.

Remember up there where I said that you have to use the right tools? This is an essential of getting a direct signal that actually sounds good. A generic, run of the mill DI box is not, in itself and without help, a sufficiently good tool for this job.

Why?

It all comes back around to those loudspeakers in guitar cabs.

Your average guitar loudspeaker starts significantly rolling off the high frequency information in the signal after about 3 – 4 kHz or so. For example, here’s a frequency response graph that I made from data provided by Eminence for their “Red, White, and Blues” loudspeaker. After about 3 kHz, the frequency response is “goin’ downhill in a decent hurry.”

This rolloff is a critical component of what we know as “the electric guitar sound.” The problem is that a half-decent, bog-standard DI doesn’t roll off the high end. Even cheap ones can be essentially “flat” to 20 kHz. The basic DI actually preserves high-frequency information that the basic guitar speaker just chucks out the window (to one degree or another). This is why a lot of people think that direct-fed electric guitar “just sounds bad – all fizzy and high endy.” That’s actually what a guitar signal is, right up until it gets pumped through a loudspeaker.

Whaddya gonna do?

Some guitar processors have a dedicated direct out. These direct outs almost always have “cab simulation” applied, and so they sound reasonably like a miced rig without any other intervention. The fancier they get, the more they take into account the effects of different speakers loaded into different cabinets. Some even simulate different mics. Some even add a bit of “room” sound to the mix. Most importantly, though, they low pass the raw signal in a way that’s similar to a loudspeaker.

If all you’ve got is a basic DI that’s pulling a signal from somewhere, there’s still hope. If you can find an EQ to insert on the guitar channel, one that has a sweepable low-pass filter, you may be able to “build your own” cab simulator. Just twist that frequency selector knob until you get the frequency in the neighborhood of 4 kHz, and then tweak a bit more until your taste is as satisfied as possible. From there, you can do more shaping with other EQ bands.

To close, I’m going to leave you with some bullet points about when it’s good to attempt a proper DI solution. Remember that there’s an assumption here: You’ve already determined that any particular cabinet is not an absolutely crucial part of the guitar player’s sound:

  • If the amp and cab sound terrible and/ or painful. (It can happen to anyone. I’ve heard some ostensibly all-tube rigs that sounded dreadfully screechy.)
  • When you need to run high monitor levels with the guitar without worrying about mic feedback. (This does happen, just not that often.)
  • When you can’t get good separation between the guitar rig and everything else on stage. (This can happen when a guitar rig is run a bit quietly, and then a bunch of guys who want to be disproportionately loud with everything else get on stage.)
  • When you can’t get even a half-decent mic placement for some reason.
  • When you don’t want to chew up stage space with mic stands.
  • You think it would be cool to try something different, and the player is on board with that idea.

Micing can be done well, and direct input can be done well. You just have to figure out what’s appropriate, and then execute your chosen strategy in the right way.