Tag Archives: How-To

An Audio Human’s Guide To Auditioning Pretty Much Everybody

My latest for Schwilly Family Musicians.

Please Remember:

The opinions expressed are mine only. These opinions do not necessarily reflect anybody else’s opinions. I do not own, operate, manage, or represent any band, venue, or company that I talk about, unless explicitly noted.

auditionWant to use this image for something else? Great! Click it for the link to a high-res or resolution-independent version.

“Now, why in blue-blazes would a live-sound engineer talk about auditioning people for your band?

Simple.

I deal with the fallout if you louse it up.

There have been many instances in my time where I’ve had to struggle with a band containing at least one member who was a terrible fit for actually playing shows. It usually makes for a frustrating and bad-sounding gig, in which a large amount (maybe all) of the available electro-acoustical headroom for the show is DEVOURED in trying to fix the problems. Nothing is left over to otherwise translate the show to the audience in a cool way. It’s all been spent on mere survival.”


Read the rest of this article (for free!) at Schwilly Family Musicians.


Zen And The Art Of Dialing Things In

Good instruments through neutral signal paths require very little “dialing in,” if any.

Please Remember:

The opinions expressed are mine only. These opinions do not necessarily reflect anybody else’s opinions. I do not own, operate, manage, or represent any band, venue, or company that I talk about, unless explicitly noted.

zenWant to use this image for something else? Great! Click it for the link to a high-res or resolution-independent version.

Not long ago, Lazlo and The Dukes paid me a visit at my regular gig. They were coming off a spectacularly difficult show, and were pleased-as-punch to be in a room with manageable acoustics, a reasonably nice audio rig, and a guy to drive it all. We got settled-in via a piecemeal sort of approach. At one point, we got Steve on deck and ran his dobro through the system. He and I were both pretty happy within the span of about 30 seconds.

Later, Steve gushed about how I “just got it all ‘dialed up’ so fast.” Grateful for the compliment, and also wanting to be accurate about what occurred, I ensured Steve that he was playing a good instrument. I really hadn’t dialed anything in. I pushed up the faders and sends, and by golly, there was a nice-sounding dobro on the end of it all. I did a little experimenting with the channel EQ for FOH, wondering what would happen with a prominent midrange bump, but that was pretty optional.

In terms of “pop-culture Zen,” Steve had gotten dialed in without actually being dialed in.

How?

Step 1: The Instrument Must Be Shaped Like Itself

The finest vocal mics I’ve ever had have been the ones in front of terrific singers. The very best signal chains I’ve ever had for drums have been the ones receiving signals derived from drums that sound killer. I’ve hurriedly hung cheap transducers in front of amazing guitar rigs, and those rigs have always come through nicely.

Whatever the “source” is, it must sound correct in and of itself. If the source uses a pickup system, that system must produce an output which sounds the way the instrument should sound.

That seems reasonable, right? The first rule of Tautology Club is the first rule of Tautology Club.

Especially with modern consoles that have tons of processing available, we can do a lot to patch problems – but that’s all we’re doing. Patching. Covering holes in things that weren’t meant to have holes. Gluing bits down and hoping it all stays together for the duration of the show. Does that sound like a shaky, uncomfortable proposition? It does because it is.

But, if the instrument is making the right noise in the room, by itself, with no extra help, then it can never NOT make the right noise in the room. We can do all kinds of things to overpower and wreck that noise by way of a PA system, but the instrument itself will always be right. In contrast, an instrument which sounds wrong may potentially be beaten into shape with the rest of the rig…but the source still doesn’t sound right. It’s completely dependent on the PA, and if the PA fails to do the job, then you’re just stuck.

An instrument which just plain “sounds good” will require very little (if any) dialing-in, so long as…

Step 2: The Rig Is Shaped Like Everything

Another way to put this is that the instrument must be filled with itself, yet the FOH PA and monitor rig must be emptied of themselves. In technical terms, the transfer function of the PA system’s total acoustical output should ideally be flat “from DC to dog-whistles.”

Let’s say you want to paint a picture. You know that the picture will be very specific, but you don’t know what that picture will be in advance. What color of canvas should you obtain? White, of course. The entire visible spectrum should be reflected by the canvas, with as little emphasis or de-emphasis on any frequency range. This is also the optimal case for a general-purpose audio system. It should impose as little of its own character as is reasonably possible upon the signals passing through.

At a practical level, this means taking the time to tune FOH and monitor world such that they are both “neutral.” Unhyped, that is. Exhibiting as flat a magnitude response as possible. To the extent that this is actually doable, this means that an instrument which is shaped like itself – sonically, I mean – retains that shape when passed through the system. This also means that if there IS a desire to adjust the tonality of the source, the effort necessary to obtain that adjustment is minimized. It is much easier to, say, add midrange to a signal when the basic path for that signal passes the midrange at unity gain. If the midrange is all scooped out (to make the rig sound “crisp, powerful, and aggressive”), then that scoop will have to first be neutralized before anything else can happen. It’s very possible to run out of EQ flexibility before you get your desired result.

Especially when talking about monitor world, this is why I’m a huge advocate for the rig to not sound “good” or “impressive” as much as it sounds “neutral.” If the actual sound of the band in the room is appropriate for the song arrangements, then an uncolored monitor rig will assist in getting everybody what they need without a whole lot of fuss. A monitor rig that’s had a lot of cool-sounding “boom” and “snap” added will, by nature, prioritize sources that emphasize those frequency ranges (and this at the expense of other sources). This can take a good acoustical arrangement and make it poor, or aggravate the heck out of an already not-so-good band configuration. It also tends to lead to feedback problems, because the critical midrange gets lost. Broadband gain is added to compensate, which combines with the effectively positive gain on the low and high-ends, and it all can end with screeching or rumbling as the loop spins out of control.

The ironic thing here is that the “netural” systems end up sounding much more impressive later on, when the show is a success. The rigs that sound impressive with walkup music, on the other hand, sometimes aren’t so nice for the actual show.

So – an audio-human with a rig that is acoustically shaped like nothing is in command of a system that is actually shaped like everything. Under the right circumstances, this means that a signal through the rig will be dialed in without any specific dialing-in being required.


Public Speaking, PA Systems, And You

Just like a concert, what we want is the best possible show at the lowest possible gain.

Please Remember:

The opinions expressed are mine only. These opinions do not necessarily reflect anybody else’s opinions. I do not own, operate, manage, or represent any band, venue, or company that I talk about, unless explicitly noted.

publicspeakingWant to use this image for something else? Great! Click it for the link to a high-res or resolution-independent version.

The inspiration for today’s article comes from Resli Costabell, a corporate trainer and professional speaker. She dropped by the Small Venue Survivalist’s Facebook page a few days ago, and left a note:

‘I know you’re about playing music, and I’d also be keen to hear your tips for speakers. Not speakers as in “big black box that pours out sound.” Speakers as in “human being talking.”‘

The great thing about sound for any event, whether that event is based on music or spoken word, is that the physical principles involved don’t change. At all. Sure, there may be differences in specific application, but all the science remains as it has always been. As such, any problems that occur will tend to crop up when there’s an attempt to “Captain Kirk” a situation: “Ya can’na change the laws of physics, Cap’n!”

As I’ve said before, sound reinforcement is all about the best possible show at the lowest possible gain. The first thing we have to figure out, then, is what is critical to the success of the event, and what isn’t. I, and many other audio humans, have been witness to situations where a non-critical element becomes prioritized to the point where it wrecks the experience of the critical parts. The major culprit for public speaking?

Visual Orientation At The Expense Of Sound

This is not, in any sense, about sound craftspersons believing that they are at the center of the Universe. This is about how audio itself IS the center of the Universe at any event where the primary mode for you to impart information is speech. If your engagement with your audience is based on an auditory event (talking, that is), then everything else MUST come second to that. It’s perfectly fine for that second-place finish to be “close.” Yes, you should look professional. Yes, your slide deck should be projected as beautifully as is possible. Yes, it’s good for you to be appropriately animated on stage. Yes, you should be able to hold yourself in a comfortable way. Yes, it’s great to be able to get right up to the first row of attendees.

Yes, but…

If any of that gets in the way of you being heard clearly and comfortably, then it has to take a back seat. If it doesn’t take a back seat, then the brutal, uncompromising, feral, and downright vicious physics of sound will begin clawing and biting at your event’s success. Gain is added to mics until the system begins to noticeably destabilize. More and more equalization is applied, assuming someone is around to apply it. The sound gets more and more “hacked up.” Eventually, an unpleasant equilibrium is reached where your talk is perhaps audible, yet of an irritating tonality, tough to actually parse, and given to “ringing” in a distracting manner.

Don’t be distraught! There are things you can do to fix this.

Prioritizing Audibility

Avoid Scrimping On Audio

An alarming number of presenters will spend enormous amounts of money on signage, computer graphics, handouts, goodies, nifty chairs, nice tables, uplighting, gobo projectors, and floral arrangements…and then have almost nothing left for audio. This is an inappropriate prioritization if speaking is the core of your audience engagement.

Instead, get your sound right first. If you are having AV provided for you, go for the best system available that makes sense. You don’t need a rock-concert rig to speak to 100 people in a breakout room, but a nice mic, a flexible mixer, and some decent loudspeakers on sticks are a much better approach than some $20/ day “mini-PA” that sits on a table. You might also want to consider owning your own PA. A few bits and pieces can sometimes outperform an installed AV system. Also, it can be very nice to have a flexible “front end” if the installed coverage is great…but the controls are poor.

This point is especially important because it underpins the rest of my particulars. With all of my following concepts, I am assuming that a correctly set up and reasonably tuned PA system is being employed. A sound system that is simply inadequate can not be correctly setup or reasonably tuned to best fit your presentation. A very nice system that is not working properly is not very likely to meet your needs.

Get Help

A competent sound crew, able to listen as though they were audience members, is an enormous help to your event. If some part of the system begins to misbehave, a dedicated craftsperson can begin to act on the problem while you continue on. Small issues can be corrected quickly, without you having to think about them. This isn’t even to mention that you can do other things while the audio rig is being set up.

The alternative is that you have to do double duty. There is a point where you alone simply cannot maintain your presentation’s flow and manage audio problems in parallel. Also, it is very hard for any “set and forget” system (whether meaningfully automated or not) to compete with a knowledgeable human operator wielding an appropriate set of tools. A crew, even if it’s just one trustworthy helper, that’s dedicated to your event alone does cost a bit more. The dividends paid from that investment can be enormous, though.

Mic Choice And Technique

For the love of all that is good, please get over any hangups you have regarding blocking your face with a microphone. Microphones work best when the apparent sound pressure of your voice is VERY large when compared to the apparent sound pressure of anything else – the PA system being a valid example of “anything else.” The louder your voice is at the capsule, the less gain is needed. Making your voice the loudest thing at the mic capsule means using a directional mic and holding that mic as close to your mouth as you can. If the overall result of sounds bad because of plosives (“p” and “b” sounds which “boom” or are otherwise problematic), then change the mic position so that the airstream from your mouth is less direct. You can try parking the front of the mic on the tip of your nose, or just below your bottom lip. Be careful not to tilt the mic so that you’re effectively talking into the side of the element. The front is where a directional mic is most sensitive and sounds the best.

Yes, holding a mic in this way is going to cause some sight lines to your face to not be the best. Remember, please, that the audibility of your speech must be the winner of all arguments. I do sympathize with the needs and wants of people running video. I recommend a cordial, polite, and firm stance that three-quarter and profile shots be used if there is a concern over straight-on views.

Implicit in the first paragraph is that a handheld mic is best. A headworn unit can be okay, but it must be placed carefully. Again, the mic should be as close to your mouth as is possible, but bear in mind that many headworns are not meant to be placed directly in front of the mouth. Their “pop-and-blast” filtering is inadequate for that approach. The corner of your mouth is the target area for many of these mics. Get the mic as close to that area as you can, and then ensure that it stays where you’ve put it.

Under no circumstances should your preferred solution be a lavalier mic attached to your jacket or shirt. Holding a directional mic at the level of your chest would not be acceptable, so I have no idea why doing the same thing with an omnidirectional unit would be considered a reasonable approach. With speech, lavalier microphones are indeed useful for “after the fact” video productions. For realtime sound-reinforcement they are simply inappropriate, and if anyone disagrees with me on that point, well, I just don’t care. I will gladly enter a competition where a properly placed lavalier and a properly placed handheld are set against each other in a battle of gain-before-feedback; I am confident that the handheld will be victorious.

Vocal Power

Just a while ago I said that, “Microphones work best when the apparent sound pressure of your voice is VERY large when compared to the apparent sound pressure of anything else.” This really is THE first principle of getting things right when speaking publicly with a PA. In the same way as a powerful singer makes concert sound much easier, so too does a powerful speaker. In fact, the PA system as a whole works best when your voice’s acoustical output is a “very hot” signal.

Speak as loudly as you can without straining. Straining your voice will tire you out, maybe damage your vocal cords, and produce unpleasant overtones that irritate your audience. Without getting to that point, speak as though you had no mic and no PA system. This will help ensure that the direct sound of your voice from your mouth is the largest possible acoustical signal the microphone can encounter. You probably will not be “too loud,” but if you are (and if you’ve followed my advice about getting good gear and good help), you can very easily be turned down. Effectively reducing a system’s gain is trivial when compared to increasing the gain. Reducing overall system gain reduces “smear” from sound looping back through the system, which helps make the presentation sound better.

Where Do You Stand?

Following on some more from my “first principle,” you should seek to stand as far behind (or out of the way of) the PA system as you possibly can. The PA is not for you to hear the sound of your own voice. It is for your audience to hear you. The closer you stand to the PA loudspeakers, and the more you stand in front of them, the greater their apparent sound pressure is from the mic’s standpoint. This, of course, works against your voice being a very large signal when compared to other arrivals at the microphone.

This is another situation where sight lines may suffer a bit for some people. It depends on how the PA is deployed. As always, this is unfortunate, but your voice’s audibility must be the top priority. Your message will probably survive people not being able to see all of you at all times, but it may not survive people not being able to hear.

Acoustical Awareness

A sad fact of life is that many of our gathering spaces are built to hold many people while looking grand…and sound terrible while doing so. In the same way as musicians must be aware of how each player’s sound fits in with other sounds, so too do you have to be aware of your voice and the room. Intelligibility is key, and difficult acoustics ruin intelligibility. The sound of the room’s reverberation can easily “run over” and mask new sounds, even if it’s in a relatively subtle way. For intelligibility, you must have separation between the direct sound of your speech, and the indirect noise of previous sounds that are bouncing around the space.

To some degree, system tuning can help with this, but it’s just a “patch.” If a certain frequency area tends to build up, that area can be de-emphasized in the PA – but you have to be careful! Too much de-emphasis and it will be very obvious that a strange-sounding audio system is firing into a reverberant room. It is simply impossible to equalize one’s way completely out of an acoustical problem. Also, simply adding volume to the sound system doesn’t really help either. The audio system is a sonic emitter in the room, just like any other, and as such the room reverberation is proportional to whatever the PA is doing. A louder PA just means louder reverberation, and also a PA that’s less sonically stable. (Remember: We want the lowest possible gain.)

If PA volume isn’t the answer, then you have only one other element to work with: Time.

In a reverberant room, you MUST slow down. You have to allow for the reverberant sound to die off so that the next sonic event (a word or sentence) is separated from all the garble. Slowing down means that you may have to condenser your presentation, or allow for extra time.

There are some volume adjustments that work, but they have to come from the way you talk. Try to add a bit of emphasis to the “hard” sounds in your speech. Hard sounds act as signposts regarding where words start and end, and are critical to people figuring out what you’ve said if some of the other information is lost. Enunciating those bits mean that they stick out from other sounds, which gives intelligibility a boost.

Of course, if you can, you should pick a space with excellent acoustics for spoken word. That is, a room with a very short reverb time and very low reverb level. The larger such a room is, the more expensive it tends to be – and that loops right back around to not scrimping on audio.


Compact Can Be Accommodated

When the PA is big and heavy, other things can be small and light.

Please Remember:

The opinions expressed are mine only. These opinions do not necessarily reflect anybody else’s opinions. I do not own, operate, manage, or represent any band, venue, or company that I talk about, unless explicitly noted.

toolargeWant to use this image for something else? Great! Click it for the link to a high-res or resolution-independent version.

Related: A mouse can fit in a mouse-sized room, a dog-sized room, and an elephant sized room. An elephant can only fit in an elephant-sized room.

Meditate upon this carefully.

There’s also this bit about elephants and garden hoses.


Practical Gain Staging For Live Sound

Find a way to run your faders where they’re truly useful to you, and don’t clip anything in the process.

Please Remember:

The opinions expressed are mine only. These opinions do not necessarily reflect anybody else’s opinions. I do not own, operate, manage, or represent any band, venue, or company that I talk about, unless explicitly noted.

preampWant to use this image for something else? Great! Click it for the link to a high-res or resolution-independent version.

This article started its life as a request from David Cavan Fraser (‏@dcfmusic on Twitter), who said he wanted to hear about practical gain staging for small venues.

“No problem!” I think – and then suddenly realize that I haven’t given a lot of systematic thought to how I gain stage. It’s not that I haven’t thought about it, and it’s not that it isn’t important. (It is important. Very.) It’s just that I don’t give it a lot of conscious thought anymore. I’ve arrived at a system that seems to work, and when it stops working, I just implement a fix without spending a lot of mental energy.

So, what I’m trying to do here is deconstruct my own thought process. Buckle up, folks!

Distillation

Gain structure is often talked about as a system of rules. There are lots of little parameters, whys, and wherefores, and the whole thing can get unwieldy. Also, rigid. Maybe both.

In my mind, you can bypass a lot of the “cruft” by boiling good gain structure down to three concepts and one accompanying bit of sound-rig physics:

1) The system’s front-end controls must be operable in a practical way that facilitates the running of the show.

2) No part of the system that is intended for linear operation should be pushed into nonlinear operation.

3) The system should not be producing more noise than is acceptable for the application.

If you distort a gain stage, you effectively distort all following gain stages. That is, the sound of the clipping will be passed down the chain, even if no further clipping actually occurs. For this reason, avoid compensating for gain reduction at a point before the gain reduction goes into effect. Instead, compensate for gain reduction at a point AFTER the gain reduction has been applied. If your overall output level is insufficient, compensate for the problem as close to the system’s output side as is practicable.

With all that in your mind, it’s my view that you can handle just about any gain-structure problem that comes your way. Because these are concepts and NOT a procedure, most edge cases are handled automatically: If your usual routine results in one of the three needs not being met, you just make the changes necessary to get things back into alignment. Those changes are situationally dependent, and up to you.

Of course, some specifics would probably be nice, right?

The Preamp

First of all, I generally recommend forgetting about the idea of finding the “sweet spot” on a head amp/ mic pre/ whatever you want to call it. A preamp’s sweet spot is the point where its circuitry is becoming nonlinear with respect to the input. Some preamps just might impart that perfect hint of distortion that adds even-numbered harmonics to a signal, those harmonics being distributed such that the lows and low mids are emphasized “just so.”

They might.

If they’re the right mic pre and you get them set properly. Otherwise, the result will probably not be very nice.

If you really want to go off in pursuit of finding a preamp’s “magical gain setting of happiness,” and you have the time to do so, then go ahead. However, it seems to me that this nifty area of not-too-much-or-too-little nonlinearity is pretty small in comparison with the range where a preamp’s output is:

A) Linear with respect to the input, and

B) Allows the rest of the system’s controls to be run in a useful way.

As an audio-human who is generally WITHOUT the time necessary to chase down the preamp sweet spot on even one channel, and who is almost completely uninterested in running a mic pre in a range with significant nonlinearity anyway, I advise most people to just “get a decent input level and move on.” It’s much easier.

So – what’s a decent level, then?

Well, your numbers may vary. In my case, a preamp output signal that’s about 15 – 20 decibels below clipping is plenty. Because of the way the rest of the system is set up, preamp output at that level lets me run my faders and aux send pots in a convenient part of their travel, use everything else in its linear range, and gets me a long way above the electronic noise floor. (In other words, I satisfy all the conditions that I listed above).

Again, your specific number may vary, though I do certainly recommend setting up your system such that the area around 20 dB below clip is a workable preamp output level. This is a holistic sort of exercise, because everything depends on everything else. Let me explain.

Channel Faders And Knobs

Faders and aux-send knobs (ALSO faders, just rotary instead of linear) have one job: To allow you to conveniently set levels being sent to other destinations. Their ability to do this is directly tied to where your preamp output is, and it’s also tied to every other downstream gain stage. We’ll get to that in more detail – just be aware of it now.

If you’re running an honest-to-goodness pro-audio rig, the various incarnations of volume controls will be logarithmic in nature. That is, near the bottom of their travel, a small movement results in a large gain change. Near their maximum travel, that same amount of control movement results in a much smaller gain change. If the preamp output or console output gain is too high, you’ll find yourself pulling your faders and send knobs back so far that you can’t make “fine” adjustments very easily. If the upstream or downstream levels are too low, your controls may reach the end of their travel before you actually get enough acoustical output.

For the basic question of control usability, I find that a fader or knob that can run somewhere between its own -10 dB and 0 dB points is easily usable. In most cases, this gives me between 10 and 22 decibels of space to “get on the gas” if necessary, and the fader being relatively near its “unity” point means that a small movement doesn’t result in a wild change in level.

Beyond the basic question, though, lie the issues of repeatability and representation of proportion. Which gain stages do those things for you is a matter of personal preference and situational applicability.

Repeatability is the ease of placing multiple, comparable controls at the same setting, or placing one control at the same setting multiple times. There are certain cases where, for example, I want my vocal faders to reflect the basic, correct blend when they’re all at 0 dB. In that case, I will “mix with the preamps” to get an initial proportionality. The preamp gain-knob travels will be different from one another, reflecting the proportionality amongst channels, but the channel faders will be all the same. They won’t represent the proportion, but they are very easy to return to the baseline position. (This is also very handy when a mic is being shared amongst various applications. Getting it back to the right level for the main application is a snap.)

In lots of other situations, however, I tend to prefer a “same preamp gain, different fader position” approach. This is very handy for grab-n-go shows, because you know that channels with the same control positions applied are at the same gain. (Not the same output! The same gain.) This helps in terms of knowing where you are in regards to system instability and feedback. If the input gain on all comparable channels is the same, and things start to get “weird” at a certain point in fader travel on one channel, then things will probably get similarly troublesome for similar channels run with their faders at that level. In this case, the faders show the proportionality of total gain applied, and the preamps are in the more easily repeatable state.

The correct choice of which method to adopt is situationally dependent, as I said. I’ve already mentioned that I do both, although I use “repeatable preamp gain with proportional faders” much more often.

The way this relates to gain staging is that, with the approach where the preamps are repeated, you can end up with significantly “hotter” or “cooler” preamp output then you might otherwise have. If this results in clipping or level-control travel that’s tough to use, you have to rethink your strategy. However, especially for human voices, I have found that a certain overall setup will be right about 90% of the time. Those are pretty good odds.

For monitor world, I am becoming more and more enamored of proportionality on the send knobs with a global fader for trim. The first thing I do is to get things set so that, between a send knob at 0 dB and the global fader at “wherever,” the level is right for the main person needing that thing in the monitors. When that person is happy, I pretty much know for certain that the signal in question is audible through an on-deck wedge. If somebody else needs that channel in the monitors, I can quickly set their sends to 0 dB, which should result in basically the same per-wedge acoustical output as the first person is getting. From there, it’s easy to make fine adjustments as necessary. When done correctly, this results in on-the-fly monitor workflow which is very fast. (Please note that this is a pretty advanced application, requiring a separate or quasi-separate monitor world. I still thought I’d share it, though.)

Output Masters

When it comes to master outputs, I am a big fan of setting up the system’s holistic gain structure so that they can always be initially set at 0 dB, with the option to pull back if necessary. For me, repeatability is the main issue for master levels. I so rarely run into a situation where a mix even has a snowball’s chance of being “too quiet” that I simply don’t worry about the option of adding level at the console output.

This may not be the case for you, however. Where this can become a problem is when a console’s output master can go no higher than “unity gain” (0 dB). In this situation, it’s probably wise to rework the gain structure downstream from the console such that the mix master can be run at, say, -10 dB. Then you’ll have some ability to get louder as the situation dictates. Remember, the reason that I recommend focusing on the downstream (post) console gain structure for this is because “distortion flows downhill.” If you make up for a 10 dB master fader drop on the upstream side, you run a relatively substantial risk of clipping something in the process. The sound of that clipping (ickkkkk…) is passed downstream, all the way to the loudspeakers. By making up the gain on the downstream side, you have a much greater chance of keeping everything in its linear range. A bit more noise is greatly preferable to “crunch.”

No matter how things shake out in terms of control settings, I generally recommend running your console outputs with at least 10 dB of headroom to spare – 20 dB, if you can manage it. (Uncompressed peaks can be great big things.) Those numbers should be scaled appropriately if you’ve pulled the master output down for some reason. For instance, if the master has been pulled back 10 dB, you should ideally have 20 – 30 dB of headroom. If that’s not the case, you’re probably mixing too hot, and you should find a way to add output at a point that’s downstream of the console. You might not be clipping the console output, but you just might be cooking the snot out of the summing bus.

Sidenote: You’ve got to know what your metering is actually reading…

Post Console Processing

When it comes to things like equalizers and crossovers, I find that the repeatability issue takes great precedence. For this reason, I greatly prefer to run my “system drive” processing at unity gain. Please note, however, that an exception exists when you’ve pulled a console output master back so that you can get louder later. In that case, you will need to make up the lost gain somewhere.

As with everything else, you want to keep some headroom in your drive processing. Whatever the unit immediately preceding the amplifiers and loudspeakers is, it should be able to drive the amps into limit or clip without having to be clipped itself. At least 10 dB of headroom is desirable, if you can get it.

The Final Stage

The end of your gain chain is the amplifier. Whether that amplifier is fully exposed to you as an independent unit, or tucked away inside a loudspeaker enclosure with a whole bunch of invisible processing in front of it, the gain on and through the amp is the last piece of the puzzle.

For pro-audio power amps that exist as separate units, it’s very likely that unity input gain and maximum input gain are the same thing. You either pass the input signal straight through to the rest of the amp’s electronics, or you lug it down to some degree. For simplicity, repeatability, and protection against driving the upstream side into distortion, I recommend running amplifiers with their input attenuators wide open. Of course, you should NOT do this if it results in an undue amount of noise, or if it forces you to operate your console in an inconvenient way.

Most amplifiers these days have some sort of clip limiting which reduces (though it may not eliminate) audible distortion from a unit running at full tilt. It’s a very good practice to set up your rig such that the amps can be driven to maximum while everything else stays well within the range of linear operation: If the only system limiter you have is in the amplifier, that should be the only limiter you hit…and you should endeavor to engage that limiter as little as is possible. Not at all, if that’s realistic.

For powered speakers, the basic idea is the same. The upstream side should be able to drive the unit to full throttle without being at full throttle itself. The difference is that a powered speaker may have an input stage which allows for greater than unity gain to be applied to the downstream electronics.

If you do all this, and everything sounds good, but you still don’t have enough output, then there’s only one thing left to do. It’s the ultimate, “as far downstream as possible” makeup gain upgrade. You need to get your hands on more – or just plain louder – PA.


If you’re not completely burned out at this point, you can always go and read my article about the holistic nature of headroom


Bore Me. Please.

July’s guest post for Schwilly Family Musicians.

Please Remember:

The opinions expressed are mine only. These opinions do not necessarily reflect anybody else’s opinions. I do not own, operate, manage, or represent any band, venue, or company that I talk about, unless explicitly noted.

boremepleaseWant to use this image for something else? Great! Click it for the link to a high-res or resolution-independent version.

From the article:

“Of course, your show should be exciting. It should be bursting with color, light, and sonic textures. The attention of everyone in attendance should be held rapt with every word, such that any notion of NOT being enthralled by your performance borders on the distasteful.

However…

The technical execution of your show should not be exciting at all. It should contribute nothing to the adrenaline rush of the experience. For the humans tasked with the practical work of ensuring that your show does burst with tangy lights and savory audio, pulling it all off should be routine.

Workaday.

Maybe even dull.

Why?”


Read the rest, for free, at Schwilly Family Musicians.


Pickups Are Helpful Kit – For Audio-Humans

I am of the opinion that a couple of removable pickup options are very helpful things for a tech to own.

Please Remember:

The opinions expressed are mine only. These opinions do not necessarily reflect anybody else’s opinions. I do not own, operate, manage, or represent any band, venue, or company that I talk about, unless explicitly noted.

pickupsWant to use this image for something else? Great! Click it for the link to a high-res or resolution-independent version.

I’m not trying to zing anybody, or speak disrespectfully about (or toward) any musician, but… I swear that there’s an unwritten rule regarding players of acoustic guitars. This unwritten rule apparently states that acoustic guitars without pickups MUST be sold to players who use a delicate technique.

When I encounter an acoustic player who has no kind of pickup for their guitar at all, the chances are alarmingly high that the player will have a “jazzy” style (quiet), or be playing achingly tender love songs, fingerstyle (really danged quiet). Further, this situation will occur in a bar or other casual setting where the audience WILL NOT SHUT UP. So, you point a mic at that big, resonating reflector of an instrument, do your best to get enough level for both the house and the deck, field the inevitable “Can’t you turn it up?” questions, and brace for the feedback problems which are almost sure to pounce.

The whole situation is basically crap for everyone.

So, if you’re an audio-human, I urge you: Buy a few more things for your workbox/ goody kit/ whatever you call it. You know, that collection of adapters, hand tools, cables, and mics that you carry around to help you out in a pinch. (You do have one, right?)

What To Buy

The few more things you should buy are a “no tools” soundhole pickup, a contact pickup, and an active DI box for each. The whole grouping can cost you less than $175, and its worth in unsuckifying your life is enormous. The peace of mind you get in knowing that your gain-before-feedback can be considerably more manageable is, itself alone, enough to justify the expenditure. Having these items handy is about as close as I think any of us can get to having a magic rabbit that can be pulled from a hat.

So, what’s it all for? Well…

1) The soundhole pickup is for acoustic guitars with metallic strings. You want one that has the semi-spongy “inserts” on the sides, so that it can fit a range of soundhole sizes. You also want one with humbucking coils. I personally have a couple of single coil models, and while I’m fine with them, their susceptibility to electronic interference is rather higher than I’d prefer.

2) Someday, you will encounter a guitar player who uses nylon strings. On that day, you will learn to love your contact pickup. As far as I can tell, a contact pickup is nothing more exotic than a piezo element in an attractive housing. The pickup should have some tacky putty pre-applied to the housing, so that you can stick the thing directly to an instrument. If not, poster putty is cheap and essentially the same thing. Finding a really good placement for the pickup can take some doing, but sticking it behind the bridge and being ready to wield a parametric EQ is a good guess if you don’t have time on your side. Also, this pickup ISN’T JUST FOR GUITARS! It can work on a lot of otherwise troublesome instruments. I have been very relieved to have a contact pickup on hand for the odd cello that comes through. I also want to try using one on a musical saw, the next time I have a chance.

3) The active DI is the missing link that ensures your pickups will play nicely with the console. I like passive pickups because there are no batteries to have die at an inconvenient time, but the drawback – especially with piezo-based contact mics – is that the pickup output impedance is higher than the mountains of Nepal. If the pickup were a water pump, it would be capable of very healthy pressure…but that pressure would be coming through a pipe with a diameter comparable to a novelty soda-straw. Acceptable voltage transfer and circuit damping requires a very healthy amount of impedance at the direct box’s input side, and that’s what an active unit gives you. Be aware that “expensive” doesn’t necessarily mean “active.” It’s entirely possible to spend $200 on a passive unit and not have sufficiently high input impedance. Look first at what the unit is, and then look at the price.

Put all this together, and you’ll have a very handy survival kit for players without pickups of their own. Yes, you DO need to ask before using the pickups. Especially in the case of the contact unit, it’s rather impolite to just tack it onto an instrument without getting permission. If you’re denied permission, then you’re stuck with using a mic and toughing out the set – but if you’ve got these extra bits on hand, having to tough it out won’t be your fault.


Where’s Your Data?

I don’t think audio-humans are skeptical enough.

Please Remember:

The opinions expressed are mine only. These opinions do not necessarily reflect anybody else’s opinions. I do not own, operate, manage, or represent any band, venue, or company that I talk about, unless explicitly noted.

traceWant to use this image for something else? Great! Click it for the link to a high-res or resolution-independent version.

If I’m going to editorialize on this, I first need to be clear about one thing: I’m not against certain things being taken on faith. There are plenty of assumptions in my life that can’t be empirically tested. I don’t have a problem with that in any way. I subscribe quite strongly to that old saw:

You ARE entitled to your opinion. You ARE NOT entitled to your own set of “facts.”

But, of course, that means that I subscribe to both sides of it. As I’ve gotten farther and farther along in the show-production craft, especially the audio part, I’ve gotten more and more dismayed with how opinion is used in place of fact. I’ve found myself getting more and more “riled” with discussions where all kinds of assertions are used as conversational currency, unbacked by any visible, objective defense. People claim something, and I want to shout, “Where’s your data, dude? Back that up. Defend your answer!”

I would say that part of the problem lies in how we describe the job. We have (or at least had) the tendency to say, “It’s a mix of art and science.” Unfortunately, my impression is that this has come to be a sort of handwaving of the science part. “Oh…the nuts and bolts of how things work aren’t all that important. If you’re pleased with the results, then you’re okay.” While this is a fair statement on the grounds of having reached a workable endpoint through unorthodox or uneducated means, I worry about the disservice it does to the craft when it’s overapplied.

To be brutally frank, I wish the “mix of art and science” thing would go away. I would replace it with, “What we’re doing is science in the service of art.”

Everything that an audio human does or encounters is precipitated by physics – and not “exotic” physics, either. We’re talking about Newtonian interactions and well-understood electronics here, not quantum entanglement, subatomic particles, and speeds approaching that of light. The processes that cause sound stuff to happen are entirely understandable, wieldable, and measurable by ordinary humans – and this means that audio is not any sort of arcane magic. A show’s audio coming off well or poorly always has a logical explanation, even if that explanation is obscure at the time.

I Should Be Able To Measure It

Here’s where the rubber truly meets the road on all this.

There seems to be a very small number of audio humans who are willing to do any actual science. That is to say, investigating something in such a way as to get objective, quantitative data. This causes huge problems with troubleshooting, consulting, and system building. All manner of rabbit trails may be followed while trying to fix something, and all manner of moneys are spent in the process, but the problem stays un-fixed. Our enormous pool of myth, legend, and hearsay seems to be great for swatting at symptoms, but it’s not so hot for tracking down the root cause of what’s ailing us.

Part of our problem – I include myself because I AM susceptible – is that listening is easy and measuring is hard. Or, rather, scientific measuring is hard.

Listening tests of all kinds are ubiquitous in this business. They’re easy to do, because they aren’t demanding in terms of setup or parameter control. You try to get your levels matched, setup some fast signal switching, maybe (if you’re very lucky) make it all double-blind so that nobody knows what switch setting corresponds to a particular signal, and go for it.

Direct observation via the senses has been used in science for a long time. It’s not that it’s completely invalid. It’s just that it has problems. The biggest problem is that our senses are interpreted through our brains, an organ which develops strong biases and filters information so that we don’t die. The next problem is that the experimental parameter control actually tends to be quite shoddy. In the worst cases, you get people claiming that, say, console A has a better sound than console B. But…they heard console A in one place, with one band, and console B in a totally different place with a totally different band. There’s no meaningful comparison, because the devices under test AND the test signals were different.

As a result, listening tests produce all kinds of impressions that aren’t actually helpful. Heck, we don’t even know what “sounds better” means. For this person over here, it means lots of high-frequency information. For some other person, it means a slight bass boost. This guy wants a touch of distortion that emphasizes the even-numbered harmonics. That gal wants a device that resembles a “straight wire” as much as possible. Nobody can even agree on what they like! You can’t actually get a rigorous comparison out of that sort of thing.

The flipside is, if we can actually hear it, we should be able to measure it. If a given input signal actually sounds different when listened to through different signal paths, then those signal paths MUST have different transfer functions. A measurement transducer that meets or exceeds the bandwidth and transient response of a human ear should be able to detect that output signal reliably. (A measurement mic that, at the very least, significantly exceeds the bandwidth of human hearing is only about $700.)

As I said, measuring – real measuring – is hard. If the analysis rig is setup incorrectly, we get unusable results, and it’s frighteningly easy to screw up an experimental procedure. Also, we have to be very, very defined about what we’re trying to measure. We have to start with an input signal that is EXACTLY the same for all measurements. None of this “we’ll set up the drums in this room, play them, then tear them down and set them up in this other room,” can be tolerated as valid. Then, we have to make every other parameter agree for each device being tested. No fair running one preamp closer to clipping than the other! (For example.)

Question Everything

So…what to do now?

If I had to propose an initial solution to the problems I see (which may not be seen by others, because this is my own opinion – oh, the IRONY), I would NOT say that the solution is for everyone to graph everything. I don’t see that as being necessary. What I DO see as being necessary is for more production craftspersons to embrace their inner skeptic. The lesser amount of coherent explanation that’s attached to an assertion, the more we should doubt that assertion. We can even develop a “hierarchy of dubiousness.”

If something can be backed up with an actual experiment that produces quantitative data, that something is probably true until disproved by someone else running the same experiment. Failure to disclose the experimental procedure makes the measurement suspect however – how exactly did they arrive at the conclusion that the loudspeaker will tolerate 1 kW of continuous input? No details? Hmmm…

If a statement is made and backed up with an accepted scientific model, the statement is probably true…but should be examined to make sure the model was applied correctly. There are lots of people who know audio words, but not what those words really mean. Also, the model might change, though that’s unlikely in basic physics.

Experience and anecdotes (“I heard this thing, and I liked it better”) are individually valid, but only in the very limited context of the person relating them. A large set of similar experiences across a diverse range of people expands the validity of the declaration, however.

You get the idea.

The point is that a growing lack of desire to just accept any old statement about audio will, hopefully, start to weed out some of the mythological monsters that periodically stomp through the production-tech village. If the myths can’t propagate, they stand a chance of dying off. Maybe. A guy can hope.

So, question your peers. Question yourself. Especially if there’s a problem, and the proposed fix involves a significant amount of money, question the fix.

A group of us were once troubleshooting an issue. A producer wasn’t liking the sound quality he was getting from his mic. The discussion quickly turned to preamps, and whether he should save up to buy a whole new audio interface for his computer. It finally dawned on me that we hadn’t bothered to ask anything about how he was using the mic, and when I did ask, he stated that he was standing several feet from the unit. If that’s not a recipe for sound that can be described as “thin,” I don’t know what is. His problem had everything to do with the acoustic physics of using a microphone, and nothing substantial AT ALL to do with the preamp he was using.

A little bit of critical thinking can save you a good pile of cash, it would seem.

(By the way, I am biased like MAD against the the crowd that craves expensive mic pres, so be aware of that when I’m making assertions. Just to be fair. Question everything. Question EVERYTHING. Ask where the data is. Verify.)


Building A Small System

A guide to building a simple live-sound rig, from input to output.

Please Remember:

The opinions expressed are mine only. These opinions do not necessarily reflect anybody else’s opinions. I do not own, operate, manage, or represent any band, venue, or company that I talk about, unless explicitly noted.

systembuildingWant to use this image for something else? Great! Click it for the link to a high-res or resolution-independent version.

Every once in a while, I get a request for information on how to create or add-on to a system for live audio. I like to personalize this information, because rigs for show and event production are best built for specific applications. However, there is a point where insisting that everything be approached in a customized way becomes inefficient – a lot of the same ground gets covered repeatedly.

So…

If you’re wondering what I think is required for a “small, basic, but still worthwhile” audio rig, read on. I’ll be including lots of links to vendor pages where you can buy various products.

(We’re going to go in order of signal flow, by the way.)

Input Transducers and Interfaces

For the smallest possible rig, take a distributed approach: With anything other than vocals, have the musician supply their own, personalized sound. Further, seek to avoid the whole issue of putting the output of that sound through the PA. Let a guitar amp make the guitar sound, let the drums just make their own noise in the room, and so on.

Having the ability to put more in the PA increases your potential control over the sound of the show, but outside factors can prevent that potential control from becoming actual control. Also, more inputs means more complexity, and thus more difficulty in system operation. There’s no hard and fast rule of what to be ready to reinforce, but I generally encourage folks – especially folks new to this whole thing – to ease themselves into the maelstrom that is live audio.

Wired Microphones

A decent mic will basically sound like the thing it’s being pointed at. For this reason, don’t agonize about getting specialized mics for everything right off the bat. A good “vocal” mic will be fine for many, many instrument applications. I recommend buying mics with tighter patterns (super or hypercardioid), as they can make the handling of high-gain situations much easier. Tight-pattern mics do require that the musicians – especially the vocalists – be able to use them appropriately. This issue should be considered as something for the musicians to figure out, because no system can fix everything (and a basic rig can fix even less of everything, if you take my meaning).

My current favorite mic is the EV ND767a. You might also consider the Audix OM2. Here’s a comparison of the two at Sweetwater.

Microphone Accessories

Each mic you buy will require an appropriate stand and XLR-Female to XLR-male cable.

Budget stands (like these from OnStage Stands) are just fine… if you can put in the effort to be nice to them. Gator Frameworks also has some promising offerings.

When it comes to cable, don’t overspend and don’t oversave. For a 20+ foot mic cable, paying more than $1.00 per foot is a huge premium for no benefit that I’ve been able to clearly observe. There are perfectly decent cables that can be had for as low as $0.40 per foot when purchased in a bundle. Going much below that, though, is likely to lead to problems.

I’ve been quite happy with cables I’ve gotten from Audiopile and Orange County Speaker. I’ve gotten some REALLY inexpensive cables from Unique Squared that were okay for a good while, but started having problems after a number of uses.

Wireless Mics

One word: Don’t.

Wireless is a pain in the donkey, with the FCC selling off all kinds of UHF spectrum to cellphone and computing companies, and the frequencies used for digital wireless becoming ever more crowded and hostile. Functionally, wireless transmission of audio is far more “fragile” than signal running on a cable, with all kinds of weird things that can happen outside your control.

But no matter what I say, you’re going to buy at least one wireless mic anyway, so…

Buy a digital system that operates in the 2.4 Ghz band if you want a chance at retaining your sanity in the short term. Specifically, look at the XD-V55 systems by Line 6. They’re very reasonably priced, have nice features like remote monitoring of mute status and battery level, and are the best wireless experience I’ve personally had to date.

You can, of course, go up from there.

Wireless Mic Accessories

Handheld wireless mics benefit greatly from having a stand available for every transmitter. Further, each receiver will need a cable to interface with the rest of the system.

Direct Boxes

A direct box is what I class as an “interface,” because it doesn’t convert acoustical events into electrical signals. A DI makes signals that are already electrical play nicely with pro-audio equipment when they might not otherwise. An aspect of this is also isolation, in that the DI creates what you might call an indirect connection between a console and a device. This can be very handy if the sending device (a guitar, keyboard, sampler, whatever) can’t tolerate phantom power, and the console has phantom applied to the signal line in question.

Direct boxes come in two main flavors, passive and active. Active DI boxes require external power of some kind, be that power from the wall, batteries, or phantom from the console. If you’re going to buy DI boxes, buy ACTIVE models. An active DI will work with almost anything, whereas some instrument pickups pair quite badly with passive boxes. You might as well buy units that work everywhere, and thus simplify your life. Expensive models from BSS, Radial, and Countryman are certainly nice, but there’s great value to be had in units from ART and Behringer, especially the “multiple modules in one box” offerings.

DI Box Accessories

Just like a microphone, each DI box will require an XLR-Female to XLR-Male cable. Remember that multi-module DI boxes require a cable for each individual module.

You don’t have to actually mount a rackable DI system, but you might want to. Sweetwater and Audiopile both sell quality rack cases in a huge variety of configurations.

Snakes/ Multicore Connections

Depending upon how you implement the mix and signal processing part of the rig, you may or may not require multicore cabling. If you want to send and receive a bunch of audio signals at a remote location, a snake really is a must. If you merely want to control the processing of signals from a remote location, you might be able to use your console in the same way you would use a traditional snakehead or stagebox.

If you do use a multicore, I suggest getting one that’s a little “overkill” in terms of the number of lines it contains. If a line fails, you’ll have a spare to patch to. “Headless or “fan-to-fan” snakes are a bit cheaper, but less convenient than multicores that terminate one end at a box. (You will always have to hunt for the specific line you want to connect to. It’s like a law of nature, or something.)

Audiopile would be my first choice for buying a snake I was really serious about. I have had good results with Seismic Audio fantail-to-fantail snakes, but my experience with their stagebox offerings has been mixed.

Mixing Consoles and Output Processing

This is where things get REALLY interesting.

Essentially, you have three major choices:

1) Use a relatively simple console where output processing is handled externally, and place all that at a “remote” location.

2) Use a more sophisticated console that encapsulates the output processing, and place the console at a “remote” location.

3) Use a more sophisticated console that encapsulates the output processing, leave the console close to the stage, and control the console from a remote location.

Option one takes up more space and requires more complicated physical patching, but the interface can be easier to understand at an intuitive level. Option two is compact and easy to physically patch, but the whole thing can be less intuitive for an inexperienced operator. Option three is like option two, with the added issue that control can depend entirely on an external device and network connection. If those fail, you may be in big trouble.

In every case, a console with some room to grow in terms of both inputs and outputs is a good idea. Don’t go overboard, though. You’ll end up spending a lot of money to no functional end. Especially if you’re new to all this, keep your monitor sends down to a maximum of four.

Option 1

The Console

Whatever you do, buy a console where the EQ has sweepable mids on the EQ and pre-fader auxiliary sends for each unique monitor mix you want to handle. A Soundcraft EPM8 is probably the minimum you should look for. I’ve been quite pleased with Yamaha’s mid-basic offerings, which have been revamped since I’ve bought one.

Simple, analog consoles “race” in a VERY tight pack, which means that there are lots of little permutations and many viable choices. Mackie, A&H, and Peavey are all worth looking at, and Behringer, while not having the shiniest reputation, has a knack for cramming lots of features into small cost. An XL2400 has what I would consider to be pretty darn flexible routing for a $650 mixer.

Console Accessories

Some consoles can be easily cased up or rackmounted, and some can’t.

You will need patch cables and/ or adapters with appropriate ends to get from your console outputs to your processing, one cable for each channel. As with other cables, high-dollar options really aren’t necessary. Stay somewhere in the $2/ foot range, and you’ll have patch connections that are long enough for some wiggle room and cheap enough that you won’t cry about ’em.

Also, get yourself a decent set of headphones for listening to the console’s solo bus. I have a pair of very-well-loved HD280s, and lots of other options exist. You want to look for closed-back, durable, “un-hyped” phones if you’re doing your own hunting.

The Processing

What you choose for output processing depends greatly on your own personal taste and comfort level. At the minimum, you should have an independent EQ for each mix. A really basic setup might be three mixes – one for the audience, and two monitor mixes for the stage. Things go up from there, of course.

Graphic equalizers, while not my personal favorite, are straightforward for most folks to operate. I generally recommend 31-band models over 15-band units, because you can focus in on a problem area without sledgehammering material that’s not making trouble. Peavey and dBX are good overall bets, but affordable graphics are similar to affordable consoles: All the players are very similar. I do like the features of the Behringer FBQ3102, but I also had one die after a year of use and a bumpy ride in the back of a truck.

If I’m going for an EQ-only solution, I can tell you that I vastly prefer a flexible parametric EQ over a graphic. In that realm, I have been extremely impressed by Behringer’s Feedback Destroyers. To be clear, my experience is that their automated feedback management is mediocre at best – but they are WICKED HANDY when you run them manually. You get a huge number of fully parametric filters at a very low price point. I’ve never had a major problem with any Feedback Destroyer I’ve owned. (Be aware that parametric EQ is more involved than graphic EQ. It’s not quite as “grab-n-go.” There are more choices that you have to make deliberately.)

If you want your processing to include dynamics, and also to let you have a graphic EQ combined with a parametric EQ, then a Behringer DEQ2496 is another killer device. Again, I haven’t found anything else exactly like it “in the wild,” although a Driverack PA2 is actually very close. DEQ2496 units do sometimes have problems with one of the internal connectors getting loose, but it’s an easy fix once you get the cover pulled off the device…and the connector freed from being glued down. (You will very definitely void your warranty if it’s still in effect, but hey, live a little.)

Processing Accessories

You may or may not be able to patch your snake returns (or other output cables) directly to your processing, so some adapters or patch cables might be necessary.

Also, you should definitely rack up any outboard processors you have for your system. It really does help to keep things neat and tidy.

Option 2

The Console

Digital consoles are a great route to take if you want to keep everything in one box. The downside, of course, is that the one box becomes a single point of failure. Then again, in any case, losing the console pretty much ends your day if you don’t have a spare.

Another factor to consider is that the processing available in digital consoles tends to be more fully featured while also being somewhat abstracted. This can make them overwhelming for new users, who simply don’t know what to make of all the options available.

If you’re going to be physically present at the console, you may as well get one that has a control-surface integrated in some way. An X32 Producer is a pretty natural choice, along with offerings from Presonus, Allen & Heath, and QSC.

Console Accessories

As was said earlier, rackmounting or casing the console might be possible. You can decide if you want to go to the expense or not.

The need to buy patch cables or adapters may still be there, depending on the configuration of your snake or other output lines.

And you’ll still want some headphones.

Option 3

The Console

You can leave the console on stage and mix remotely with the consoles detailed above, although the control surface might be a bit of a waste. Affordable digi-mixers that lack a surface are an interesting new product on the scene – just remember to factor in the cost of a remote-control laptop or tablet. Also, be aware that remote control is inherently a bit more “shaky” than being physically present at the mixer. It’s not horribly problematic, of course, but you have to have a contingency plan.

Surfaceless consoles at lower price points are available from Behringer, Soundcraft, and A&H. More expensive units also exist, of course.

Console Accessories

Surfaceless consoles are definitely rackable, and definitely should be.

Remember to buy the necessary patch cables or adapters for the outputs.

…but you can probably skip the headphones, because the consoles don’t currently stream the solo bus to a remote location (that I know of). That’s another downside of the number three option – to access the solo bus, you still have to be physically present at the console’s location.

Output Transducers (Speakers, That Is)

You’ll notice that I didn’t include an option for amps and passive speakers, and there’s a reason for that: This is supposed to be a simple system, and powered speakers are really the way to go to achieve simple.

Also in the service of simple is to keep your monitor wedges and FOH speakers interchangeable. Unless it’s completely inappropriate for your application, having loudspeakers that are all of the same model means that you can expect similar behavior from each box. If a failure occurs, you can swap one box for another and not have to think about it too much.

When buying powered loudspeakers, accept nothing less than an honest-to-goodness, biamped, fully processed unit. There are plenty of powered speakers that are single amped, with no processing outside of a passive crossover that is placed between the amplifier and the drivers. You want something more – something with an active crossover, basic corrective EQ applied at the factory, and an internal limiter. A peak SPL rating of greater than 120 dB @ 1 meter is also a good thing to look for, even with all the “fudging” that marketing departments apply to output numbers.

In terms of specific recommendations, I can say that PVXP12s have done very well for me. I can do “rock and roll” monitors with them in a small space, and I’m confident that they would perform equally well as an FOH unit. There are lots of other possibilities of course, provided by JBL, Mackie, Yamaha, and Behringer (just to name a few).

Loudspeaker Add-Ons

First, make sure you have the necessary cables to get from the console or snake outputs to the loudspeakers. Because speakers tend to be deployed in a rather spread-out fashion, it’s advisable to buy a bit more cable than you think you need. A 50 footer for each loudspeaker is probably a good start.

When it comes to stands for your FOH speakers, it’s good to get something a little nicer. Stands with locking collars and/ or piston assists can be a big help. I’ve used crank stands in the past, and they’re okay, but given a chance I’d make the upgrade to a more technologically advanced support.

The Biggest Accessories Of All

In the end, none of the fancy gear will mean much without power. You don’t have to buy really fancy power-conditioning equipment, but some rackmountable power units help reduce the need to fish around for a bunch of “free range” power taps. Of course, you should still keep a few freely-positionable power taps handy, along with several extension cords that use 14-gauge conductors (or something beefier, like 12-gauge). Powered speakers spread out all over creation have an alarming tendency to need those extension cords.


While there are other sundries and gadgets you can add on, going through the above should get you a working rig. As I said, this is a basic system. It won’t do everything for everybody all the time, but it should provide you with a decent start.

The Glorious Spectrograph

They’re better than other real time analysis systems.

Please Remember:

The opinions expressed are mine only. These opinions do not necessarily reflect anybody else’s opinions. I do not own, operate, manage, or represent any band, venue, or company that I talk about, unless explicitly noted.

thegloriousspectrographWant to use this image for something else? Great! Click it for the link to a high-res or resolution-independent version.

I don’t really know how common it is, but there are at least a few of us who like to do a particular thing with our console solo bus:

We connect some sort of analyzer across the output.

This is really handy, because you can look at different audio paths very easily – no patching required. You do what you have to do to enable “solo” on the appropriate channel(s), and BOOM! What you’ve selected, and ONLY what you’ve selected, is getting chewed on by the analyzer.

The measurement solution that seems to be picked the most often is the conventional RTA. You’ve almost certainly encountered one at some point. Software media players all seem to feature at least one “visualization” that plots signal magnitude versus frequency. Pro-audio versions of the RTA have more frequency bands (often 31, to match up with 1/3 octave graphic EQs), and more objectively useful metering. They’re great for finding frequency areas that are really going out of whack while you’re watching the display, but I have to admit that regular spectrum displays have often failed to be truly useful to me.

It’s mostly because of their two-dimensional nature.

I Need More “Ds,” Please

A bog-standard spectrum analyzer is a device for measuring and displaying two dimensions. One dimension is amplitude, and the other is frequency. These dimensions are plotted in terms of each other at quasi-instantaneous points in time. I say “quasi” because, of course, the display does not react instantaneously. The metering may be capable of reacting very quickly, and it may also have an averaging function to smooth out wild jumpiness. Even so, the device is only meant to show you what’s happening at a particular moment. A moment might last a mere 50ms (enough time to “see” a full cycle of 20 Hz wave), or the moment might be a full-second average. In either case, once the moment has passed, it’s lost. You can’t view it anymore, and the analyzer’s reality no longer includes it meaningfully.

This really isn’t a helpful behavior, ironically because it’s exactly what live production is. A live-show is a series of moments that can’t be stopped and replayed. If you get into a trouble spot at a particular time, and then that problem stops manifesting, you can’t cause that exact event to happen again. Yes, you CAN replicate the overall circumstances in an attempt to make the problem manifest itself again, but you can’t return to the previous event. The “arrow of time,” and all that.

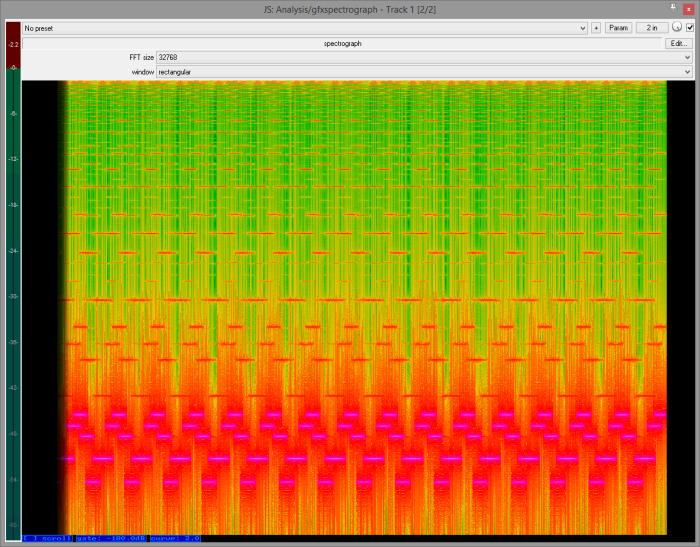
This is where the spectrograph reveals its gloriousness: It’s a three-dimensional device.

You might not believe me, especially if you’re looking at the spectrograph image up there. It doesn’t look 3D. It seems like a flat plot of colors.

A plot of colors.

Colors!

When we think of 3D, we’re used to all of the dimensions being represented spatially. We look for height, width, and depth – or as much depth as we can approximate on displays that don’t actually show it. A spectrograph uses height and width for two dimensions, and displays the third with a color ramp.

The magic of the spectrograph is that it uses the color ramp for the magnitude parameter. This means that height and width can be assigned, in whatever way is most useful, to frequency and TIME.

Time is the key.

Good Timing

With a spectrograph, an event that has been measured is stored and displayed alongside the events that follow it. You can see the sonic imprint of those past events at whatever time you want, as long as the unit hasn’t overwritten that measurement. This is incredibly useful in live-audio, especially as it relates to feedback.

The classic “feedback monster” shows up when a certain frequency’s loop gain (the total gain applied to the signal as it enters a transducer, traverses a signal path, exits another transducer, and re-enters the original transducer) becomes too large. With each pass through the loop, that frequency’s magnitude doesn’t drop as much as is desired, doesn’t drop at all, or even increases. The problem isn’t the frequency in and of itself, and the problem isn’t the frequency’s magnitude in and of itself. The problem is the change in magnitude over time being inappropriate.

There’s that “time” thing again.

On a basic analyzer, a feedback problem only has a chance of being visible if it results in a large enough magnitude that it’s distinguishable from everything else being measured at that moment. At that moment, you can look at the analyzer, make a mental note about which frequency was getting out of hand, and then try to fix it. If the problem disappears because you yanked the fader back, or a guitar player put their hand on their strings, or a mic got temporarily moved to a better spot, all you have to go on is your memory of where the “spike” was. Again, the basic RTA doesn’t show you measurements in terms of time, except within the limitations of its own attack and release rates.

But a spectrograph DOES show you time. Since a feedback problem is a limited range of frequencies that are failing to decay swiftly enough, a spectrograph will show that lack of decay as a distinctive “smear” across the unit’s time axis. If the magnitude of the problem area is large enough, the visual representation is very obvious. Further, the persistence of that representation on the display means that you have some time to freeze the analyzer…at which point you can zero in on exactly where your problem is, so as to kill it with surgical precision. No remembering required.

So, if you’ve got a spectrograph inserted on your solo bus, you can solo up a problem channel, very briefly drive it into feedback, drop the gain, freeze the analyzer, and start fixing things without having to let the system ring for an annoyingly long time. This is a big deal when trying to solve a problem during a show that’s actually running, and it’s also extremely useful when ringing out a monitor rig by yourself. If all this doesn’t make the spectrograph far more glorious than a basic, 2D analyzer, I just don’t know what to do for you.