Tag Archives: Monitors

The Order Matters

Getting your signal chain sorted out is key – especially when monitor world and FOH come together.

Please Remember:

The opinions expressed are mine only. These opinions do not necessarily reflect anybody else’s opinions. I do not own, operate, manage, or represent any band, venue, or company that I talk about, unless explicitly noted.

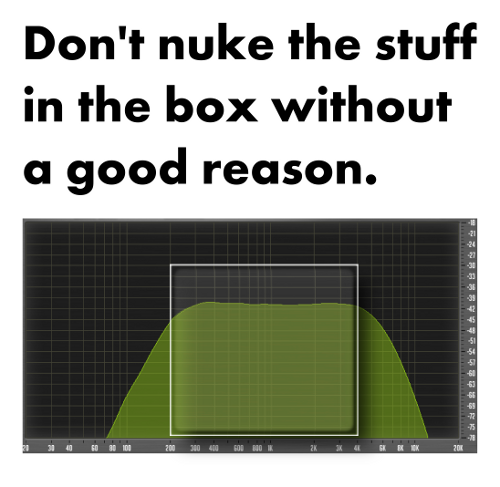
Sometimes, you have to do things that “break the rules.”

Audio-humans internalize a lot of pointers as they learn their craft, and those tactics are often in place for very good reasons. When a given way of making things happen has survived for decades, it’s usually because it’s either a really good idea, or we just haven’t found a way around it yet. The problem that arises, though, is that a lot of techs don’t know the “deep roots” of why certain signal flows are as they are.

For instance, just about everybody knows that a gate should – 99% of the time – be placed pre-compression. Not everybody can verbalize the “why” of that rule, though. The “deep root” of the rule is that dynamic range expansion (gating) works more effectively as the dynamic range of an input signal increases. The less of a level difference that you have between the material you want gated out and the material you want to keep, the less able you are to cause the gate to discriminate between the two. Compressing a signal at some point that’s pre-gate is just working against yourself, because compression is dynamic range reduction.

But I digress.

The point of this article isn’t to get into every kind of signal flow arrangement. The idea here is to relate an anecdote that shows why I had to “break some rules” recently. It was all in the name of getting FOH (Front Of House) and monitor world to play nicely.

FX Out Front and On Deck

As I was soundchecking a band, one of the players expressed a request to have reverb on his instrument. He also specifically requested that the reverb be routed to the monitors.

Here’s where the trouble can start.

See, “everybody knows” that reverbs are fed from post-fader sends. Most of the time, this is the right thing to do. You use the send to create a reverb proportionality, and if you end up pushing the channel level around, the proportionality stays the same. If the fader goes up 6 dB, the reverb level goes up 6 dB – the wet/ dry mix remains as it was set. That’s a good thing.

Except when it isn’t.

The problem in the “Curious Case of a Reverb That’s Going to FOH and Monitor World” is that you DON’T want the reverb level to track with level changes out front. If it does, then the wet/ dry blend on deck can go all over the place during the show. This is especially true in small venues, where a instrument may be completely “out” until a solo, at which point you drive the level up into audible territory. That could mean an effective dynamic range of 80 db or more. Possibly a lot more.

Obviously, appearing and disappearing reverb isn’t what the gents on stage are after. As a result, the “post-fader sends to FX” rule has to go out the window, because it’s no longer appropriate. Instead, the reverb has to be run from a pre-fader send. As long as you don’t fiddle with your preamp gain, the reverb level will be unaffected by what you’re doing out front.

Or will it?

The other thing you have to be aware of is where that pre-fader send lives in relation to your channel EQ. If you have something bizarre going on with the channel EQ for FOH (and you very well might), and that pre-fader send takes a split AFTER the EQ, your reverb may sound awfully strange.

What To Do, What To Do?

The first thing that you have to do is prioritize. In most cases, making a consistent blend “easy” for monitor world should come before making FOH easy. (There’s probably a whole article to be written about this, but the short version is that you can often hear, and act on, issues in FOH faster than issues on deck.)

The next thing to do is to figure out what you need for that prioritization to be fulfilled. In this case, I needed reverb that was driven from a pre-fader, pre-EQ signal. I also needed the “wet” audio from the reverb to be independently routable to FOH and the monitor wedges. Making this happen for me is no problem, because I run a console with insanely flexible routing. I can actually use “subchannels” within channels to pass audio “around” processors, and any channel can send to or receive from any other channel. I also have the built-in option to run sends pre or post any channel processing.

But, what if you don’t have all that?

Heck, what if you don’t have completely separate sets of channels for FOH and monitor land?

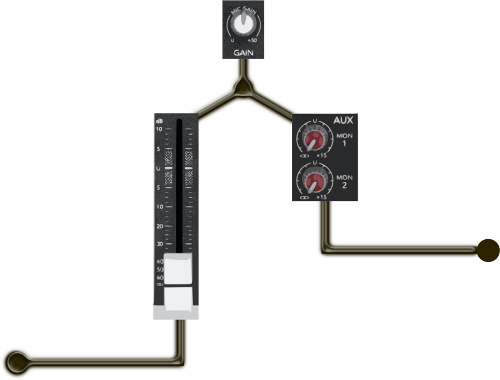
You can still make this happen. Take a look:

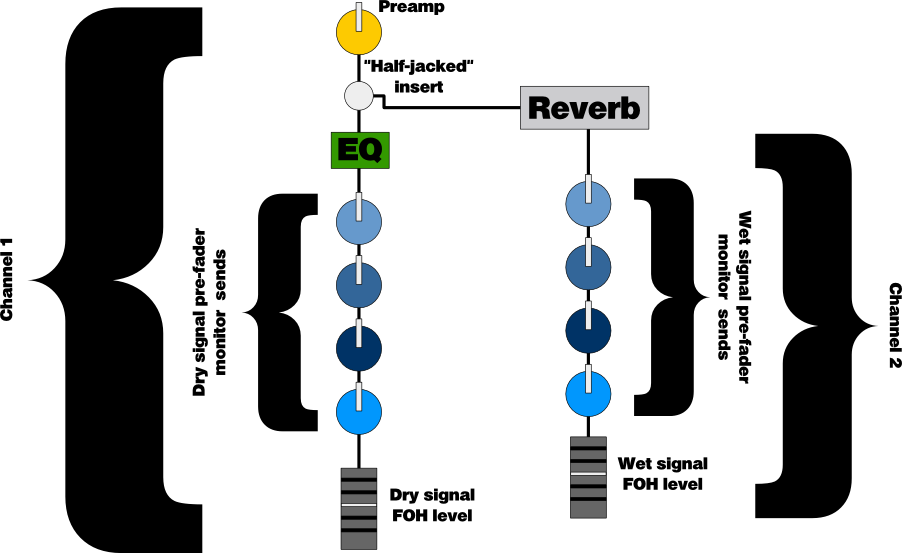
The “half-jacked” insert lets you mult (split) the original signal over to the reverb. At the same time, the signal continues to flow through the FOH channel and its monitor sends. You can then take the reverb processor’s output, put that in a different channel, and use the pre-fader sends to get reverb to monitor world. The reverb channel’s fader output can then be blended into FOH as necessary.

With this kind of setup, you can go hog-wild with your FOH levels, and monitor world won’t be directly affected. There are other ways of accomplishing this, of course, but this setup is one of the simpler ones.

Yes, this is a bit more complicated than what you might think of “off the cuff,” but it lets you have what you need out front without compromising what the folks on deck can have for themselves. I think it’s worth doing if you have the channels, and it’s not that hard to adapt to your own needs…

…you just have to remember that “the order matters.”


The Peavey PVXp-12

As usual, Peavey delivers a competent product with only a few downsides.

Please Remember:

The opinions expressed are mine only. These opinions do not necessarily reflect anybody else’s opinions. I do not own, operate, manage, or represent any band, venue, or company that I talk about, unless explicitly noted.

I’m sure that Peavey encompasses many adjectives that start with “P,” like “proficient” and “pugilistic.” (They’re feisty.) My favorite Peavey adjective, though, is “predictable.”

Now, don’t get me wrong! I love innovation and “cool new stuff,” but I also love being able to get cool new stuff that I know is made well. That’s where Peavey delivers: They make affordable gear that delivers usable performance and holds up under the rigors of live-audio. You know what to expect when you order a box with the Peavey badge, and that is tremendously valuable for live-sound humans.

When it comes to speaker enclosures, the big “P” has never let me down. Even when a box has suffered some sort of problem, the issue was either too subtle for most people to notice, or correctable with a few minutes of work. Almost every Peavey loudspeaker that I’ve ever owned is either still in service somewhere, or was traded up for the next box. I had some cheap subs that I overpowered (because I was young and dumb), and they endured the punishment that I was dishing out for gig after gig after gig. The voice coils did get pushed a bit out of true, but the drivers never entirely quit – in fact, the only component to actually fail was the crossover on one of the boxes. A quick bypass operation later, and I had a working sub again.

It’s fitting, then, that my monitor-wedge woes would be brought to an end by a bevy of Peavey units. After some disappointing misadventures with offerings from Avid/ M-Audio and Seismic Audio, a sextet of PVXp-12s has put the smile back on my face.

I Don’t Have Lots Of Numbers, Because I Don’t Need Them

When I did my review of the monitor wedges I procured from Seismic Audio, there was a fair bit of testing involved. Numbers…you know, quantitative analysis.

I haven’t done anything like that for the PVXp-12s. They might be able to do what Peavey claims they can do, or they might not.

But I don’t care.

Why?

Because, whatever the PVXp boxes do, they do enough of it to satisfy my needs as a small-venue audio human. What’s more, they do what they do in a seemingly effortless way.

You might not think that says much, but it actually says a lot – and loudly. I measure when a piece of gear is giving me a reason to be skeptical. If I have no reason to “pick at” a manufacturer’s claims, then I don’t. Peavey claims that PVXp-12s can produce a peak of 127 dB SPL with music. Of course, every time a manufacturer says “peak,” you can subtract 3 – 6 dB to get an idea of what the box will actually do in real life. My guess is that a strong vocal input through these units has a fighting chance of doing 120 dB SPL continuous at a listener’s position. That guess is backed up by the fact that, over a good number of shows, I have never been able to observe the DDT™ (Peavey’s proprietary limiting system) indication on the units that I have. In contrast, other monitor wedges that I’ve had in service would either light their limiting indicators regularly, or be in audible distortion.

The bottom line is that I don’t have to nitpick the PVXp-12s. I don’t care if they can actually reach the claimed 325/ 75 watts continuous into the LF (Low Frequency) and HF drivers, because whatever wattage is actually being dissipated is plenty. I commonly “double up” two units, which gives a theoretical “maximum continuous vocal output” of 123 dB SPL.

Quite frankly, if you need more than that on stage, your show doesn’t belong in a venue that seats 200 people or fewer. Either that, or somebody is playing WAY too loud and needs to be fired.

I’ll also mention that, at one show, the lead singer asked for a pretty good amount of kick in the wedges. A box loaded with a 12″ LF driver can’t be asked to deliver crushing “boom,” but for that show (which was of about average overall volume), the PVXps delivered enough thump that I didn’t need any kick in the FOH (Front Of House) PA. Not bad for a box that retails at $350 – at least, in my opinion.

As far as sound-quality goes, I don’t really know what to say. PVXp-12s “sound like music to me,” which is to say that they seemed to be tuned in a pretty sane fashion. No, you’re probably not going to have a spiritual experience when you listen to these boxes, but that’s not what they’re for. The primary purpose of a sound-reinforcement box is to deliver sufficient output, cleanly, with a smooth response across the critical frequencies for music (about 100 Hz to 12 kHz, or a little more depending on the application). That’s what these Peavey’s seem to do.

If your experience is similar to mine, you may actually need to apply a 3 to 6 dB, 1 – 2 octave wide boost at around 2 kHz, along with a less pronounced, 1-ish octave wide boost at 8 kHz to make the boxes “flat.” It all depends on what you want, though.

Again, there just isn’t much to say. As monitor wedges, my PVXp enclosures pass signals and don’t make me struggle. That’s all I want, and judging by the number of compliments I get regarding the sound on deck, that’s all that most bands seem to be looking for. I know there are better sounding boxes out there because there is ALWAYS a better sounding box out there, but everything beyond the basics is gravy…and gravy is pretty expensive.

The Quibbles

Another piece of Peavey’s predictability – at least for me – is that they always seem to make some kind of design decision that causes me to scratch my head. It’s a different thing for every product line, but I swear, it isn’t Peavey unless I want to write a letter to them that reads: “In regards to this design aspect of this product…REALLY?”

The PVXp-12 is no exception in this regard.

To start with, the XLR input on the boxes is connected to circuitry with much higher gain than the TRS input. On one hand, this makes some sense. It allows people to plug a microphone directly into the box and get results without having to hit a mic/ line switch. On the other hand, not having a switch to select mic/ line gain means that using the XLR jack for line-level input requires that the input potentiometer be set quite low, in its “finicky” range. Even there, I have to trim my monitor send masters down about 6 dB to keep my on-channel sends in an operational area that’s consistent with other things.

Now, this isn’t a huge deal. It’s certainly a “first world problem,” which can be corrected with just a bit of doing. I can acknowledge that. Still, I’m a little surprised at Peavey apparently thinking that a robust, multipin connector shouldn’t be the first choice for line-level AND mic-level audio.

There’s also the issue of how the input plate is located. For some cables, you may find that a monitor placement causes a certain amount of shearing (sideways) force on your cable’s strain relief. This may or may not be enough to cause a problem – it’ll depend on your usage patterns, though.

Another oddity is that the Peavey design department apparently lives in a world where only one side of a box needs to be angled for monitor usage. This means that, whether you want it or not, a PVXp-12 doing monitor duty will have the HF horn on the stage-right side. If you want to “bookmatch” a pair of these boxes when doubling them up, you’re out of luck. It’s hardly a critical issue, but I swear, even manufacturers who build questionable boxes have figured out how to let you lay the enclosure on either side.

Going back to the level potentiometer, I’ve found myself wishing that it would be easier to get a “repeatable” setting for the knob. If you’re using the XLR input for line-level signals, it’s impossible to accurately see where the knob is if the box is in a monitor placement. In fact, to accurately set the knob, the box has to be rotated onto its face. Further (and this isn’t just a Peavy thing), the knob is of a “continuous sweep” variety. I just don’t understand why – on a piece of gear that is probably going to be used in multiples – level controls aren’t given clickstops for easy and accurate repeatability.

All of this is just nitpicking, though. Sure, you can spend more on a speaker enclosure. Sure, there are other boxes which may be more or less “your taste.” Still, my opinion is that the PVXp-12 is a great example of how far we’ve come in terms of affordable gear. Think about it: These boxes are biamped, with all kinds of nifty processing that’s been set at the factory, and it’s all been stuffed into a pretty compact package. I got started in pro-audio during the ’90s, and the functionality in a PVXp-12 wasn’t even something we were dreaming about then.

Maybe it’s just me, but there seems to be a lot of “bang” in these Peaveys for the bucks you’ll pay for them. The boxes aren’t flashy, and there’s no hype surrounding them…

…and there’s no need for any of that, because these units just go to work, get to work, and consistently deliver.

Well, they do for me, anyway.


The Curious Case Of The Miced Acoustic That Fed Back

Putting a mic in front of an acoustic guitar does NOT allow the laws of physics to be overcome.

Please Remember:

The opinions expressed are mine only. These opinions do not necessarily reflect anybody else’s opinions. I do not own, operate, manage, or represent any band, venue, or company that I talk about, unless explicitly noted.

Every so often, I’ll work on a set (or even a whole show) where I struggle. It’s why I try to remember to say, “I hope it’s not my night to suck.” I think it’s important to be honest about not being able to work miracles.

Anyway.

Not too long ago, I did a show where the opening act brought an acoustic guitar. Please note my exact words: “Acoustic Guitar.” Not electro-acoustic!

Acoustic guitar. No pickup, that is.

Luckily for me, the opening act’s set was pretty short. This was lucky because I had more feedback problems in that one set than I usually have in two-months-worth of shows. Weird rings. Phantom squeals. High-pitched ghosts that bared their teeth and then disappeared. It was embarrassing, and un-fun.

My mistake primarily lay in trying harder to make the performer happier than the laws of physics would allow. I should have gotten on the talkback and said, “I’m sorry, but I think that’s all we can get out of this setup tonight,” but I didn’t. I tried to fight my way through, and I think the end result was worse for it.

…but everything seemed okay during soundcheck. What went wrong?

The Changing Environment

Your gear isn’t the only thing with a noisefloor. (The noisefloor is the voltage or sound pressure level where non-musical information can be found. It usually sounds like hiss, or rumble, or hum, or a combination of all three.) A venue also has a noisefloor, and unlike a well-maintained piece of equipment, a venue’s noisefloor can change wildly and quickly.

In the case of the problematic set, we were fine at soundcheck. The performer was happy with the onstage blend between his voice and his guitar, and we all liked how things sounded out front.

The venue noisefloor was also about 50 – 60 dB SPLC (Sound Pressure Level, C weighted).

Between soundcheck and the actual show, a rather dramatic thing happened: A whole bunch of college-age humans arrived. Unsurprisingly, most of them were talking to each other. If I had my guess, the new noisefloor was probably between 75 and 85 dB SPLC. In “linear” terms, that’s a magnitude difference with a factor between about 30 and 300.

I’m not joking. An 85 dB SPLC noisefloor is just a bit more than 300 times louder when compared to a 60 dB SPL noisefloor. Logarithmic math is a heck of an eye-opener, I tell ya.

For a performer who’s perception of the “correct” level for their sound was formed in an empty, relatively quiet space, the addition of the crowd certainly had a HUGE effect. What’s more, I’m guessing that the total level on stage was only slightly higher (3 – 6 dB) than the level of the crowd’s conversations. Even worse, the “roar” was probably right in the critical ranges for both the guitar and the vocals.

So, of course, the performer wanted more level from the monitors. He couldn’t hear himself properly anymore – he even said so, outright.

I got on the gas with both the guitar mic and the vocal mic, and that’s when the fight start – I mean, that’s when my feedback issues took hold.

I Had A Problem, So I Added A Mic. Then, I Had Two Problems

Another issue that worked against me was that I had two mics contributing to one “loop.” There was a mic for vocals, and one for the guitar. The mics were in relatively close proximity, and being put through the same monitor.

At high gain.

See where this is going?

Essentially, the two microphones combined into a single, extremely high-gain device that was in a partially closed loop with the wedges. Of course the system was unstable. Of course it was a battle. The gain was so high that, if one of the “so much vocal power that my usual head-amp preset would be driven into hard clip” singers around town had grabbed a mic at that setting, they would have launched a monitor’s LF driver through the grill and into their face.

But here’s the thing:

Gain is proportionally related to acoustic output, but gain is NOT absolutely related to acoustic output.

That is to say, more gain will produce more volume compared to lower gain on the same signal, but the measured, acoustic sound pressure level for any particular gain setting will not always be the same. The entire acoustical and electrical signal chain is ultimately responsible for that.

So, we were running at “super hot” gain levels, but we weren’t all that loud. Unfortunately:

Undamped feedback in a loop is a product of gain, not volume. The only limiting factor that volume represents is that the system must be able to produce enough level to be audible over the noisefloor.

The performer could barely hear himself, but when the system “took off,” all of us could hear THAT just fine.

Reflection and Resonance

There are a couple of other factors that contribute to acoustic guitar feedback issues, especially when monitor wedges are involved.

The first factor is resonance. An acoustic guitar works as an acoustic guitar because of the big, vibrating box that the strings are attached to. The box works because it vibrates in response to external stimuli. The problem is that the box can’t tell the difference between the stimulus presented by the strings, and the stimulus presented by a sufficiently-loud monitor wedge. Get the wedge loud enough at the right frequency, and the resonant acoustic circuit you’ve just unleashed will ring until you do something to stop it.

In the case of the show I’ve been referencing, I don’t think we got the monitors loud enough for wedge-to-body resonance to be a real factor. What may have been a factor, though, is reflection.

Onstage feedback happens when the audio captured by a mic is output through a loudspeaker, and then re-enters the same mic. It doesn’t really matter how the audio returns to the mic – it just matters that it does. So, what do you think happens when a mic is pointed at an acoustic guitar body, which is big, and flat, and not completely absorptive, and which is also right in the path of the audio coming out of the monitors?

Yup.

The monitor audio hits the guitar body and reflects back into the mic. Sure, the lower frequencies might diffract around the guitar, or just pass through the thin walls of the body, but the high frequencies are a different story.

SQUEEEAALLL!

And, of course, the squeal comes and goes, because the guitar player is probably moving around a bit. A lot of the time, you might just barely be okay, and then the guitarist gets everything in just the right alignment…

SQUEEEAALLL!

The Upshot

At this point, the question becomes: “What can we take away from this?”

I think the main takeaway – and it applies to everybody, performers and techs alike – is that a purely acoustic guitar really can’t be expected to be dramatically louder than it already is. Perhaps even more correctly, a purely acoustic guitar can’t be expected to be dramatically louder than it is, as experienced by the microphone capsule.

As a result, if an acoustic guitar needs to be at 90 dB SPL in order to compete with a rowdy crowd, then it really needs to be making at least 87 dB SPL without any help from the PA. If, for some reason, the guitar needs to be a great deal (10 dB or more) louder than it is naturally, then we must have some way of “partially opening the loop” that includes the guitar, the mic, and the audio rig. Either that, or we have to make the guitar much louder – from the mic’s perspective – than the wedges and main PA.

The most practical way to do this is with an internal pickup, optionally coupled with a soundhole cover. The internal pickup gains some isolation by virtue of being inside the guitar body (or outside, but directly coupled to some part of the guitar), and the mic also “perceives” the guitar as being quite loud.

Because it’s, you know, inside or directly attached to the guitar. Life is pretty loud right there, just like it’s really loud inside a piano.

The soundhole cover helps by providing even more isolation from external sounds, and also by changing the resonant frequency of the guitar body. The size and shape of the soundhole is a major component in determining what an acoustic guitar sounds like, and closing the hole may just shift the body resonance to a non-problematic area.

In the end, we all need to know our abilities, and the abilities of our tools, and be aware of when we’re asking too much of ourselves or our gear. We also need to be able to look back at our problems with an analytical eye, and figure out exactly what went wrong.

Of course, I’ll probably end up trying to break the laws of physics again in six months, because I have a short memory for situations I don’t encounter every week…


In-Ear Success – A Basic Guide

IEMs can revolutionize your monitoring experience, if you do your homework.

Please Remember:

The opinions expressed are mine only. These opinions do not necessarily reflect anybody else’s opinions. I do not own, operate, manage, or represent any band, venue, or company that I talk about, unless explicitly noted.

The other day, Christina from Merchant Royal (a totally sweet Salt Lake City band) asked me a few questions about getting started with an In-Ear Monitoring (IEM) rig. After the conversation, it occurred to me that getting good results out of an IEM system isn’t exactly intuitive or obvious.

It also occurred to me that it’s probably easy to become disappointed with IEMs, because of the “celebrity” factor.

Think about it: A big-name artist gushes to a musician’s magazine about being on in-ears, and how it’s so brilliant, and it’s revolutionized their stage show, and so on. An up-and-coming musician reads the interview and decides to take the plunge. Of course, the local player doesn’t have a massive crew of top-shelf audio techs at their disposal, which means that any issues they encounter are likely to go uncorrected or misdiagnosed. The experience quickly goes sour.

Now, I’m not comparing myself to the high-level pros in the international touring game, but I have picked up some pointers that can help you have a more successful relationship with an in-ear system.

IEM Is A Style, Not A Fix

Before we even get into the technical considerations, I think it’s important to make this point:

IEMs should be viewed primarily as a different method for accomplishing monitoring needs. They should not be viewed as a fix for a band that can’t work as an ensemble.

In other words – if one member of the band is being drowned by the rest of the band, and you have to struggle with getting a decent mix out of traditional wedges, then you don’t need IEMs. What you need is to fix the actual problem, which is that the band doesn’t know how to be an effective ensemble on an actual stage.

Yes, in-ears are stage-volume reducers and feedback abatement devices by their very nature. However, if you use them to get around a proportionality issue, then you’re just applying a patch to something that needs to be addressed at “the root.”

Good Is Necessary, Expensive May Not Be

Some people need to buy the really spendy IEM systems. If you’re playing in small venues, you probably don’t. The really expensive in-ear systems are necessary if you’re going to be a long way from the transmitter, and/ or in a tough RF (radio frequency) environment, and/ or if you’re going to be rough on your gear.

If you’re going to be gentle with your rig, you don’t need to pay for an IEM system that can be run over by a tour bus.

If you’re not going to have to fight with more than eight channels of simultaneous wireless traffic, you don’t need to pony up for world-class RF performance.

If you’re only ever going to be a few tens of feet from the transmitter, and always able to see the antenna, you don’t need to buy gear that can cover a stadium.

On the other hand, you do want to spend enough money to buy a system from a reputable manufacturer. Having worked with mid-priced systems from Shure, and low-priced systems from Galaxy, I can say that both builders seem to know what they’re doing.

IMPORTANT: I do need to make it clear that wireless for live-audio is NOT a trivial thing. We’ve made some pretty great strides in terms of “commoditizing” it, but just running out and buying a whole bunch of RF gear is a really bad idea. Even if you’re just buying a single channel, you have to be careful that the transmission frequency works in your area. If you’re going to tour, you need to make sure that the system will be able to cope with radio traffic in other areas…which probably means spending the money for a frequency-agile (“tunable”) transmitter/ receiver pair. If you’re going to run two or more systems, you need to be sure that they’re all run on frequencies which don’t interfere too badly. If you’re going to buy wireless, make sure you get help from an experienced salesperson or customer-service rep.

Bad Buds Make Everything Suck

You can have the most rock-solid, trouble-free RF implementation on the planet, and make it all for nought with a pair of ear-buds that won’t do the job.

It’s similar to playing a beautifully engineered album through a clock-radio with a half blown speaker. The mix is fine, and the reception is fine – but it doesn’t matter, because the last link in the signal chain is letting you down.

Now, you can spend a TON of dough on earbuds. There are $500 earsets on the market that are like putting a quad-amped PA system where your brain is supposed to be. I don’t think that you need to start at that level. Where you probably need to be begin is with a pair of buds that cost between $100 and $200, and have a wide selection of “tips” or “sleeves.”

I say that because I think the fit of the actual in-ears is paramount. I’m not convinced that the really expensive buds are guaranteed to fit better – they just have fancier upstream electronics. In fact, I will go so far as to say this:

It’s better to have an affordable pair of beautifully-fitted earbuds than an expensive pair that you have to constantly struggle with.

…and hey, if you want a whole article on just this subject, you can find it here.

Everything Or Nothing

The last piece of this particular puzzle has just as much to do with logistics as technical considerations.

I can’t remember who said it, but a contributor on The LAB (Live Audio Board) once made a remark like this: “For bands with their own monitor systems – please bring EVERYTHING or NOTHING.”

What he was getting at was the tendency of bands with IEM rigs to leave key pieces at home, and hope that the sound providers they worked with would fill in the gaps. Even as an experienced tech with lots of equipment at his disposal, this unpreparedness on the part of the bands was causing him problems.

Assuming that a random audio human can handle anything thrown at them is a bad idea, but the behavior continues because of the perception that “sound guys know everything that is even tangentially connected to sound.”

This is not the case.

Especially in the small-venue world, you are very likely to encounter audio techs who know just enough to run ONE house system in one, very particular way. They may or may not have a generalized conception of how routing for monitors works, and so a request for an IEM send may be met with a blank stare. Even if the house tech knows what they’re doing, some venues may not be set up to conveniently pull a line-level wedge feed for your in-ears.

The good news is that you can do something about this:

If you really want to commit to in-ear monitoring, then you should take steps to be as self-sufficient as possible.

What being “self-sufficient” means is to be able to get something in your IEM system, with or without the aid of the house tech. This can be as simple as one or two transformer-isolated mic splits and a mini mixer. Plug your mic into the split, send the passthrough to the house, put the split into the mini-mixer, and send the mixer out to your IEM transmitter. If the house tech can get you an EQ-bypassed feed for another channel on your mixer, then you can get a full-on monitor mix that features a “more me” control. If you can’t get anything from the house, then at least you can pop in your buds and blend your vocal with the ambient stage volume.

Being self-sufficient also means that YOU know how to run your IEM rig. If it’s got a fancy, menu driven interface, then you need to know how to get around on it. You need to know what the inputs and outputs do. You need to know how to get the transmitter and receiver on the same channel (if applicable). You need to know how to quickly and competently make the connections I described above. I certainly do think that sound persons should be able to handle all kinds of gear, and I think we should do everything we can to help you, but I also think that your own personal monitoring rig is YOUR responsibility.

In-ears can be brilliant fun. They can help you have consistent monitoring capability in all kinds of rooms. They can help you get your stage-volume down. They can help control worries about feedback. They only work really well, though, if you’re truly willing to make good choices and take charge of your own monitoring solution.


No Sale

A Small Venue Survivalist Saturday Suggestion

Please Remember:

The opinions expressed are mine only. These opinions do not necessarily reflect anybody else’s opinions. I do not own, operate, manage, or represent any band, venue, or company that I talk about, unless explicitly noted.

Shopping for a personal vocal mic?

Forget about how it sounds in a pair of headphones.

Find some monitor wedges, and crank up the mic until it sounds like what you’ll need for your band. If the mic sounds bad, or you’re struggling with feedback, then it’s “no sale.”


For The Love Of Mid

The material that’s critical for a mix is between about 200 Hz and 4000 Hz.

Please Remember:

The opinions expressed are mine only. These opinions do not necessarily reflect anybody else’s opinions. I do not own, operate, manage, or represent any band, venue, or company that I talk about, unless explicitly noted.

We’ve all seen and heard it, in some way. You know what I mean. The “smiley face” EQ. “Scoop” switches. The midrange all the way down – and, optionally, the bass and treble CRANKED.

“Hi-fi.”

“Bedroom tone.”

Heck, most of us have been practitioners of this very thing. When trying to make something sound impressive, polished, and big, ruthlessly carving out the midrange is like the Dark Side of The Force: Quick, easy, and seductive.

Also, really bad for you in the end.

What a mix (live, studio, monitors, stage-volume, anything) actually stands or falls on is the midrange. Sure, you want the top and bottom octave to be in the right place, but they really aren’t as critical as you may have been led to believe.

So, why do people de-emphasize the midrange so much?

Tough, Lonely, Unexciting Rooms

There are all kinds of contexts that drive scooped, sizzle-thump tones. Getting into every detail could make for a very long, barely readable article. I think that you can get a decent picture by generalizing, though:

Midrange is common, unexciting, and – due to its criticality – annoying when it’s wrong.

See, humans hear midrange better than almost anything else. We’re great at detecting and analyzing human speech, because our lives basically depend on it. Human speech is all about midrange, and expressive, detailed vocalization is one of the things that makes humans actually…you know…human. We grow up hearing midrange. We communicate using midrange. We hear midrange all the time, in every possible place, in all kinds of contexts.

Midrange? More like, mundane-range.

When we come across a sound-generating item that can do the bits of the audible spectrum that are outside the boring and everyday, we fall in love pretty fast. “Bass” and “air” are like candy to our common meal of mid. They’re impressive. Fun. Exciting. Everything that those pokey, old-hat mids aren’t.

So, there’s a strong temptation to emphasize the fun bits at the expense of the boring parts.

At the same time, our particular human genius for detecting problems and unnatural weirdness in the mids makes us intolerant. Our brains are also VERY good at synthesizing missing information, especially when a lot of the basic cues are still intact. If your stereo or amplified instrument are in a not-so-acoustically-nice room, a quick fix is to yank out as much of the troublesome midrange as you can. The music still sounds fine, because the mids are still audible enough for you to imagine whatever you’re missing as you revel in the sounds that are emphasized.

The success of this is further enhanced by being alone, which is what leads to “bedroom sound.” With nothing else “in the mix,” you can hear your instrument just fine – and it sounds GREAT! All the midrange problems are sucked out, and the impressive “body” and “top” ends are dialed way up.

Awesome sauce.

Until real-life intervenes, of course.

Midrange Makes Mixes Musical

In the context of modern music, especially in small venues, what you have is an assemblage of amplified sounds that coexist with a lot of acoustical goings-on. For example, take a typical rock band’s rehearsal space. You’re probably going to run into an un-miced drumkit, one or two guitar amps, and a bass rig. The guitar and bass players, through electronics, have very immediate and dramatic control over the timbre of their instruments. Within the limits of their instruments and amplifiers, they can dial up some wild and weird tones.

On the other hand, the drummer can’t go quite as crazy. Sure, there’s a lot of variation to be had from shellpack to shellpack, especially with different heads, tunings, sticks, and everything else, but the reality is that most acoustic drumkits impart a tremendous amount of midrange into the room. If nobody else has much midrange left over, then the kit is going to obliterate the tonal parts of the song arrangements…unless, of course, the guitar and bass rigs are much louder than the drums.

So, here’s the major thing:

Sufficient midrange content is the primary and essential component of a tonal instrument’s place in a mix.

The reality is that, for all the excitement and fun that low and high-frequency information give us, there is very little actual music that occurs far below 200 Hz, or far above 4 kHz. It’s not that there isn’t ANY musical information beyond those areas – of course there is – it’s just that it usually isn’t critical to the actual song.

(Yes, bass guitars produce lots of fundamentals that are around or below 100 Hz, but the reality is that we mostly end up listening to the harmonic content of what the bassist is doing. Seriously – find yourself some songs with prominent, melodic basslines. Load the files into a DAW and filter everything below 200 Hz. I’ll bet that you can still hear the bass-human doing their thing.)

If the midrange content of a given part is de-emphasized in a big way, there is a very good chance that the part will disappear in an ensemble context. The flipside is that allowing everybody to have their own piece of the mids means that you’re much likely to get a better mix…especially when you’re playing live in a small room, where the interplay between purely acoustical sounds and amplified tones can be either beautiful or horrific.

Practical Considerations

The biggest take-away from this is that everybody – guitar players, bassists, vocalists, monitor guys, FOH (Front Of House) humans, and anybody else that I’ve missed – should resist the urge to “kill the mids.”

I should know, because I’ve had my own “scooping” bite me. Killed-mid vocals sound great in FOH and monitor world, right up until they have to be matched up with an actual band. At that point, you have to get the vocals VERY loud to get audible lyrics, and that can lead harshness, feedback, and an audience that wants to not be in the seats anymore.

I once had vocals dialed up in the monitors that sounded “super-studio.” Very hi-fi. It would have been great, except that when the band actually started playing you could barely hear the vocals in the wedges. You’ve gotta let those boxes “bark” a little if people are going to hear themselves sing.

On the flipside, I once worked with a band where one of the guitar players had a serious fascination with HF content. Once the drummer was playing, all you could hear out of that guitar was basically “eeeeeeessshhhh.” He would play these super-fast solos, but you couldn’t hear what he was doing. His actual notes were dialed out so far that, even when he was painfully loud and clearly in front of everybody else’s volume, you still only had a sort of screechy, clicky hiss to listen to.

There’s even a “technologic-economic” side to the whole thing. Making lots of low end and high end are tough things to do with an amplifier or a PA system. Killing the midrange and cranking the ends means that you’re probably wasting a ton of internal headroom and power-stage output on material that might not even be audible. If you want that material to be audible, you need lots of power and lots of speakers – and that’s spendy. Want to get the most out of more affordable gear? Get the midrange in the right place as the first step, and then use what you’ve got left over for the top and bottom.

The mids can be tough to love at first, but it’s a worthwhile relationship.


Split Monitor For The Little Guy

You don’t have to be in the big-leagues of production to get big-league functionality.

Please Remember:

The opinions expressed are mine only. These opinions do not necessarily reflect anybody else’s opinions. I do not own, operate, manage, or represent any band, venue, or company that I talk about, unless explicitly noted.

So, I’ve already talked a bit about why “split monitoring” is a nifty idea. Independent signal paths for FOH and monitor world let you give the folks onstage what they want, while also giving FOH what you want – and without having to directly force either area’s decisions on the other.

…but, how to set this up?

Traditional split-monitor setups are usually accomplished with a (relatively) expensive onstage split. Individual mic lines are connected to the stagebox, which then “mults” the signal into at least two cable trunks. This can be as simple as bog-standard parallel wiring – like you can find in any “Y” cable – or it can be a more complex affair with isolation transformers.

While you can definitely use a splitter snake or stagebox to accomplish the separation of FOH from monitor world, the expense, weight, and hassle may not really be worth it. Traditional splitters are usually built with the assumption that there will be separate operators for FOH and monitor world, and that these operators will also be physically separated. As a result, the cable trunks tend to be different lengths. Also, those same cables are made of a lot of expensive copper and jacketing material, and the stagebox internals can be even more spendy.

Now, if you actually need the functionality of a full-blown splitter snake, you should definitely invest in one. However, if you just want to get in on the advantages of a split monitor configuration, what you really need to shift your spending to console functionality and connectivity.

General Principles

Whether you implement a split monitor solution via analog or digital means, there are some universally applicable particulars to keep in mind:

  • You need to have enough channels to handle all of your inputs twice, OR you need enough channels to handle the signals that are “critical for monitoring” twice. For instance, if you never put drums in the monitors, then being able to “double up” the drum channels isn’t necessary. On the other hand, only doubling certain channels can be more confusing, especially for mixes with lots of inputs.
  • You actually DON’T need to worry about having enough pre-fader aux sends. In a split monitor configuration, post-fader monitor sends can actually be very helpful. Because you don’t have to worry about FOH fader moves changing the monitor mixes, you can run all your monitor sends post fader. This lets you use the monitor-channel fader itself as a precise global trim.
  • If the performers need FX in the monitors, you need to have a way to return the FX to both the FOH and monitor signal paths.
  • You need to be wiling to take the necessary time to get comfortable with running a split monitor setup. If you’ve never done it before, it can be easy to get lost; try your first run on a very simple gig, or even a rehearsal.

With all of that managed, you can think about specific implementations.

Analog

To create an affordable split monitor rig with an analog console (or multiple consoles), you will need to have a way to split the output of one mic pre to both the FOH and monitor channels. You can do this by “Y” cabling the output of external pres, but external mic preamps tend to be pretty spendy. A much less expensive choice is to use the internal pres on insert-equipped consoles. Ideally, one pre should be the “driver” for each source, and the other pre should be bypassed. Whether you pick the FOH or monitor channel pre is purely a matter of choice.

Your actual mic lines will need to be connected to the “driver” pre. On most insert-equipped consoles, you can plug a TS cable into the insert jack halfway. This causes the preamp signal to appear on the cable tip, while also allowing the signal to continue flowing down the original channel. The free end of the TS cable should also be connected to the insert on the counterpart channel, but it will need to be fully inside the jack. This connects the split signal to the electronics that are downstream of the preamp.

If you are working on a single console, you will need to be extra careful with your routing. You’ll need to take care not to drive your monitor sends from FOH channels, and on the flipside, you should usually disconnect your monitor channel faders from all outputs. (If all your monitor auxes are set as pre-fader, you can connect your monitor channel faders to a subgroup to get one more mix. This costs you your “global trim” fader functionality, of course. Decisions, decisions…)

Digital

Some digital consoles can allow you to create a “virtual” monitor mixer without any extra cables at all. If the digital patchbay functions let you assign one input to multiple channels, then all you have to worry about is the post-split routing. Not all digi consoles will let you do this, however. There are some digital mixers on the market that are meant to bring certain aspects of digital functionality to an essentially analog workflow, and these units will not allow you to do “strange” patching at the digital level.

As with the analog setup, if you’re using a single console you have to be careful to avoid using the monitor auxiliaries on the FOH channels. You also have to disconnect the monitor faders from all post-fade buses and subgroups – usually. Once again, if you don’t mind losing the fader-as-trim ability, setting all your monitor auxes to pre-fader and connecting the fader to a subgroup can give you one more mix.

Split-monitor setups can be powerful tools for audio rigs with a single operator. The configuration releases you from the compromises that can’t be avoided when you drive FOH and monitor land from a single channel. I definitely recommend trying split monitors if you’re excited about sound as its own discipline, and want to take your system’s functionality to the next level. Just take your time, and get used to the added complexity gradually.


Why A “Split Monitor” Configuration Is Cool

Running separate channels for FOH and monitor world can be a big help.

Please Remember:

The opinions expressed are mine only. These opinions do not necessarily reflect anybody else’s opinions. I do not own, operate, manage, or represent any band, venue, or company that I talk about, unless explicitly noted.


Buying A Vocal Mic

Sound quality is important, but it’s not at the top of the priorities list.

Please Remember:

The opinions expressed are mine only. These opinions do not necessarily reflect anybody else’s opinions. I do not own, operate, manage, or represent any band, venue, or company that I talk about, unless explicitly noted.

As a live-audio tech, I’m often the guy who supplies all the mics. As such, I end up picking microphones that work for me in a variety of situations. My “favorite pets” are usually the transducers that work without a fuss on 90%+ of whatever they get pointed at. It really isn’t about what’s stunningly stellar for any particular vocalist or instrument rig, because there isn’t time to figure that out directly.

What you might think, then, is that buying a mic for yourself as an individual vocalist would be an exercise in different priorities. At an intuitive level, it makes sense that you would put most of your effort into finding a transducer that sounds amazing when coupled with your voice.

…and of course, you don’t want to pick a mic that makes you sound bad, or is downright painful to listen to.

But…

What’s not intuitive is that you will probably be best-served by satisfying a different list of priorities. That priorities list is basically the same one that a pro-audio human uses – it’s just that you meet it in ways that are specific to you, instead of ways that are generally applicable.

Priority 1: Gain Before Feedback

The most beautiful sounding mic for your voice is completely worthless if you can’t be heard. The most durable mic on Earth isn’t worth a dime if you’re completely and unintentionally buried in the mix. The mic that you could afford “right now” that squeals like a pissed-off toddler and howls like a talkative husky? It just effectively made the spendier mic even more expensive.

The most important thing to look for in a mic for stage-vocals is that it, when coupled with your performance style, can have sufficient gain applied for you to be heard clearly – both onstage and out front.

A complete discussion of everything that effects GBF is beyond the scope of this article. However, there are some rules of thumb that can help you narrow things down a bit:

  • You don’t need to worry about the microphone’s sensitivity or overall output. You can think of mic sensitivity as a sort of fixed, pre-preamp gain. It doesn’t necessarily buy you greater feedback rejection. It dictates how much preamp gain is required to get the mic output up to a voltage that’s good for other devices…and that’s it.
  • You do need to think about the mic’s polar pattern. Mics with tighter patterns, like supercardioid and hypercardioid models, can be more resistant to feedback when used correctly. The tradeoff with a tighter pattern is that it’s easier to cause feedback by “cupping” the mic, and you have to be much more careful not to move “off axis” during your performance.
  • You also need to think about where the mic’s capsule is placed. Certain mics achieve better GBF by putting the capsule very close to the grill – it’s just basic physics. The tradeoff is that you only get the benefit of this placement if you are willing to park your face right on the mic. If you’re not willing to do this, then any benefit of “right up on the grill” capsule placement is lost.
  • You don’t necessarily need a mic with “laser flat” frequency response, but you should try to find a mic where the response is “smooth.” Feedback problems are exaggerated by mics with narrow peaks in their response, because the peaks are disproportionately disposed to ringing compared to the frequencies around them. If a mic has a “response peak” or “presence boost” that’s been designed into the capsule, it’s best if the peak or boost covers a wide area – say, two octaves or more.
  • Even though a flat response isn’t imperative, you should be wary of mics that are overly “hyped” in one frequency range or another. If a monitor or FOH rig also has proportionately higher gain in the same frequency range, you may experience problems. VERY exaggerated response can cause feedback even if the live-sound rig doesn’t have higher gain in the same range.

Priority 2: Reliability

I chose “reliability” over “durability” because I think there’s more to this factor than just being able to handle wear and tear. A reliable mic stands up to being transported and accidentally dropped, but it also “just works” without being finicky.

The second most important thing to look for in a stage-mic is that it should be resistant to accidents, and require as little external or specialized equipment as possible.

So – what does this mean?

Well, for one thing, it means that condenser mics are less reliable than dynamic mics. It’s not that a condenser mic can’t be made to be quite durable. The drop in reliability comes from the condenser needing phantom power to work. It’s possible to be in a situation where you don’t have phantom available for the mic. It’s also possible to have phantom, and forget to engage it. The mic may be rock-solid, but it becomes effectively less reliable.

(This isn’t to bag on condenser mics, by the way. A condenser may, in fact, be the right mic for you. You just need to be aware of the downsides.)

There are, of course, all kinds of other considerations. If a mic needs a special, odd-sized clip to fit on a stand, it’s effectively less reliable. If its XLR connector has trouble mating with certain mic cables, the microphone is effectively less reliable. If the mic has a switch that’s a little too easy to disengage, the unit is effectively less reliable. If the mic has extremely high or low sensitivity, it’s effectively less reliable.

You might say that another way to express “reliability” is “resistance to unexpected events.” If you can cover the unexpected events by carrying more equipment (a mic pre with phantom power, your own cables, spare mic clips, etc), then you can increase a finicky mic’s reliability.

For the record, the most reliable stage-vocal mics are dynamic units with thick, metal cases, and capsules with sensitivities of roughly -55 dBV/Pa (about 1.7 – 1.8 mV). They require no phantom power, stand up to abuse, and work with the gain ranges available from most preamps.

Priority 3: Great Sound

This might seem like an obvious factor, but it still bears some discussion. You have to think about which mics will sound great on your voice, and in the performance situations that you find yourself in the most. A mic that sounds fantastic when you listen to it in headphones is great – if everybody’s going to be listening to it in headphones. A mic that sounds divine at the venue you only get to play at once a year isn’t a good choice if it’s unflattering through the PA and monitor rigs you play through every other weekend.

Further, a mic has to work well with your performance style. This is similar to the considerations involved with GBF. If the unit is breathtakingly beautiful only when you’re right on it, and you almost never get right on the mic, then you should probably pick something else. On the flipside, if you always have your face planted on the grill, and the mic sounds terribly muddy when you do, then you might want to pick something else.

I should definitely point out that you can be VERY surprised by what works well and what doesn’t. Some folks think that the only way to get a great vocal is with a super-spendy mic, but I once heard Katie Ainge sing at a coffee shop with an inexpensive mic connected to a keyboard amp.

It was one of the most beautiful and perfect vocal sounds that I’ve ever heard.

So…How Do You Test For These Priorities?

The actual nuts and bolts of figuring out which mic is right for you look like this:

  • Do some research, either empirically or online. If you play at a bunch of different places with different mics, make note of when you could hear yourself, were feedback free, and you liked the overall sound.
  • Most mics can’t be returned once purchased, so either borrow or rent the units you’re interested in.
  • At rehearsal, try the different mics you’ve gathered up. Feed the signal through a monitor wedge to find out which ones are feedback resistant while sounding as nice as possible.

Recommendations

To help narrow down the bewildering array of choices to be had in the vocal mic arena, here are a few transducers that I’ve had decent experiences with:

Shure SM-58 – I’m really not a fan of the 58, but that doesn’t make it an invalid choice. Most 58s that I’ve run across have ended up sounding muddy, with a rolled-off top end, but there are some voices that they’re just perfect for. The SM-58 has a cardioid pattern, workable GBF, and is capable of surviving a LOT of punishment. SM-58s seem to be slightly more forgiving of shaky mic technique than some other products.

Shure Beta 87a – These are mics that Stonefed carries with them for road shows. I would characterize them as “pretty okay.” In certain situations, we had some issues with feedback at very high frequencies (in the range of 15kHz). Their clarity can border on “whininess” in some situations, and they have more mud than I think a condenser ought to have. I’d probably cut these mics more slack if they weren’t $250 a pop – to me, that’s a lot of money for something that isn’t my favorite. The “a” units are supercardioid, so you need to stay on axis and avoid cupping the grill.

Sennheiser e835 – Bought singly, an 835 costs about as much as an SM-58…but I’ll take an 835 over an 85 any day of the week. These mics seem to have far less of the “Shure-standard mud,” coupled with a crisp top end. That same crispiness may be a bit much, depending on your tastes. GBF on these mics has rarely been a problem for me, but every so often I’ve had some trouble with ringing at low frequencies. An 835 is a cardioid device.

Sennheiser e822s – A major advantage of the e822 is that you can still find it in packages for about $50 a unit. These mics are surprisingly good for the price. I personally own a handful of them, and they have been just as reliable as more expensive units. I personally prefer the sound of these mics over that of an SM-58, but they do still have a bit of mud and garble to manage. The GBF on an 822 seems to be comparable to other mics I’ve used – sometimes even a bit better. Sennheiser e822 units are cardioid.

Audix OM5 – These mics are VERY crisp. So crisp, in fact, that you can really tear people’s heads off if things get loud. On the other hand, I’ve heard these mics deliver live vocals that sounded like a world-class studio recording. Their GBF is definitely “pro-grade,” although their marketing might make you expect miracles that they can’t deliver. OM5s are hypercardioid, so they’re best for people who aren’t shy about sticking their face to the mic.

Electrovoice N/D767a – The 767a is one of the few mics I’ve heard that seems to get the top end exactly right. They have nice clarity without being overhyped. The bottom end of the frequency response is okay, but these mics do seem to suffer from breath noise and plosives more than some others. They don’t display as much muddiness as other mics, but some situations will still require a good bit of EQ. The GBF on these supercardioid mics seems to be on par with other, professional level units.


The Appreciation And Care Of Strong Singers

Strong singers are great to work with. You just have to remember to use the right strategies.

Please Remember:

The opinions expressed are mine only. These opinions do not necessarily reflect anybody else’s opinions. I do not own, operate, manage, or represent any band, venue, or company that I talk about, unless explicitly noted.

I used to do a lot more work with exceptionally strong vocalists. In the period from 2005 – 2010, I was the operator of an all-ages music venue. In Salt Lake, if you were all-ages and all-genre, you did a lot (A LOT) of heavy music. Death/ Black/ Doom/ Whatever Metal. Hardcore. Screamo.

Pretty much every night, you would encounter vocalists who could produce levels that were surprising, staggering, or even frightening.

Nowdays, I mostly encounter vocalists with average to slightly-above-average power. As such, I have my mic-pres set up to afford about 9 – 15 dB of headroom to the singers I have around most often.

Every once in a while, though, I get a big surprise. When that happens, I have to adjust my tactics accordingly.

A Surprise From The Daylates

Picture the scene.

An Americana band called The Daylates has brought their show to Fats Grill. They’re a quartet of highly personable dudes who can REALLY play.

Plus, the lead guitarist’s actual, honest-to-goodness name is John McCool.

Seriously, when someone rolls up to a venue with “McCool” stenciled on their roadcases, things are about to get extremely real.

Anyway.

At this last show, we didn’t do a full-on check. We got tones for all the instruments, spread some things around in monitor world, and confirmed that the mics were audible – but we didn’t actually do a song. What I ended up with was a “ballpark” rock-band mix where the vocals had a very healthy amount of gain applied on stage and in the house.

And then, the actual show started.

Brian, the vocalist, got on the mic and promptly blew the band away. The backline was completely swamped by the lyrics…as in, the band was almost a whisper in comparison. He drove the console’s input stage into audible clipping. The low-mids and lows from monitor world were outrunning the “clarity zone” in FOH by a wide margin. I was hammering the “sane level enforcement” limiter on the console’s main output.

In a word: Dang.

Obviously, I was going to have to make some changes.

Using The Tools

Being able to really sing in a rock-band context is a mix of both talent and practice. In essence, it’s all about good “tool use.” The first tool is your own body. The second tool is the microphone.

Really strong vocal inputs come from two things.

The first thing is that the singer can actually “bring it to the table.” Actually being able to vocalize with serious output, great tone, and correct pitch is a major skill. Also a minor one. And Mixolydian too, not to mention all the other scales and modes out there. THAT’S A LITTLE MUSIC JOKE, FOLKS. Please, try the veal.

Anyway.

The second secret to a super-strong singer is that they get up-close and personal with the microphone when they’re singing at or below their average level. That is to say, a vocalist should be right up on the mic most of the time. If they’re going to get really loud in proportion to the rest of the show, then backing off a bit is “good form.” The “proportion” bit is very important. For a good number of metal vocalists, their average level and maximum level are basically the same – so they should be right on the mic at all times. For other folks, the range is wider.

…but why be right up on the mic?

Ironically, separation.

A singer’s proximity to the microphone element is (effectively) a “force multiplier” for their vocal strength. As many audio techs have said in a variety of ways, “the loudest noise at the capsule wins.” For a given sound pressure source, the apparent sound pressure level increases as distance decreases. So, if a singer wants to be clearly distinguished from all the sources behind them (drums, amps, etc), their chances go up significantly if they are – literally – right up in the mic’s grille. It’s essentially a classic signal-to-noise ratio issue, and proximity to the mic tilts the ratio in favor of the “signal,” that is, the vocalist.

Now, if you’re like Brian of The Daylates, what you’ve got is tremendous natural power coupled with a willingness to be as close as physically possible to the microphone element. This results in an excellent signal-to-noise situation, in addition to a very “hot” signal from the microphone, and some combination issues between monitor world and FOH.

In such a situation, the audio tech needs to be mindful of, and adjust for, a couple of major factors.

Gain and EQ

Mics can have “hot” output from receiving a lot of input, having a high-output element, or both. An important thing to note is that mic output which is proportionally hotter due to a high-SPL signal is a good thing. It lets you maintain your final system output level for that signal, while running at a lower gain. This increases system stability.

(This does NOT apply for mics which simply have high-output elements. The sensitivity of the element is a kind of fixed gain, so reducing the downstream gain just gets you back to the same overall gain as you would have had for a different mic. This being the case, there’s no stability benefit.)

With a vocalist like Brian, you do need to reduce your preamp gain to keep the signal out of clipping. That’s exactly what I did.

What did NOT happen, however, was a preamp gain reduction significant enough to restore the usual balance that I have between FOH and monitor world. Everybody on deck seemed to be happy with the lead vocal blend as it “settled in,” so there was no need for additional changes. What this meant from the FOH perspective was that the vocal started out a bit muddy.

Why?

Beyond just the simple fact of the monitors being louder, their tonal balance was different. This is a side-effect of having the vocalist very close to the microphone element. Single-element directional mics work by creating conditions necessary for audio traveling to the rear of the element to be significantly more delayed than it would be otherwise. As a result, the audio arriving at the rear of the mic is out of phase with the audio arriving at the front. This effect is different at different frequencies. For a given delay time, low frequencies will generate a smaller pressure difference than higher frequencies, because they have less “cycle time” available. This being so, the element has to be increasingly damped at higher frequencies to get an overall response that’s actually pleasing.

When the singer gets right up on the mic, the overall sound pressure at the capsule increases. However, the high frequencies are more damped than the low frequencies. This means that the effectiveness of increasing proximity to the element is greater for low frequencies than high frequencies. This is what causes “proximity effect” – the boost in tonal richness when a singer is close to the microphone.

Now, then…

In a small-venue situation, the monitoring on deck interacts – greatly – with the sound from FOH. Part of the tech’s job in a small room is to get a nice balance between the “monitor wash” and the PA that’s meant to cover the audience. In a reasonably decent room, the monitor wash is mostly midrange and below. The high frequencies get soaked up to some degree. As such, the contribution from the FOH PA will need to have less midrange and low-frequency content…unless FOH is completely overpowering monitor world.

In a small room, completely washing out the monitor spill with FOH is usually – to use formal terminology – way too !@#ing loud.

So, what I ended up with was a much louder than normal monitor contribution, and (because of proximity effect) that contribution had a lot of low-mids and bottom end. Like I said, the vocals were a bit muddy “out of the gate.”

The fix was to aggressively high-pass the vocals in FOH, while applying some mild taming to the low-mids and bottom end in the monitors. You don’t want to get crazy with changing the monitor mixes, because you can’t necessarily be sure that what sounds great at FOH is actually tonally pleasing to the players on deck. At FOH, however, you can get as nutty as you like, because you probably have a pretty good idea of what the audience is hearing. High passing the vocals (or cutting away the general area where monitor world and FOH are combining) lets you use your FOH power for what really matters – the high-mid and high frequencies which govern vocal intelligibility.

With the FOH audio trimmed to work well with the monitor wash, the mix cleared up nicely.

The bottom line is that a powerful singer who is willing to get close to their mic is a joy to work with. You just have to be ready to do your part.