Tag Archives: Science

How Much Light For Your Dollar?

Measurements and observations regarding a handful of relatively inexpensive LED PARs.

Please Remember:

The opinions expressed are mine only. These opinions do not necessarily reflect anybody else’s opinions. I do not own, operate, manage, or represent any band, venue, or company that I talk about, unless explicitly noted.

box_of_lightsWant to use this image for something else? Great! Click it for the link to a high-res or resolution-independent version.

I’m in the process of getting ready for a pretty special show. The album “Clarity” by Sons Of Nothing is turning 10, and a number of us are trying to put together one smasher of a party.

Of course, that means video.

And our master of all things videographic is concerned about having enough light. We can’t have anybody in the band who’s permanently stuck in “shadow.” You only get one chance to shoot a 10th anniversary concert, and we want to get it right.

As such, I’m looking at how to beef up my available lighting instruments. It’s been a long while since I’ve truly gone shopping for that old mainstay of small-venue lighting, the LED wash PAR, but I do take a look around every so often. There’s a lot to see, and most of it isn’t very well documented. Lighting manufacturers love to tell you how many diodes are in a luminaire, and they also like to tell you how much power the thing consumes, but there appears to be something of an allergy to coughing up output numbers.

Lux, that is. Lumens per square meter. The actual effectiveness of a light at…you know…LIGHTING things.

So, I thought to myself, “Self, wouldn’t it be interesting to buy some inexpensive lights and make an attempt at some objective measurement?”

I agreed with myself. I especially agreed because Android 4.4 devices can run a cool little Google App called “Science Journal.” The software translates the output from a phone’s ambient light sensor into units of lux. For free (plus the cost of the phone, of course). Neat!

I got onto Amazon, found myself a lighting brand (GBGS) that had numerous fixtures available for fulfillment by Amazon, and spent a few dollars. The reason for choosing fulfillment from Amazon basically comes down to this: I wanted to avoid dealing with an unknown in terms of shipping time. Small vendors can sometimes take a while to pack and ship an order. Amazon, on the other hand, is fast.

The Experiment

Step 1: Find a hallway that can be made as dark as possible – ideally, dark enough that a light meter registers 0 lux.

Step 2: At one end, put the light meter on a stand. (A mic stand with a friction clip is actually pretty good at holding a smartphone, by the way.)

Step 3: At the other end, situate a lighting stand with the “fixture under test” clamped firmly to that stand.

Step 4: Measure the distance from the lighting stand to the light meter position. (In my case, the distance was 19 feet.)

Step 5: Darken the hallway.

Step 6: Set the fixture under test to maximum output using a DMX controller.

Step 7: Allow the fixture to operate at full power for roughly 10 minutes, in case light output is reduced as the fixture’s heat increases.

Step 8: Ensure the fixture under test is aimed directly at the light meter.

Step 9: Note the value indicated by the meter.

Important Notes

A relatively long distance between the light and the meter is recommended. This is so that any positioning variance introduced by placing and replacing either the lights or the meter has a reduced effect. At close range, a small variance in distance can skew a measurement noticeably. At longer distances, that same variance value has almost no effect. A four-inch length difference at 19 feet is about a 2% error, whereas that same length differential at 3 feet is an 11% error.

It’s important to note that the hallway used for the measurement had white walls. This may have pushed the readings higher, as – similarly to audio – energy that would otherwise be lost to absorption is re-emitted and potentially measurable.

It was somewhat difficult to get a “steady” measurement using the phone as a meter. As such, I have estimated lux readings that are slightly lower than the peak numbers I observed.

These fixtures may or may not be suitable for your application. These tests cannot meaningfully speak to durability, reliability, acceptability in a given setting, and so on.

The calculation for 1 meter lux was as follows:

19′ = 5.7912 m

5.7912 = 2^2.53 (2.53 doublings of distance from 1m)

Assumed inverse square law for intensity; For each doubling of distance, intensity quadruples.

Multiply 19′ lux by 4^2.53 (33.53)

Calculated 1 meter lux values are just that – calculated. LED PAR lights are not a point-source of light, and so do not behave like one. It requires a certain distance from the fixture for all the emitters to combine and appear as though they are a single source of light.

The Data

The data display requires Javascript to work. I’m sorry about that – I personally dislike it when sites can’t display content without Javascript. However, for the moment I’m backed into a corner by the way that WordPress works with PHP, so Javascript it is.


Ascending sort by:


Loud, Low, Little

You may pick two, maximum.

Please Remember:

The opinions expressed are mine only. These opinions do not necessarily reflect anybody else’s opinions. I do not own, operate, manage, or represent any band, venue, or company that I talk about, unless explicitly noted.

speakerwallWant to use this image for something else? Great! Click it for the link to a high-res or resolution-independent version.

Most of you have probably heard the old chestnut, “Good, fast, cheap. You may pick two of the three.” The saying is an “iron law” of project management.

There’s a very similar law when it comes to loudspeakers:

A loudspeaker might be inherently efficient (Loud), it might reproduce useful low-frequency information (Low), and it might be compact in size (Little). You can’t get more than two of those things to happen at once.

By way of example, let’s take a gander at the high-frequency horn section in your typical, full-range, live-sound box. In all likelihood, it produces quite a bit of SPL with not very much power – lots of affordable, high-frequency compression drivers won’t handle more than 50 watts of continuous input. Heck, some can barely manage 20! The driver is quite small, especially when compared to a 12″ or 15″ cone.

Loud and little is 100% within that driver’s wheelhouse, but it won’t go low. If it did, there wouldn’t be a low-frequency driver in the cabinet. To prevent that itty-bitty compression driver from being wrecked, a high-pass crossover filter is needed. The corner frequency of that filter might be up at 2.5 kHz or so. There’s nobody on Earth who would confuse the high-midrange/ high-frequency transition zone for “lows.”

The above is fairly intuitive for most, but it can be a bit easier to get bamboozled when you see a big driver. An 18″ driver must be able to make really low-frequency material at high volume, right? Well…maybe. The box that driver is sitting in is a HUGE part of the equation; A large-diameter diaphragm isn’t enough. The smaller the box gets, the more power you have to dump into the driver to get the really deep material to play “loud.” Past a certain point, things get ridiculous in one way or another, which includes the unbridled hilarity of cooking the voice coil or destroying the suspension.

A compact subwoofer is highly unlikely to do a whole lot for you below about 50 Hz. Forty Hz might be doable at “half power” if the manufacturer is using a bandpass design for the box. (A bandpass design is great in a small frequency range, and terrible everywhere else – which is perfectly fine for a subwoofer.)

You have to decide on what you actually need, versus what you think you need.

For rock-band reinforcement, really deep bass actually isn’t a top requirement. Mostly, what we need is high output, though not so high that we run the whole audience out of the room. I haven’t really cared about anything below 50 Hz for a long time, especially because large SPL at low frequency is what annoys the “neighbors” the most easily. “Varsity-Level” EDM, on the other hand, can be HIGHLY dependent on very, very low frequency information (35 Hz or even lower) that has to be at levels exceeding 110 dB SPL C, slow-average. Doing that in a reasonable way demands bigger boxes, or several truckloads of smaller boxes.

So, when you’re out shopping for low-frequency loudspeakers, be wary of anything that claims to be effective for concert sound below 50 Hz, while also fitting easily into the trunk of a compact car. If a single box is going to play low AND loud without a staggering amount of amplifier power, it just can’t be little.


Virtually Unusable Soundcheck

Virtual soundchecks are a neat idea, but in reality they have lots of limitations.

Please Remember:

The opinions expressed are mine only. These opinions do not necessarily reflect anybody else’s opinions. I do not own, operate, manage, or represent any band, venue, or company that I talk about, unless explicitly noted.

virtual-soundcheckWant to use this image for something else? Great! Click it for the link to a high-res or resolution-independent version.

Before we dive in to anything, let’s go over what I’m not saying:

I’m not saying that virtual soundchecks can never be useful in any situation.

I’m not saying that you shouldn’t try them out.

I’m not saying that you’re dumb for using them if you’re using them.

What I am definitely saying, though, is that the virtual soundcheck is of limited usefulness to folks working in small rooms.

What The Heck Is A Virtual Soundcheck?

A virtual soundcheck starts with a recording. This recording is a multitrack capture of the band playing “live,” using all the same mics and DI boxes as would be set up for the show. The multitrack is then fed, channel-per-channel, into a live-sound console. The idea is that the audio-human can tweak everything to their heart’s delight, without having the band on deck for hours at a time. The promise is that you can dial up those EQs, compressors, and FX blends “just so,” maybe even while sitting at home.

This is a great idea. Brilliant, even.

But it’s flawed.

Flaw 1: Home is not where the show is.

It may be possible to make your headphones or studio monitors sound like a live venue. You may even be able to use a convolution reverb to make a playback system in one space sound almost exactly like a PA system in another space. Unless you go to that trouble, though, you’re mixing for a different “target” than what’s actually going to be in play during the actual show. Using a virtual soundcheck system to rough things in is plenty possible, even with a mix solution that’s not exactly tailored for the real thing, but spending a large amount of time on tiny details isn’t worth it. In the end, you’re still going to have to mix the concert in the real space, for that EXACT, real space. You just can’t get around that entirely.

As such, a virtual soundcheck might as well be done in the venue it concerns, using the audio rig deployed for the show.

Flaw 2: Live audio is not an open loop.

A virtual soundcheck removes one of the major difficulties involved in live audio; It opens the feedback loop. Because it’s all driven from playback which the system output cannot directly affect, it’s immune from many of the oddities and pitfalls inherent with mics and speakers that “talk” to each other. A playback-based shakedown might lead an operator to believe that they can crank up the total gain applied to a channel with impunity, but physics will ALWAYS throw the book at you for trying to bend the rules.

The further implication is that “going offline” is about as helpful to the process of mixing wedge monitors as a house stuffed with meth-addled meerkats. In-ears are a different story, but a huge part of getting wedges right is knowing exactly what you can and can not pull off for that band in that space. Knowing what you can get away with requires having the feedback loop factored in, but a virtual check deletes the loop entirely.

Flaw 3: We’re not going to be listening to only the sound rig.

As I’ve been mentioning here, over and over, anybody who has ever heard a real band in a real room knows that real bands make a LOT of noise. Even acoustic shows can have very large “stage wash” components to their total acoustical output. A virtual soundcheck means that the band isn’t there to make noise, and so your mix gets built without taking that into account. The problem is that, in small venues, taking the band’s acoustical contribution into account is critical.

And yes, you could certainly set up the feeds so that monitor-world also gets fed – but that still doesn’t fully fix the issue. Drummers and players of amplified instruments have a lot to say, even before the roar of monitor loudspeakers gets added. This is even true for “unplugged” shows. If the PA isn’t supposed to be drowningly loud, you might be surprised at just how well an acoustic guitar can carry.


As I said before, the whole idea is not useless. You can certainly get something out of playback. You might be able to chase down some weird rattle or other artifact from an instrument that you couldn’t find when everything was banging away in realtime. Virtual soundchecks also become much more helpful when you’re in a big space, with a big PA that’s going to be – far and away – the loudest thing that the audience is listening to.

For those of us in smaller spaces, though, the value of dialing up a simulation is pretty small. For my part, the whole point of soundcheck is to get THE band and THE backline ready for THE show in THE room with THE monitors and THE Front-Of-House system. In my situation, a virtual soundcheck does none of that.


The Basics Of Live-Sound “Nerdery”

I made a book, and now I’m making it free.

Please Remember:

The opinions expressed are mine only. These opinions do not necessarily reflect anybody else’s opinions. I do not own, operate, manage, or represent any band, venue, or company that I talk about, unless explicitly noted.

fadersWant to use this image for something else? Great! Click it for the link to a high-res or resolution-independent version.

Back in 2012, I compiled some of my writings into the form of an actual book. The first part was all about the quantitative material behind noise-louderization – the math and science of audio, that is – and the second part was commentary on the concrete realities of sound in actual rooms with actual bands.

I put the book up for sale, and it didn’t do well. I hadn’t done much of anything to build an audience, and my marketing efforts were very weak. (My total sales were three copies.) For years, the poor thing has been languishing behind a “paywall,” not accomplishing much for anyone.

Today that changes. My hope is that making the thing free will allow more people to enjoy it.

In a lot of ways, the book is a precursor to this site. Many of the themes and topics should be quite familiar to regular visitors. As a stylistic note, readers may find that I use parenthetical statements in much the same way as J.J. Abrams used lens flares in the first “Star Trek” reboot film.

So, here you go:

Download PDF


Bass Distance

You can hear low-frequency information just fine at short range.

Please Remember:

The opinions expressed are mine only. These opinions do not necessarily reflect anybody else’s opinions. I do not own, operate, manage, or represent any band, venue, or company that I talk about, unless explicitly noted.

bassguitarWant to use this image for something else? Great! Click it for the link to a high-res or resolution-independent version.

There are wonderful people doing wonderful work in this business who will lie to you. They won’t mean to do it, but they’ll do it just the same.

They’ll tell you that clipping contains direct current. (It doesn’t.)

They’ll insist that digital audio works in basically the same way as “raster” graphics. (It doesn’t.)

And they’ll say that you have to be at least 1/2 wavelength from a sound source to hear the corresponding frequency content.

To quote the gentlemen from “Car Talk:” Bo-oh-oh-oh-gus!

I’ve heard this myth from an assortment of well-meaning people. A large percentage of those people are folks that I completely respect. It’s still a myth, though.

Have You Listened On Headphones Lately?

…and, if you haven’t listened on headphones, have you listened to music in a car? Or, have you listened to a mix on nearfield monitors? If the 1/2 wavelength rule was true, and you were sitting, say, 2 feet from the loudspeakers, how could you hear anything under about 300 Hz? If you were listening in headphones, how could you hear anything at all? That distance is pretty close to zero.

I am, at the very moment of this writing, sitting about two feet from a pair of studio monitors. I have my copy of Reaper open, with the included tone-generator running. There’s a clearly audible 50 Hz sine-wave emanating from the setup. If I had to be a minimum of 1/2 wavelength from the boxes in order to hear 50 Hz, I would have to be about 11 feet away.

You absolutely CAN hear low frequency information at close range, because you hear frequency, not wavelength.

The Kernel Of Truth

So, why does the myth persist, if it’s so easy to prove incorrect?

If I had my guess, it would be that earnest, smart people with good intentions can still misinterpret observations. Acoustical phenomena in a room can make it difficult to hear bass at certain points in the room. For instance, when I worked at Fats Grill, the mixing console was tucked into a sort of shallow corner. That area was a great bass-chamber. Lots of bottom end built up there, giving a false sense of what was going on below 100 Hz. If you moved about 3 – 6 feet to the right, most of the deep LF flat-out disappeared. The effect was NOT subtle.

It’s entirely possible, then, that other folks in other rooms have stood in places where low frequency information was canceling – or even just “normal” – and have then moved to a spot where bass was collecting and reinforcing itself. A distinct possibility is that they found the peak of a standing wave while walking away from the stage. With their teeth suddenly rattling out of their skulls, they think, “Ah ha! You have to be a certain distance away from things to really hear the bass!”

And that’s true…in that room, at that frequency, under those acoustical conditions.

It’s also possible to setup a PA such that LF cancels in a helpful (or unhelpful) way. For instance, Dave Rat created a subwoofer setup for Bassnectar that created 360-degree coverage, and did so WITHOUT flattening Lorin Ashton at the center. A person who was listening to the system at the midpoint could erroneously come to the conclusion that you have to be farther away to hear the subwoofers properly, due to the (intentional!) level loss at the center area of the deployment.

Thus, the myth survives, but it’s still untrue. You can be an inch from a bass rig or subwoofer box and hear all the output just fine. You can then move a few feet, and have acoustics kill everything. There’s no “universal minimum distance” for hearing LF, although a particular venue or setup might have some peculiarities.


Hysteresis

The name is weird, but the concept isn’t that bizarre.

Please Remember:

The opinions expressed are mine only. These opinions do not necessarily reflect anybody else’s opinions. I do not own, operate, manage, or represent any band, venue, or company that I talk about, unless explicitly noted.

gateWant to use this image for something else? Great! Click it for the link to a high-res or resolution-independent version.

I’m not a huge fan of gates. I’ve never found them to be a “must have” audio processor, and even knowing that their output will get blended into everything else in the mix, I rarely find myself liking their output. For whatever reason, gating almost always sounds unnatural and jarring to me, whereas even a signal that’s been horrifically mangled by a compressor can still have some redeeming qualities in my ears.

Even so, gates can be handy on occasion – and it’s a good idea to know how they work, so that the (hopefully) rare occasion can be risen to.

No, this is not going to be a primer on the basic setup and operation of a gate or expander. It IS going to be a discussion of a nifty feature found on more fully equipped units. I’m talking about hysteresis.

Hysteresis is one of those words which is highly abstract. The definitions you can find tend to make your eyes glaze over. To wit, this example from Google:

“The phenomenon in which the value of a physical property lags behind changes in the effect causing it, as for instance when magnetic induction lags behind the magnetizing force.”

Geeze. Wow.

It all makes more sense when you yank the concepts out of the abstract and into practical reality. And what better reality to use than a direct one, i.e., a problem with a gate.

If you’ve gotten some hands-on time with these dynamic-range expander things, you’ve probably run into the problem of “chatter.” Chatter is the process gain being rapidly adjusted up and down as a signal repeatedly crosses above and below the threshold at short intervals. The signal exceeds the threshold, the processor gain quickly returns to unity, and then the signal drops under the threshold, resulting in the gate slamming the gain back down. Sure, you could increase the attack and release times, but what if you need a fast attack? What if the signal decay time is highly variable? You’re out of luck, chum.

This is where hysteresis can come in handy, by allowing the gate gain (the processor’s “physical property”) to lag behind the signal changes (the effect causing the gain change). In practice, what you might see is a hysteresis setting defined in positive or negative decibels relative to the threshold. What you’re getting is the ability to set a release threshold which is different from the attack threshold.

So, if you set the hysteresis to -24 dB, and the main threshold is at -12 dB, a signal greater than or equal to -12 dB will trigger the gate to begin opening. At that point, the gate will not begin closing until after the signal drops to a level equal to or lower than -24 dB. This helps to prevent the aforementioned “chatter,” because the gate isn’t constantly trying to follow a signal that’s varying quickly around a single detection point. The gate can be aggressive about opening, but “lazy” about closing.

Available hysteresis still isn’t enough for me to become a big fan of gating, but it does make these processors a bit more intelligent and flexible.


Comb Filtering By The Numbers

Shorter delays mean higher initial nulls, and wider spacing.

Please Remember:

The opinions expressed are mine only. These opinions do not necessarily reflect anybody else’s opinions. I do not own, operate, manage, or represent any band, venue, or company that I talk about, unless explicitly noted.

combWant to use this image for something else? Great! Click it for the link to a high-res or resolution-independent version.

Comb filtering. The weird, hollow sound. The heart of the flanger’s “747 flying overhead” effect. The annoying airhose-esque noise.

What is it? Where does it come from? Why does it behave like it does?

Phase

The heart of comb filtering is phase – that is, a time-arrival difference between two sonic events of the same frequency. For instance, here are two events (at an arbitrary frequency) that have no time difference at all. Don’t worry about all the symbols and numbers, just look at the lines on the graph.

inphase

If these events are mathematically combined, they constructively interfere, like this (the orange trace):

inphasesum

Now, let’s make one of the events “late” when compared to the other. Specifically, let’s make it late enough that it’s completely out of phase. When one event’s amplitude is positive, the other event’s amplitude is the precise negative. This is a phase difference of 1/2 cycle, or 180 degrees.

outofphase

If those two events are combined, say, by arriving at a listener’s ear canal, or via a summing operation in a console, you get cancellation at the frequency in question:

outofphasesum

If the delay is reduced, then the cancellation isn’t complete.

partialdestructivesum

More Content

Now then.

Let’s say that the example above was a 1 kHz tone. A wave with a frequency of 1 kHz requires 1 ms to complete a full cycle. A half cycle, then, is half the time, or 0.5 ms. If you take two 1 kHz signals, delay one 0.5 ms, and then combine them, the output signal should be silence. The signal that’s a half cycle late is fully negative when the undelayed signal is fully positive.

Now, let’s imagine a different set of signals. Each signal contains three, pure tones: 1, 2, and 3 kHz. As before, 1 kHz has a period (a cycle time) of 1 ms, whereas the 2 kHz wave cycles twice as fast, and 3 kHz cycles three times as fast. Let’s delay one signal 0.5 ms again.

What happens is that the delayed signal is late by a different number of cycles at each frequency.

1 kHz : 0.5 ms/delay * 1 cycles/ms = 0.5 cycles.
2 kHz : 0.5 ms/delay * 2 cycles/ms = 1 cycle.
3 kHz : 0.5 ms/delay * 3 cycles/ms = 1.5 cycles.

The 1 kHz tone cancels, as we would expect. The 2 kHz wave does NOT cancel. Because the delay is one full cycle, the effect is constructive addition – after the first 0.5 ms has passed, of course. Where things get very interesting is at 3 kHz, because that’s where another cancellation occurs. The 3 kHz tone’s amplitude goes one full cycle, and then only gets halfway when its delayed version begins. Because 3 kHz is at a halfway point when its delayed version starts, the 3 kHz tone also cancels.

You can begin to imagine what would happen if the two signals had content all the way up through the end of the audible spectrum. The phase difference would continue to “wrap” from all the way out of phase to “in phase, but late,” and back again.

Locating The Dips

An important note:

For these examples, I’m working in an electronic system where wavelength doesn’t matter. In a real room, with sound pressure waves in air, the numbers get to be a bit different. Sound travels at about 1126 feet/ second in the air, so a 1 kHz wave is physically 1.126 feet long. For sounds that are physically combining in air, the actual wavelength “in the room,” and the delay time corresponding to that are what determine where comb filtering occurs.

At the same time, rounding things off so that 1 ms = 1 foot will get you into the ballpark, and make math easier. Just be aware that the rounding error is occurring.


Comb filtering can occur in all manner of “same signal, but late” situations. One common situation is two microphones picking up the same sound, at a similar amplitude, but with some spacing between the mics.

Let’s assume that our two mics are 2 feet apart. We’ll use the 1 ms = 1 foot rounding to keep the math easy, recognizing that the numbers won’t be exact. A sound arrives at one mic, and then travels onward to the other. The mics are then summed in the console to feed the PA.

For any given delay time, there is a lowest frequency of complete cancellation. This is the frequency which has a cycle time that is twice the delay. At that frequency, one delay time is half a cycle. Frequencies lower than the first cancellation will all be somewhat out of phase, of course, but to lesser degrees.

In more practical terms, this means that (1/[delay in seconds])/2 will give you the frequency with the first complete cancellation. For the above example this works out to (1/[0.002])/2 = 250 Hz.

Above the first cancellation, the cancellation repeats as the phase relationship “wraps” from fully out of phase, to late but in phase, and back again.

These cancellations occur at each odd-numbered harmonic of the first cancellation frequency. Each odd-numbered harmonic is a frequency that is some number of cycles + 1/2 cycle at the delay time.

For our example, this means:

First cancellation – 250 Hz.
Other cancellations – 750 Hz, 1250 Hz, 1750 Hz, 2250 Hz, 2750 Hz, 3250 Hz, 3750 Hz, and so on.

Below is a calculator to help you. It takes a delay time in milliseconds, finds the first cancellation, and then finds the upper cancellations through the audible frequency range.

First cancellation: 1/[]/2 = Hz

Additional cancellations:


A Guided Tour Of Feedback

It’s all about the total gain from the microphone’s reference point.

Please Remember:

The opinions expressed are mine only. These opinions do not necessarily reflect anybody else’s opinions. I do not own, operate, manage, or represent any band, venue, or company that I talk about, unless explicitly noted.

smoothed-monitorsWant to use this image for something else? Great! Click it for the link to a high-res or resolution-independent version.

This site is mostly about live audio, and as such, I talk about feedback a lot. I’m used to the idea that everybody here has a pretty good idea of what it is.

But, every so often, I’ll do a consulting gig and be reminded that feedback can be a mysterious and unknown force. So, for those of you who are totally flummoxed by feedback monsters, this article exists for your specific benefit.

All Locations Harbor Dragons

The first thing to say is this: Any PA system with real mics on open channels, and in a real room, is experiencing feedback all the time. Always.

Feedback is not a phenomenon which appears and disappears. It may or may not be a problem at any particular moment in time. You may or may not be able to hear anything like it at a given instant. Even so, any PA system that is doing anything with a microphone is guaranteed to be in a feedback loop.

What matters, then, is the behavior of the signal running through that loop. If the signal is decaying into the noise floor before you can notice it, then you DO have feedback, but you DON’T have a feedback problem. If the signal is dropping slowly enough for you to notice some lingering effects, you are beginning to have a problem. If the signal through the feedback loop isn’t dropping at all, then you are definitely having a problem, and if the looped signal level is growing, you have a big problem that is only getting bigger.

Ouroboros

If every PA system is a dragon consuming its own tail – an ouroboros – then how does that self-consuming action take place?

It works like this:

1) A sound is made in the room.
2) At least one microphone converts that sound into electricity.
3) The electricity is passed through a signal chain.
4) At the end of the chain is the microphone’s counterpart, which is a loudspeaker.
5) The loudspeaker converts the signal into a sound in the room.
6) The sound in the room travels through direct and indirect paths to the same microphone(s) as above.
7) The new sound in the room, which is a reproduction of the original event, is converted into electricity.

The loop continues forever, or until the loop is broken in some way. The PA system continually plays a copy of a copy of a copy (etc) of the original sound.

How Much Is The Dragon Being Fed?

What ultimately determines whether or not your feedback dragon is manageable or not is the apparent gain from the microphone’s reference point.

Notice that I did NOT simply say “the gain applied to the microphone.”

The gain applied to the microphone certainly has a direct and immediate influence on the apparent gain from the mic’s frame of reference. If all other variables are held constant, then greater applied gain will reliably move you closer toward an audible feedback issue. Even so, the applied gain is not the final predictor of ringing, howling, screeching, or any other unkind noise.

What really matters is the apparent gain at the capsule(s).


Gain in “absolute” terms is a signal multiplier. A gain of 1, which may be referred to as “unity,” is when the signal level coming out of a system (or system part) is equal in level to the signal going in. A signal level X 1 is the same signal level. A gain of less than 1 (but more than zero) means that signal level drops across the in/ out junction, and a gain of greater than 1 indicates an increase in signal strength.

A gain multiplier of zero means a broken audio circuit. Gain multipliers of less than zero are inverted polarity, with the absolute value relative to 1 being what determines if the signal is of greater or lesser intensity.

Of course, audio humans are more used to gain expressed in decibels. A gain multiplier of 1 is 0 dB, where the input signal (the reference) is equal to the output. Gain multipliers greater than 1 have positive decibel values, and negative dB values are assigned to multipliers less than 1. “Negative infinity” gain is a multiplier of 0.


The apparent gain as referenced by the pertinent microphone(s) is what can also be referred to as “loop gain.” The more the reproduced sonic event “gets back into” the mic, the higher that loop gain appears to be. The loop gain is applied at every iteration through the loop, which each iteration taking some amount of time to occur. If the time for a sonic event to be reproduced and arrive back at the capsule is short, then feedback will build aggressively when the loop gain is positive, but also drop quickly when the loop gain is negative.

Loop gain, as you might expect, increases with greater electronic gain. It also increases as a mic’s polar pattern becomes wider, because the mic has greater sensitivity at any given arrival angle. Closer proximity to a source of reproduced sound also increases apparent gain, due to the apparent intensity of a sound source being higher at shorter distances. Greater room reflectivity is another source of higher loop gain; More of the reproduced sound is being redirected towards the capsule. Lastly, a frequency in phase with itself through the loop will have greater apparent gain than if it’s out of phase.

This is why it’s much, much harder to run monitor world in a small, “live” space than in a large, nicely damped space – or outside. It’s also why a large, reflective object (like a guitar) can suddenly put a system into feedback when all the angles become just right. The sound coming from the monitor hits the guitar, and then gets bounced directly into the most sensitive part of the mic’s polar pattern.

Dragon Taming

With all that on the table, then, how do you get control over such a wild beast?

Obviously, reducing the system’s drive level will help. Pulling the preamp or send level down until the loop gain becomes negative is very effective – and this is a big reason for bands to work WITH each other. Bands that avoid being “too loud for themselves” have fewer incidences of channels being run “hot.” Increasing the distance from the main PA to the microphones is also a good idea (within reason and practicality), as is an overall setup where the low-sensitivity areas of microphone polar patterns are pointed at any and all loudspeakers. In that same vein, using mics with tighter polar patterns can offer a major advantage, as long as the musicians can use those mics effectively. Adding heavy drape to a reflective room may be an option in some cases.

Of course, when all of that’s been done and you still need more level than your feedback monster will let you have, it’s probably time to break out the EQ.

Equalization can be effective with many feedback situations, due to loop gain commonly being notably NOT equal at all frequencies. In almost any situation that you will encounter in real-life, one frequency will end up having the highest loop gain at any particular moment. That frequency, then, will be the one that “rings.”

The utility of EQ is that you can reduce a system’s electronic gain in a selected bandwidth. Preamp levels, fader levels, and send levels are all full-bandwidth controls – but if only a small part of the audible spectrum is responsible for your troubles, it’s much better to address that problem specifically. Equalizers offering smaller bandwidths allow you to make cuts in problem areas without wrecking everything else. At the same time, very narrow filters can be hard to place effectively, and a change in phase over time can push a feedback frequency out of the filter’s effective area.

EQ as a feedback management device – like everything else – is an exercise in tradeoffs. You might be able to pull off some real “magic” in terms of system stability at high gain, but the mics might sound terrible afterwards. You can easily end up applying so many filters that reducing a full-bandwidth control’s level would do basically the same thing.

In general, doing as much as possible to tame your feedback dragon before the EQ gets involved is a very good idea. You can then use equalization to tamp down a couple of problem spots, and be ready to go.


Double Hung Discussion

It’s not magic, and it may not be for you. It works for me, though.

Please Remember:

The opinions expressed are mine only. These opinions do not necessarily reflect anybody else’s opinions. I do not own, operate, manage, or represent any band, venue, or company that I talk about, unless explicitly noted.

double-hungWant to use this image for something else? Great! Click it for the link to a high-res or resolution-independent version.

On the heels of my last article, it came to may attention that some folks were – shall we say – perplexed about my whole “double hung” PA deployment. As can be the case, I didn’t really go into any nuance about why I did it, or what I expected to get out of it. This lead some folks to feel that it was a really bizarre way to go about things, especially when a simpler solution might have been a better option.

The observations I became aware of are appropriate and astute, so I think it’s worth talking about them.

Why Do It At All?

First, we can start with that logistics thing again.

When I put my current system together, I had to consider what I was wanting to do. My desire was to have a compact, modular, and flexible rig that could “degrade gracefully” in the event of a problem. I also had no desire to compete with the varsity-level concert systems around town. To do so would have required an enormous investment in both gear and transport, one that I was unwilling (and unable) to make.

What I’ve ended up with, then, is a number of smaller boxes. If I need more raw output, I can arrange them so that they’re all hitting the same general area. I also have the option of deploying for a much wider area, but with reduced total output capability. I wouldn’t have that same set of options with a small number of larger, louder enclosures.

That’s the basic force behind why I have the rig that I have. Next come the more direct and immediate issues.

The first thing is just a practical consideration: Because my transport vehicle isn’t particularly large, I don’t really have the necessary packing options required to “leave gear on the truck.” If I’m getting the rig out, I might as well get all of it out. This leads to a situation where I figure that I might as well find a way to deploy everything all the time. The gear is meant to make noise, not sit around. “Double hung” lets me do that in a way that makes theoretical sense (I’ll say more on why in a bit).

The second reason is less practical. I have a bit of a penchant for the unconventional and off-the-wall. I sometimes enjoy experiments for the sake of doing them, and running a double hung system is just that kind of thing. I like doing it to find out what it’s like to do it.

Running double hung is NOT, by any means, more practical than other deployments. Especially if you’re new to this whole noise-louderization job, going with this setup is NOT some sort of magical band-aid that is going to fix your sound problems. Also, if you’re getting good results with a much simpler way of doing things, going to the extra trouble very well may not be worth it.

At the same time, though, the reality of making this kind of deployment happen is not really all that complicated. You can do it very easily by connecting one pair to the left side of your main mix, and the other pair to the right side. Then, you just pan to one side or the other as you desire.

System Output And Response

Up above, I mentioned that running my system as a double hung made sense in terms of audio theory. Here’s the explanation as to why. It’s a bit involved, but stick with me.

I haven’t actually measured the maximum output of my FOH mid-highs, but Turbosound claims that they’ll each make a 128 dB SPL peak. I’m assuming that’s at 1 meter, and an instantaneous value. As such, my best guess at their maximum continuous performance, run hard into their limiters, would be 118 dB SPL at 1 meter.

If I run them all together as one large rig, most people will probably NOT hear the various boxes sum coherently. So, the incoherent SPL addition formula is what’s necessary: 10 Log10[10^(dB SPL/ 10) + 10^(dB SPL/ 10)…]. What I put into Wolfram Alpha is 10 Log10[10^11.8 + 10^11.8 + 10^11.8 + 10^11.8].

What I get out is a theoretical, total continuous system output of 124 dB SPL at 1 meter, ignoring any contribution from the subwoofers.

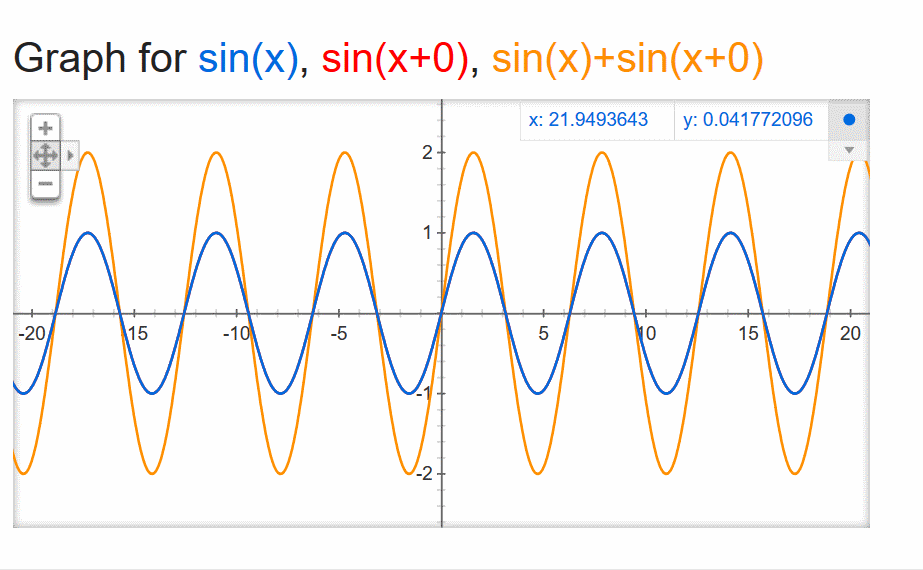
At this point, you would be quite right to say that I can supposedly get to that number in one of two ways. The first, simple way, is to just put everything into all four boxes. The second, not simple way is to put some things in some boxes and not in others. Either way, the total summed sound pressure should be basically the same. The math doesn’t care about the per-box content. So, why not just do it simply?

Because there’s more to life than just simply getting to the maximum system output level.

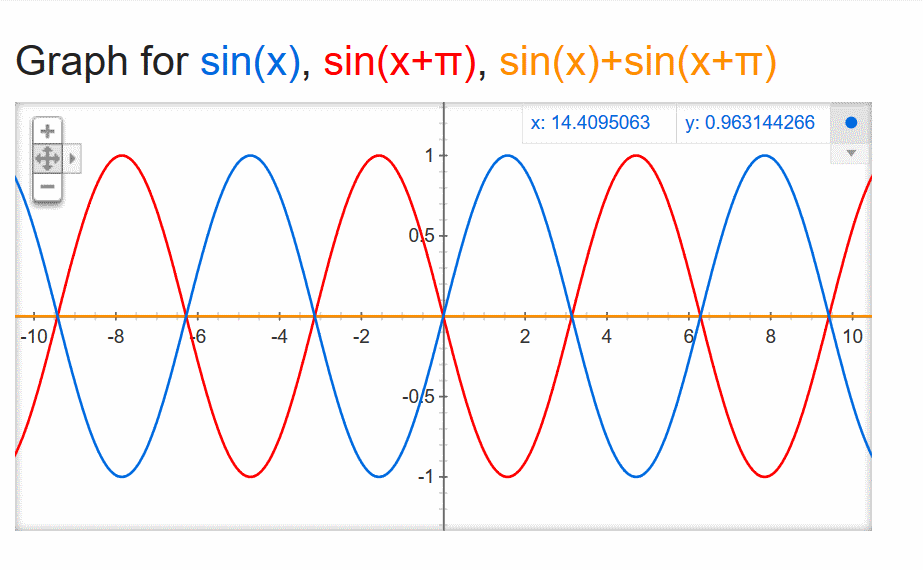
By necessity of there being physical space required for the speakers to occupy, the outer pair of enclosures simply can’t create a signal that arrives at precisely the same moment as the signal from the inner pair, as far as the majority of the audience can perceive. Placed close together, the path-length differential between an inner box and an outer box is about 0.0762 meters, or 3 inches.

That doesn’t seem so bad. The speed of sound is about 343 meters/ second in air, so 0.0762 meters is 0.22 ms of delay. That also doesn’t seem so bad…

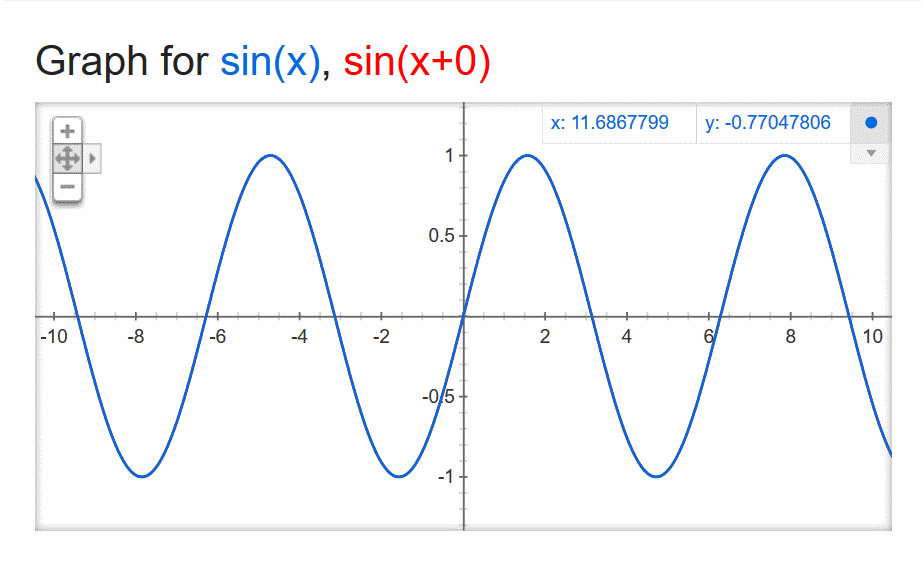
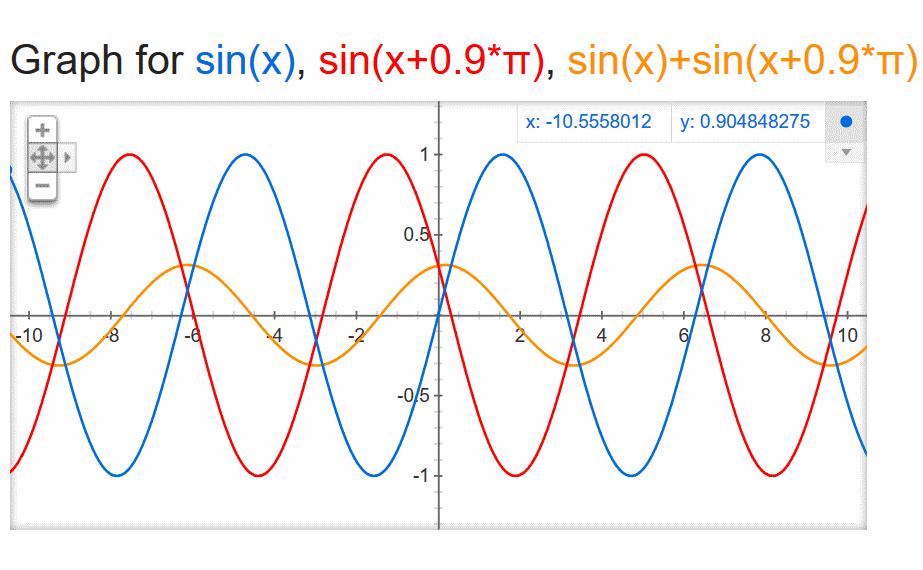
…until you realize that 0.22 ms is the 1/2 cycle time of 2272 Hz. With the outer boxes being 1/2 cycle late, 2272 Hz would null (as would other frequencies with the same phase relationship). If everything started as measuring perfectly flat, introducing that timing difference into a rig with multiple boxes producing the same material would result in this transfer function:

combfiltering0.22ms

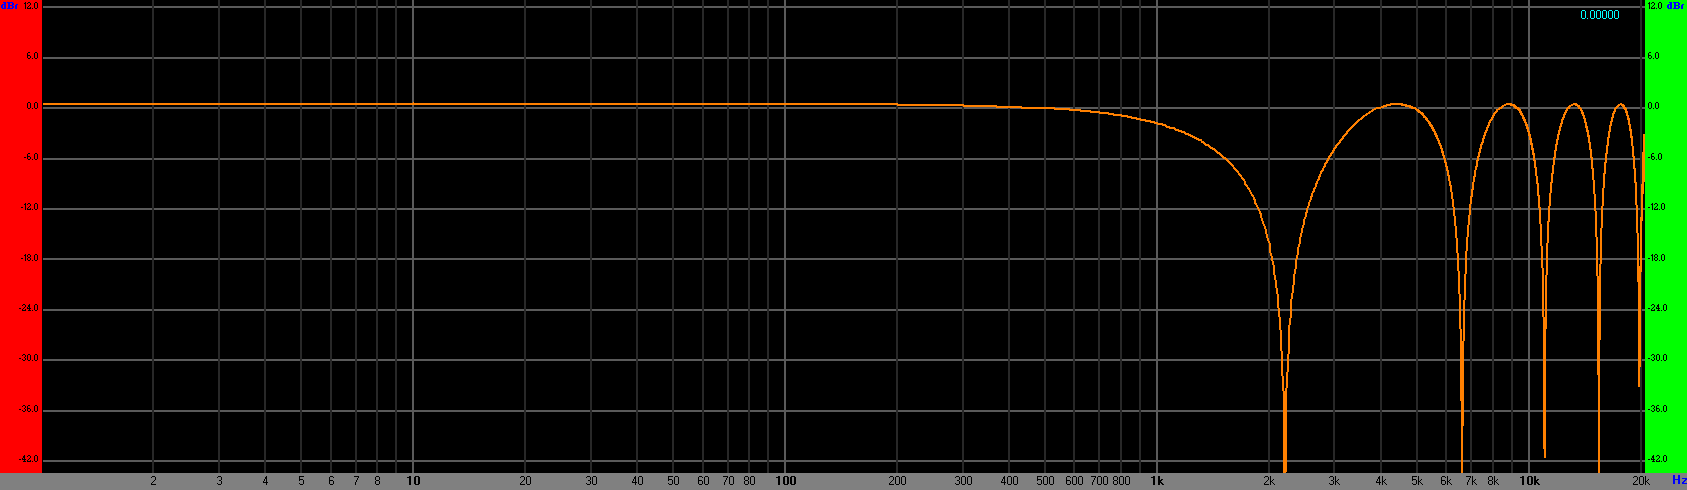
Of course, everything does NOT start out as being perfectly flat, so that craziness is added onto whatever other craziness is already occurring. For most of the audience, plenty of phase weirdness is going on from any PA deployed as two, spaced “stacks” anyway. To put it succinctly, running everything everywhere results in even more giant holes being dug into the critical-for-intelligibility range than were there before.

Running double hung, where the different pairs of boxes produce different sounds, prevents the above problem from happening.

So, when I said that I was running double hung for “clarity,” I was not doing it to fix an existing clarity problem. I was preventing a clarity problem from manifesting itself.

Running absolutely everything into every mid-high, and then having all those mid-highs combine is a simple way to make a system’s mid-highs louder. It’s also a recipe for all kinds of weird phase interactions. These interactions can be used intelligently (in an honest-to-goodness line-array, for instance), but for most of us, they actually make life more difficult. Louder is not necessarily better.

More On Output – Enough Rig For The Gig?

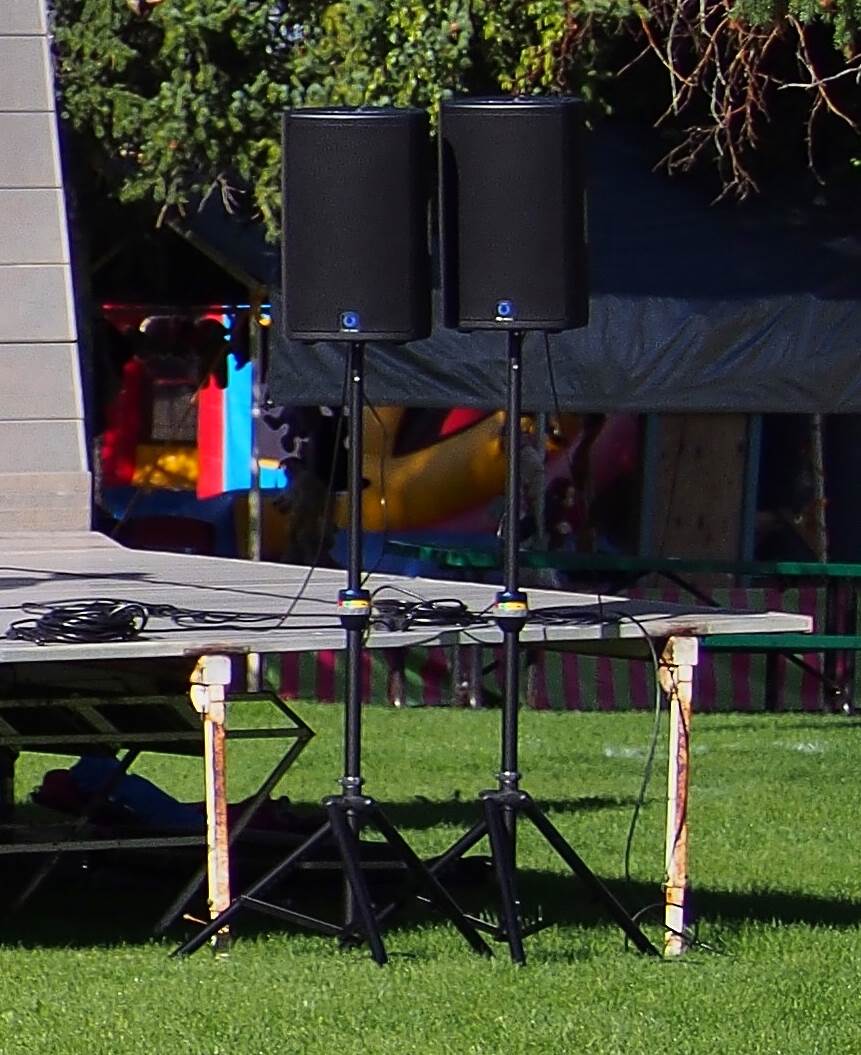
For some folks reading my previous installment, there was real concern that I hadn’t brought enough PA. They took a gander at the compactness of the rig, and said, “There’s no way that’s going to get big-time sound throughout that entire park.”

The people with that concern are entirely correct.

But “rock and roll level everywhere” was not at all what I was trying to do.

The Raw Numbers

What I’ve found is that many people do NOT actually want everything to be “rock and roll” loud over every square inch of an event area. What a good number of events actually want is a comfortable volume up close, with an ability to get away from the noise for the folks who aren’t 100% interested. With this being the case, investing in a system that can be clearly heard at a distance of one mile really isn’t worthwhile for me. (Like I said, I’m not trying to compete with a varsity-level sound company.)

Instead, what I do is to deploy a rig that’s in close proximity to the folks who do want to listen, while less interested people are at a distance. Because the folks who want more volume are closer to the PA, the PA doesn’t have to have crushing output overall. For me, the 110 dB SPL neighborhood is plenty loud, and I can do that for the folks nearby – by virtue of them being nearby.

Big systems that have to cover large areas often have the opposite situation to deal with: The distance differential between the front row and the back row can actually be smaller, although the front row is farther away from the stacks in an absolute sense. With my rig, the people up close are probably about three meters from the PA. The folks far away (who, again, aren’t really interested) might be 50 meters away. That’s more than a 16-fold difference. At a bigger show, there might be a barricade that’s 10 meters from the PA, with the main audience extending out to 100 meters. That’s a much bigger potential audience, but the difference in path lengths to the PA is only 10-fold.

Assuming that the apparent level of the show drops 6 dB for every doubling of distance, my small show loses about 24 decibels from the front row to the folks milling around at 50 meters. The big show, on the other hand, loses about 20 dB. (But they have to “start” much louder.)

That is, where the rubber hits the road is how much output each rig needs at 1 meter. At the big show, they might want to put 120 dB SPL into the front seats. To do that, the level at 1 meter has to be 140 dB. That takes a big, powerful PA. The folks in the back are getting 100 dB, assuming that delays aren’t coming into the picture.

For me to do a show that’s 110 dB for the front row, my PA has to produce about 119 dB at 1 meter. That’s right about what I would expect my compact setup to be able to do, with a small sliver of headroom. At 50 meters, my show has decayed to a still audible (but not “rock show loud”) 86 dB SPL.

That’s what I can do, and I’ve decided to be happy with it – because the folks I work with are likely to be just as happy with that as I am. People don’t hire me to cover stadiums or have chest-collapsing bass. They hire me because they know I’ll do everything in my power to get a balanced mix at “just enough” volume.

The Specifics Of The Show

Ultimately, the real brass tacks are to be found in what the show actually needed.

The show did not need 110 dB SPL anywhere. It needed a PA that sounded decent at a moderate volume.

The genre was folksy, indie material. A 110 dB level would have been thoroughly inappropriate overkill. At FOH control, the show was about 80 – 90 dB, and that was plenty. There were a few times where I was concerned that I might have been a touch too loud for what was going on. In that sense, I had far more than enough PA for raw output. I could have run a single pair of boxes and been just fine, but I didn’t want to get all the speakers out of the van and not use them. As I said before, I chose “double hung” to use all my boxes, and to use them in the way that would be nicest for people’s ears.


If you’re curious about running a double hung setup, I do encourage you to experiment with it. Curiosity is what keeps this industry moving. At the same time, you shouldn’t expect it to completely knock you off your feet. If you have a good-sounding system that runs everything through one pair of mains, adding another pair just to split out some sources is unlikely to cause a cloud-parting, ligh-ray-beaming experience of religious proportions. Somewhat like aux-fed subwoofers, going double hung is a taste-dependent route to accomplishing reinforcement for a live event. For me, it solves a particular problem that is mostly logistical in nature, and it sounds decent doing it.


Thermodynamics, System Coverage, And The Cost Of Lunch

Lunch is not free, and energy isn’t magic.

Please Remember:

The opinions expressed are mine only. These opinions do not necessarily reflect anybody else’s opinions. I do not own, operate, manage, or represent any band, venue, or company that I talk about, unless explicitly noted.

thermodynamicsWant to use this image for something else? Great! Click it for the link to a high-res or resolution-independent version.

Before diving into this topic, I want to be very clear on a few points. First, this kind of discussion is a bit “above the pay grade” of small-venue folks like myself. Second, there’s a lot of theory involved, because I don’t have anything in the way of deep, direct, hands-on experience with it.

Ready a grain of salt to take with all this, okay?

Okay.


The pro-audio world sometimes likes to behave as though thermodynamics is less of a harsh mistress than it really is. That is, there seems to be a semi-willful ignorance regarding energy and where it goes. This can lead to a sense of there being some sort of free (or reduced cost) “lunch” when it comes to the directivity of a system. The problem is that lunch is always served at full price. If you want sound to only go where you want it to go, you also have to deal with the laws governing the behavior of that audible energy.

Achieving useful, desirable directivity with an audio system was traditionally the purview of wave-guidance. In other words, horns. You channel your sonic flux through the horn, and (within the physical limits of the horn), you get certain advantages. One benefit is better “pressure transfer” to the world beyond the driver. Another nice bit of help is greater directivity. With a horn of the correct overall size and flare rate, you can focus sonic energy (within a certain passband) into a defined radiation pattern.

When horns and horn-cone hybrid boxes are used with the intention that their natural, physical directivity prevents them from interacting too much with each other, what you have is a point-source system. In such a setup, the hope is that any particular listener is overwhelmingly hearing only one source per passband…or, even better, hearing all passbands from one source. (This only has so much feasibility, especially where low-frequency material is concerned.)

As the ability to use more boxes and more electronic transformation has expanded, people are doing more and more with system processing on arrays. The enclosures involved in these arrays also have natural, physical directivity. They are also very likely to use some sort of horn for the high-frequency section. Unlike a point-source system, though, the idea is that you actually are supposed to hear the boxes interacting. This interaction can be controlled on the fly by way of changing box or driver amplitude and delay. If you want one kind of coverage, you tweak the system to interact in one way. If you suddenly decide that you want different coverage, it’s theoretically possible to simply tweak some parameters and get your change.

This is very nifty. Managing everything with actual, physical horns is a heavy, large, and predetermined sort of affair. Processing changes, in contrast, are flexible and physically lightweight. (The math, on the other hand…) “Nifty” is not “magic,” however, and this is where some people get tripped up.

The Lighting Analogy

Bear with me for a moment, as we do a foundational thought experiment.

Let’s say you have a stage light. You turn it on, and it works nicely, but you have light energy hitting something you don’t want to hit. The nice thing about your fixture is that it has shutters. You adjust the shutters so that the light no longer falls on the undesired area.

Question: Did the light falling on what you actually wanted to hit become more intense as you shuttered the beam?

No, of course not.

The visible-light radiation from the fixture hit the shutters, and was largely exchanged into heat. The luminous flux wasn’t redirected through the business-end of the fixture and mystically redirected – it was absorbed and converted. The relevant thermodynamics of the system are fully in play, and inescapable. The “cropped” energy was simply prevented from reaching a target, and that energy stopped being useful as visible light.

Now, let’s take a different approach. Let’s say you could avoid hitting an unwanted area with the light by a different means: Optics. You put a lens with tighter focus into the system, and restrict the beam-width that way.

Did the light falling on the object become more intense?

Yes, all else being equal.

The lens took the entire output of the fixture and focused that flux into a smaller area. The maximum possible fixture output remained usable.

So, what does this have to do with sound?

Focus Vs. Cancellations

In an effective sense, a horn is acoustical “lensing.” It’s a way to focus sonic energy from a driver (or drivers) into a defined space, physically giving you the directivity you want.

The flipside to this is a large, highly processed array of sound sources. Given enough drivers, enough processing, and enough time, it seems entirely feasible that a system operator could get the same coverage pattern as what would be found with point-source boxes. What has to be remembered, though, is that “lunch” has a required cost. The thermodynamics of the two approaches are not the same at all. Like our hypothetical light and tight-beam, hypothetical lens, the highly focused horn is energy efficient. A single driver (or set of drivers) have as much of their acoustical output as possible put to use solely for covering an audience.

The big, technically advanced array is energy inefficient, because it doesn’t use a physical object to focus its coverage. Instead, it requires the interaction of more energy. If you want to create an acoustical pattern through interference, you have to combine the output energies of multiple audio-output units. There are many shades of grey to take into account, of course. Even so, in the most extreme case, cancelling the output of a 1000 watt driver may require the use of another 1000 watt driver. The energy consumption of the resulting system is 2000 watts plus inefficiency losses, but your usable sonic output has not necessary doubled – remember, you’re using one driver to cancel the other for purposes of pattern control. At the physical point of that cancellation, the usable sonic energy is 0, even though the system is still consuming a large amount of electricity. It’s the same as shuttering the light. The sonic energy is merely being made unusable in a certain target area.

…and there’s a tendency to try to forget or “talk around” this. Marketing departments especially love to come up with fancy terms for things, even when those terms make no sense. Some of these highly processed systems are called impressive things like “complex point source.” The problem is that there’s no such thing. As soon as the idea for the system is to have large, intentional, audible interaction and interference across multiple units producing wideband audio, we aren’t in point-source-Kansas anymore, Toto.

There’s nothing wrong with that. Systems that have their coverage managed by way of processing and multi-box interactions are a great tool for versatility. You always bring the same gear and deploy it in basically the same way. Having exactly the right boxes for a needed point-source solution is much more possible when you’re doing a permanent, custom-built install. I’m inclined to believe the folks who claim that point-source will always measure as being more clean and coherent, but I also believe that measuring well isn’t the end-all, be-all in a discipline that has so many trade-offs.

The solutions are different, their appropriateness is situationally dependent, they are not thermodynamically equivalent, and someone is going to have to buy lunch.