Tag Archives: Signal Flow

Infinite Impulse Response

Coupled with being giant, resonant, acoustical circuits, PA systems are also IIR filters.

Please Remember:

The opinions expressed are mine only. These opinions do not necessarily reflect anybody else’s opinions. I do not own, operate, manage, or represent any band, venue, or company that I talk about, unless explicitly noted.

iirWant to use this image for something else? Great! Click it for the link to a high-res or resolution-independent version.

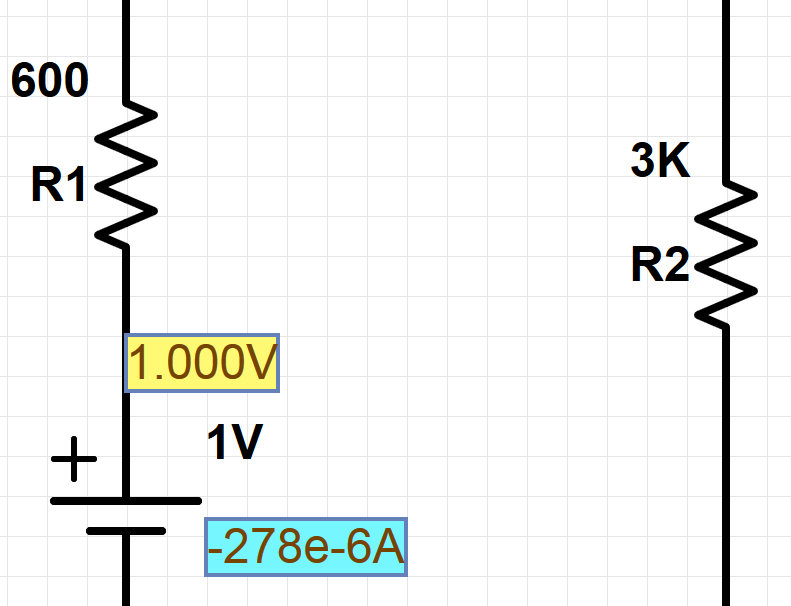
I’ve previously written about how impedance reveals the fabric of the universe. I’ve also written about how PA systems are enormous, tuned circuits implemented in the acoustic domain.

What I haven’t really gotten into is the whole concept of finite versus infinite impulse response. This follows along with the whole “resonant circuit” thing. A resonant circuit useful for audio incorporates some kind of feedback into its design, whether that design is intentional (an equalizer) or accidental (a PA system). Any PA system that amplifies the signals from microphones through loudspeakers which are audible to those same microphones is an IIR filter. That re-entrant sound is the feedback, even if the end result isn’t “feedback” in the traditional, loud, and annoying sense. Even if the PA system uses FIR filters for certain processing needs, the device as a whole exhibits infinite impulse response when viewed mathematically.

What the heck am I talking about?

FIR, IIR

Let’s first consider the key adjectives in the terms we’re using: “Finite” is one, and “infinite” is the other. The meanings aren’t complicated. Something that’s finite has an endpoint, and something that’s infinite does not. The infinite thingamabob just goes on forever.

The next bit to look at is the common subject that our adjectives are modifying. The impulse response of a PA system is what output the system produces when an input signal is applied.

So, if you stick both concepts together, a finite impulse response would mean that the PA system output relative to the input comes to a stop at some point. An infinite impulse response implies that our big stack of sound gear never comes to a stop relative to the input.

At this point, you’re probably thinking that I’ve got myself completely backwards. Isn’t a PA an FIR device? If we don’t have “classic” feedback, doesn’t the system come to a stop after a signal is removed? Well, no – not in the mathematical sense.

Functionally FIR, Mathematically IIR

First, let me talk about a clear exception. It’s entirely possible to use an assemblage of gear that’s recognizable as a PA system in a “playback only” context. The system is used to deliver sound to an audience, but there are no microphones involved in the realtime activity. They’re all muted, or not even present. Plug in any sort of signal source that is essentially impervious to sound pressure waves under normal operation, like a digital media player, and yes: You have a system that exhibits finite impulse response. The signal exiting the loudspeakers is never reintroduced to an input, so there’s no feedback. When the signal stops, the system (if you subtract the inherent, electronic noise floor) settles to a zero point.

But let’s look at some raw math when microphones are involved.

An acoustical signal is presented to a microphone capsule. The microphone converts the acoustical signal to an electrical one, and that electrical signal is then passed on to a whole stack of electronic doodads. The resulting electrical output is handed off to a loudspeaker, and the loudspeaker proceeds to convert the electrical signal into an acoustical signal. Some portion of that acoustical signal is presented to the same microphone capsule.

There’s our feedback loop, right?

Now, in a system that’s been tuned so as to behave itself, the effective gain on a signal traveling through the loop is a multiplier of less than one. (Converted into decibels, that means a gain of less than 0 dB.) Let’s say that the effective gain on the apparent pressure – NOT power – of a signal traversing our loop is 0.3. This means that our microphone “hears” the signal exiting the PA at a level that’s a bit more than 10 dB down from what originally entered the capsule.

If we start with an input sound having an apparent pressure of “1”:

Loop 1 apparent pressure = 0.3 (-10.5 dB)
Loop 2 apparent pressure = 0.09 (-21 dB)
Loop 3 apparent pressure = 0.027 (-31 dB)

Loop 10 apparent pressure = 0.0000059049 (-105 dB)

Loop 100 apparent pressure = 5.15e-53 (-1046 dB)

And so on.

In a mathematical sense, the PA system NEVER STOPS RINGING. (Well, until we hit the appropriate mute button or shut off the power.) The apparent pressure never reaches zero, although it gets very close to zero as time goes on.

And again, this brings us back to the concept of our rig being functionally FIR, even though it’s actually IIR. It is entirely true that, at some point, the decaying signal becomes completely swallowed up in both the acoustical and electrical noise floors. After a number of rounds through the loop, the signal would not be large enough to meaningfully drive an output transducer. As far as humans are concerned, the timescale required for our IIR system to SEEM like an FIR system is small.

Fair enough – but don’t lose your sense of wonder.

Fractal Geometries and Application

Although the behavior of a live-audio rig might not quite fit the strict definition of what mathematicians call an iterated function system, I would argue that – intriguingly – a PA system’s IIR behavior is fractal in nature. The number of loop traversals is infinite, although we may not be able to perceive those traversals after a certain number of iterations. Each traversal of the loop transforms the input in a way which is ultimately self-similar to all previous loop inputs. A large peak may develop in the frequency response, but that peak is a predictable derivation of the original signal, based on the transfer function of the loop. Further, in a sound system that has been set up to be useful, the overall result is “contractive:” The signal’s deviation from silence becomes smaller and smaller, and thus the signal peaks come closer and closer together.

I really do think that the impulse behavior of a concert rig might not be so different from a fractal picture like this:

sonicbutterful

And at the risk of an abrupt stop, I think there’s a practical idea we can derive from this whole discussion.

A system may be IIR in nature, but appear to be FIR after a certain time under normal operating conditions. If so, the transition time to the apparent FIR endpoint should be small enough that the system “ring time” does not perceptibly add to the acoustical environment’s reverb time.

Think about it.


The Inverse Relationship

The more gain you apply, the more unstable the system becomes.

Please Remember:

The opinions expressed are mine only. These opinions do not necessarily reflect anybody else’s opinions. I do not own, operate, manage, or represent any band, venue, or company that I talk about, unless explicitly noted.

stabilitygainWant to use this image for something else? Great! Click it for the link to a high-res or resolution-independent version.

If you want to louse up the sound of a PA system without actually damaging any components, there’s a really quick way to go:

1) Plug in some microphones.

2) Keep the PA and the microphones in the same room.

3) Apply enough gain to the microphones such that they actually become useful for sound reinforcement.

In other words, just go ahead and use the PA as you would normally expect to use it. As you add more gain to the system, the system’s sound quality will degrade progressively. If you want to avoid this degradation, don’t use the PA for anything except playback – not turntable playback, though! Those tone arms are sensitive to environmental vibration. Use a media player, or a phone with the right software.

Okay, so I’m kinda “winding you up” with this. To be practical, we have to use PA systems in the same room as the microphones they’re amplifying. We do this all the time. We tend not to agonize over the loss of sound reproduction quality, because it just isn’t worth it. The issue is just inherent to the activity.

The reason to present this in such a stark fashion, though, is to get your attention – especially if you’re new to live audio. There are plenty of inescapable facts in this business, but one of the most important bugaboos is this:

In any audio system that involves a closed or partially closed loop from the input to the output, the system’s stability decreases as the applied gain increases. Further, to use such a system means that the assemblage is at least partially destabilized as a matter of necessity.

Gain

We spend a lot of time working with and talking about “gain” in pro-audio, but we don’t usually try to formally define it very often. Gain is a multiplier applied to a signal’s amplitude. Negative gain is a multiplier that is less than one, and positive gain is a multiplier that is greater than one. A gain of exactly one (the multiplicative identity) is “unity,” where the input signal and the output signal amplitudes are the same.

For convenience, we usually express gain as the ratio of the input signal to the output signal in decibels. Unity gain in decibels is zero, because 0 dB relative to a given amplitude is that same amplitude.

Because our systems work in partially closed loops, we can also talk about concepts like “loop gain.” Loop gain is the ratio between the system output and system input, where the output is at least partially connected to the input. A system with a loop gain greater than one is in the classic “hard feedback” scenario, where an unwanted signal aggressively self-reinforces until it can no longer do so – or somebody fixes the problem. A loop gain of exactly one is still a huge problem, because a signal just continues to repeat indefinitely. The sound may not be getting progressively louder, but it’s still tremendously annoying and a grossly incorrect rendition of the original sonic event.

Especially in the context of system stability, it’s important to understand that there is a difference between gain settings and “effective loop gain.” For instance, a microphone with greater sensitivity increases the effective loop gain of a system, because it increases the system output for a given, re-entrant signal from an input…if the downstream gain settings remain fixed.

“We plugged in that condenser, and we got crazy feedback!”

“Of course we did. That condenser is 10 dB more sensitive than the mic it replaced, and you didn’t roll the preamp gain back at all. You would have gotten feedback with the original mic if you had suddenly gunned it +10 dB, that’s for sure.”

In the same vein, any physical change that increases the intensity of re-entrant signal relative to the original input is also an increase in effective loop gain. If somebody insists on having a microphone close to a PA speaker, then the system’s electronic gain structure has to be dropped if you want to compensate. (Sometimes, you don’t want to fully compensate, or you can’t for some reason.)

Stability

Okay, then.

What do I mean by “stability?”

For our purposes, “stability” is a tendency for a system to return to a desired equilibrium after having been disturbed. In an audio system, the “disturbance” is the input signal. If our sound rig was perfectly stable, the removal of the input signal would correspond with an instantaneous stoppage of output signal. The system would immediately come to “rest” at zero output (plus any self noise).

Systems used only for playback tend to have very high stability. When an input stops, the system stops making noise almost immediately.

Yes, there are limitations. Loudspeaker drivers don’t actually come to a stop instantly, for example.

Anyway.

Playback-only systems have such great stability because they tend to be “open loop.” The system’s output is not reintroduced to the system input in any meaningful way. (Record players are an exception to this, as I alluded to in the introduction.)

But PA systems being used for actual bands in an actual room are at least a “semi-closed” loop. Some portion of the output signal makes it back to the input devices, and travels through the system again. This increases the time necessary for the system to settle back to “zero output plus noise” for any given input signal – and, if you REALLY want to split hairs, you have to deal with the reality that the system never actually settles to zero at all. The signal runs through the loop indefinitely, until the loop is broken by way of a mute button, a fader being set to -∞, or the system having its power removed. To be fair, the repeating signal is usually lost completely to the noise floor in a relatively short amount of time. Even so.

Cooking up a “laboratory” example of this is fairly easy. You just take a sample of audio, run it through a delay line, and apply feedback to the delay line. To get a quantitative perspective on things, you can figure out the time required for the total output to decay into an arbitrary noisefloor. You do this by taking the signal loss through each traversal of the loop, dividing the noisefloor dB (a negative number indicating how much signal decay you want) by the “loop traversal loss” dB, and then multiplying that number by the loop traversal time.

For example, let’s say that I have a desired noisefloor of -100 dB, referenced to the original input signal level. The loop time is 10 ms, which I encounter regularly in real-life applications. If the loop traversal loss is -50 dB (meaning that the signal drops 50 decibels each time it exits and re-enters the system), then:

-100 dB/ -50 dB = 2

2 * 10 ms = 20 ms

In 20 ms, the signal has dropped far enough that I can ignore it.

Fifty dB of rejection is REALLY high for a small-venue PA system. That kind of system “instability” is impossible for me to hear. Take a listen yourself:

A traversal loss of 20 dB means that it takes over twice as long to hit the desired noisefloor – 50 ms. I can sorta start to hear some issues if I know what to look for, but it’s nothing that’s really bothersome.

A signal that decays at the rate of only 10 dB per loop traversal is audibly “smeared.” A 100 ms decay time is actually pretty easy to catch, and I’ll bet that if the instability was band-limited (as it usually is), we’d be well inside the area where the mic is starting to get “ringy and weird” in the monitors.

…and then the singer wants nine more dB on deck, which bumps the decay time to a full second. The monitor rig is getting closer and closer to flying out of control.

You get the idea. This simulation is rather abstract, but the connection to real life is that adding gain to a system reduces loop traversal loss. That is, if a signal has a loop traversal loss of -20 dB, and we increase the applied gain by 10 dB, the loop traversal loss is now only -10 dB. It takes longer for the signal to settle into the noisefloor. The system stability has decreased.

And, of course, if we go far enough with our gain we’ll get the total loop gain to be one or greater. FEEEEEEEDBAAAAAACK!

The Upshot

What this all comes down to is pretty simple:

Anything that causes you to increase a system’s effective loop gain is undesirable…but sometimes you have to do undesirable things.

Live sound is not simply an academic exercise. There are all kinds of circumstances that end up pushing us into the increase of total loop gain, and while that’s not our most preferred circumstance, we often have no choice. Even though any increase in gain also increases the instability of our systems, there’s a certain amount of instability which can be tolerated. Also, because there’s always SOME amount of re-entrant signal, there’s no setup which is fully stable – unless we give everybody in the room a set of in-ears. ($$$)

Also, we can get a bit of help in that our systems aren’t linearly unstable. We tend to get instabilities in strongly band-limited areas, which means that surgical EQ can patch certain problems without ruining the whole day. We reduce our loop gain in a very specific area, which hopefully buys us the ability to get more gain across the rest of the audible bandwidth.

Of course, if something comes along which lets us reduce our effective gain, that makes us happy. Because it helps keep us stable.


The Board Feed Problem

Getting a good “board feed” is rarely as simple as just splitting an output.

Please Remember:

The opinions expressed are mine only. These opinions do not necessarily reflect anybody else’s opinions. I do not own, operate, manage, or represent any band, venue, or company that I talk about, unless explicitly noted.

boardfeedWant to use this image for something else? Great! Click it for the link to a high-res or resolution-independent version.

I’ve lost count of the number of times I’ve been asked for a “board mix.” A board mix or feed is, in theory, a quick and dirty way to get a recording of a show. The idea is that you take either an actual split from the console’s main mix bus, or you construct a “mirror” of what’s going into that bus, and then record that signal. What you’re hoping for is that the engineer will put together a show where everything is audible and has a basically pleasing tonality, and then you’ll do some mastering work to get a usable result.

It’s not a bad idea in general, but the success of the operation relies on a very powerful assumption: That the overwhelming majority of the show’s sound comes from the console’s output signal.

In very large venues – especially if they are open-air – this can be true. The PA does almost all the work of getting the show’s audio out to the audience, so the console output is (for most practical purposes) what the folks in the seats are listening to. Assuming that the processing audible in the feed-affecting path is NOT being used to fix issues with the PA or the room, a good mix should basically translate to a recorded context. That is, if you were to record the mix and then play it back through the PA, the sonic experience would be essentially the same as it was when it was live.

In small venues, on the other hand…

The PA Ain’t All You’re Listening To

The problem with board mixes in small venues is that the total acoustical result is often heavily weighted AWAY from what the FOH PA is producing. This doesn’t mean that the show sounds bad. What it does mean is that the mix you’re hearing is the PA, AND monitor world, AND the instruments’ stage volume, hopefully all blended together into a pleasing, convergent solution. That total acoustic solution is dependent on all of those elements being present. If you record the mix from the board, and then play it back through the PA, you will NOT get the same sonic experience that occurred during the live show. The other acoustical elements, no longer being present, leave you with whatever was put through the console in order to make the acoustical solution converge.

You might get vocals that sound really thin, and are drowning everything else out.

You might not have any electric guitar to speak of.

You might have only a little bit of the drumkit’s bottom end added into the bleed from the vocal mics.

In short, a quick-n-dirty board mix isn’t so great if the console’s output wasn’t the dominant signal (by far) that the audience heard. While this can be a revealing insight as to how the show came together, it’s not so great as a demo or special release.

So, what can you do?

Overwhelm Or Bypass

Probably the most direct solution to the board feed problem is to find a way to make the PA the overwhelmingly dominant acoustic factor in the show. Some ways of doing this are better than others.

An inadvisable solution is to change nothing about the show and just allow FOH to drown everything. This isn’t so good because it has a tendency to create a painfully loud experience for the audience. Especially in a rock context, getting FOH in front of everything else might require a mid-audience continuous sound pressure of 110 dB SPL or more. Getting away with that in a small room is a sketchy proposition at best.

A much better solution is to lose enough volume from monitor world and the backline, such that FOH being dominant brings the total show volume back up to (or below) the original sound level. This requires some planning and experimentation, because achieving that kind of volume loss usually means finding a way of killing off 10 – 20 dB SPL of noise. Finding a way to divide the sonic intensity of your performance by anywhere from 10 to 100(!) isn’t trivial. Shielding drums (or using a different kit setup), blocking or “soaking” instrument amps (or changing them out), and switching to in-ear monitoring solutions are all things that you might have to try.

Alternatively, you can get a board feed that isn’t actually the FOH mix.

One way of going about this is to give up one pre-fade monitor path to use as a record feed. You might also get lucky and be in a situation where a spare output can be configured this way, requiring you to give up nothing on deck. A workable mix gets built for the send, you record the output, and you hope that nothing too drastic happens. That is, the mix doesn’t follow the engineer’s fader moves, so you want to strenuously avoid large changes in the relative balances of the sources involved. Even with that downside, the nice thing about this solution is that, large acoustical contributions from the stage or not, you can set up any blend you like. (With the restriction of avoiding the doing of weird things with channel processing, of course. Insane EQ and weird compression will still be problematic, even if the overall level is okay.)

Another method is to use a post-fade path, with the send levels set to compensate for sources being too low or too hot at FOH. As long as the engineer doesn’t yank a fader all the way down to -∞ or mute the channel, you’ll be okay. You’ll also get the benefit of having FOH fader moves being reflected in the mix. This can still be risky, however, if a fader change has to compensate for something being almost totally drowned acoustically. Just as with the pre-fade method, the band still has to work together as an actual ensemble in the room.

If you want to get really fancy, you can split all the show inputs to a separate console and have a mix built there. It grants a lot of independence (even total independence) from the PA console, and even lets you assign your own audio human to the task of mixing the recording in realtime. You can also just arrange to have the FOH mix person run the separate console, but managing the mix for the room and “checking in” with the record mix can be a tough workload. It’s unwise to simply expect that a random tech will be able to pull it off.

Of course, if you’re going to the trouble of patching in a multichannel input split, I would say to just multitrack the show and mix it later “offline” – but that wouldn’t be a board feed anymore.

Board mixes of various sorts are doable, but if you’re playing small rooms you probably won’t be happy with a straight split from FOH. If you truly desire to get something usable, some “homework” is necessary.


Is The Problem Voltage, Or Voltage Transfer, Or…?

If you’re going to fix a problem, you have to know what the problem actually is.

Please Remember:

The opinions expressed are mine only. These opinions do not necessarily reflect anybody else’s opinions. I do not own, operate, manage, or represent any band, venue, or company that I talk about, unless explicitly noted.

voltagetransferWant to use this image for something else? Great! Click it for the link to a high-res or resolution-independent version.

If you’re going to troubleshoot (and if you’re in the business of show production, troubleshooting is inevitable), there are two basic rules:

1) You have to know what the device is supposed to do.

2) You have to know how the device does what it’s supposed to do.

There are many layers of doing 1 and 2 effectively. The deeper you go, the more problem solving you can do. Gaining the knowledge required to peel back more and more layers is a long process. Decades long. I’ve had my hands in pro-audio since I was a teenager, and with about 20 years under my belt I’m finally starting to feel like I get what’s going on. In part, that’s because I’m getting more and more acquainted with the oceans of material I still don’t know. When you start to realize just how deep the rabbit hole is, you’ve been falling down that hole for a good while.

The above is a basic, foundational statement for this article, which is a follow-on to the opening “case study” from my previous post. After having a potential issue discussed with me, I ended up finding an alternate route to a solution. I took the different path because I had a suspicion that the problem wasn’t the voltage level of a pickup’s output. I figured that the real bugbear was that the voltage from the pickup was being transferred poorly, and also that the pickup’s bottom end was being lost. I considered this assumption as possible because I have a notion (not a truly detailed one, but a notion nonetheless) about how high-impedance pickups work. That is, I know that they can be reasonably modeled as a voltage source in series with a capacitance. This all comes together to form a device with a rather high output impedance in pro-audio terms. The issue with high-impedance outputs is that voltage transfer becomes non-trivial, and the issue with capacitors in series with voltage sources is that they create a high-pass filter.

Modeling Voltage Transfer With DC

For audio folks, what we’re interested in is voltage transfer. Even when amplifiers and loudspeakers are involved, and we become interested in power transfer, we achieve power transfer by way of voltage transfer. In many ways, effective voltage transfer is invisible to audio humans. It just sort of happens for us, because a lot of our gear is built to play nicely with a lot of other gear. At times, though, we’ll encounter gear that was NOT actually built to interface nicely with our existing equipment, and that can throw us for a loop. In the case of a high-impedance pickup interfaced with pro-audio inputs, we can get into a situation where we’re PILING on the gain, only to end up with a relatively weak signal. If we don’t know how the device does what it’s supposed to do, then we can start to assume that the voltage from the pickup is too low.

But that’s not the case. Piezo pickups – probably THE example of a high-output impedance device – make plenty of voltage. When mated to, say, a basic DI box, the problem is that the voltage doesn’t transfer. The input impedance of the mic pre is too low.

Before I go any further with this, I need to say something:

IMPORTANT – Audio circuits are NOT direct current. They are alternating current. Modeling an audio circuit via a DC example is not an entirely accurate picture of what’s happening. DC examples are simple to read and easy to “construct,” but they neither show the entire picture nor all the details of what’s happening.

With that in mind…

At a very basic level, the underlying issue with voltage transfer is that voltage drops when it travels across resistors. If we mentally model an audio circuit as a voltage source across one resistor (output impedance), and then have the remaining voltage travel across an additional load resistor (input impedance), we start to get a basic idea of how things can play out.

In our simplified, DC, everything-in-series circuit, the voltages across each resistor add up to the total voltage in the circuit. As such, the proportionality between the resistors representing output and input impedance matters a lot. If the output impedance is high in relation to the input impedance, a good deal of voltage will drop before ever getting a chance to drive the input. In the reverse case, only a small amount of the total voltage drops across the output impedance, allowing a healthy voltage transfer into the next part of the audio chain.

If I take a quick jaunt over to PartSim, I can build a quick ‘n dirty example circuit. This one represents one of my EV ND767a mics plugged into one of the preamps they usually “see,” which are on an M-audio Profire 2626. At a continuous level of 94 dB SPL (1 Pascal), an ND767a is rated for 3.1mV of RMS voltage output. That output can be modeled as being in series with a 300 ohm resistor. The mic-pre of the Profire can be modeled as a 3.7 kilohm resistor.

lowtohigh

In this example, 0.23mV drops across the output impedance of the microphone. If you do the math to figure out the decibel loss, you find that about 0.67 dB was lost before the signal hit the mic pre. Even with this being a DC example, that number tracks very well with the output of the bridging calculator at Sengpiel Audio.

The above is an example of equipment that’s designed to interface nicely. What happens when a piezo pickup gets plugged into a basic DI box? That’s probably something like a 1 megohm output impedance being mated to a 50 kilohm input. The piezo can develop plenty of electrical potential. One volt RMS is +2.2 dBu, or definitely within the “line level” range. The voltage isn’t a problem at all, but the transfer of that voltage is a big deal.

hightolow

Immediately, 26 dB of voltage is dropped. If the DI box steps the voltage down even further (as is apt to happen), then the signal arriving at the console pre might be 46 dB down from the original voltage supplied by the pickup. The voltage arriving at the preamp is no higher than what you would get from a “hot output” dynamic mic in front of a not-too-loud source.

But Why Does It Sound So Bad?

Now then.

If the only real downside of our “not enough input impedance” situation was voltage loss, it wouldn’t be so bad. We’d have to run our preamps a little hot, but that’s hardly a dealbreaker.

The real awfulness comes about when the AC circuit issues enter into play. As I mentioned earlier, a piezo pickup in an audio circuit naturally tends to create a high-pass filter on its output. The high-pass filter becomes less audible as the load (input) impedance goes up. The problem, then, is that a too-small load impedance causes a very marked loss of low-frequency information. The pickup sounds “clanky” or “nasal,” because all of its really usable output becomes restricted to the high-frequency part of the audio passband.

Here’s a simplified model of a piezo pickup connected to a 50 kilohm DI box. I haven’t tried to fully represent the output impedance of the pickup, so the voltage numbers won’t be right. I used a 650 pF capacitor to represent the pickup, because the simulation of the circuit with that capacitance seems to basically represent what I’ve observed in the field.

piezomodel

highpass

At 1 kHz, the signal is about 13 dB down from the maximum level. At 200 Hz the signal is down 27 dB. Good luck correcting that with any bog-standard EQ you have handy.

Compare that with what happens when the load impedance is 1 megohm, which is what some of my active DI boxes are rated for:

highpasshighimpedance

Yes, there’s still a highpass filter in effect. Even so, it’s rather less terrifying. The filter’s 3 dB down point happens at about 250 Hz, and you’re only about 8 dB down at 100 Hz. That’s hardly perfect, but it’s manageable. (A DI box or preamp with a 10 megohm input impedance basically makes the low frequency loss a non-issue.)

Once more, I need to emphasize that these are simple models. They won’t exactly represent what you run into during the course of setting up an actual show.

But they do show that the voltage generated by a troublesome audio source is not necessarily the root of a given problem. Poor voltage transfer and circuits that mess with frequency response (when presented with a small load impedance) may be what’s really hurting you.


The Cable Termination Isn’t The Signal

The connector on the end of a cable doesn’t necessarily indicate what kind of signal is present.

Please Remember:

The opinions expressed are mine only. These opinions do not necessarily reflect anybody else’s opinions. I do not own, operate, manage, or represent any band, venue, or company that I talk about, unless explicitly noted.

xlrWant to use this image for something else? Great! Click it for the link to a high-res or resolution-independent version.

Just recently, I ran into a musician who decided to solve a problem with a cable.

The problem was that he couldn’t get his instrument pickup to work with direct boxes. He had heard that the signal from the pickup was “mic level,” and so he did a bit of thinking. Pro-audio microphones that connect directly to general-purpose preamps (whether the preamps are outboard or contained within consoles) have XLR connectors. His instrument pickup has a 1/4″ phone jack. It seemed reasonable, then, that a TRS phone plug wired to a male XLR would help.

One the one hand, this is rational. Although his pickup is almost certainly an unbalanced output on a 1/4″ TS connector, the TRS cable has a good probability of working. The likelihood is that the tip and sleeve portions will mate with the jack, while the ring simply floats. At the other end, the XLR connector can’t be mistakenly mated with the input side of a direct box, which would increase the likelihood of the instrument being connected to a mic pre. Purely as a question of physical connectivity, the cable solution is okay.

However, the basic, physical connectivity probably isn’t his issue. My guess (which ended up appearing to be correct) was that what he really had was an impedance problem. He has probably been running into audio humans who assume that his pickup will play nicely with basic DI boxes. Basic, passive DI boxes usually have input impedances that are too low to get proper voltage transfer from pickups with high-impedance outputs. (For more, you can read this article I wrote for Schwilly Family Musicians. You’ll have to scroll down a bit.) When we connected his instrument pickup to an active DI via a bog-standard TS cable, everything worked beautifully.

I should also mention that, if his custom cable had been mated to a jack with phantom power applied, he might have ended up with a very dead pickup. Some things these days are built to tolerate having 48 volts DC applied. Some things simply “release their magic smoke,” and that’s that.

Now, I can’t say that I know everything that was going on the player’s head. It’s entirely possible that his solution was just a “shorthand,” and that he’s entirely aware of the separation between cable connectors and the signals on the cable.

Some people aren’t aware of that, though, and that’s why this is worth talking about. If you’re new to audio, here’s what you need to remember:

The termination used on a cable does not guarantee any aspect of the signal flowing on that cable. The termination only represents an upper-limit to the functionality of signals flowing on the cable.

Let’s flesh that out a bit.

Voltage Level Uncertainty

Let’s say I hand you one end of a cable. The end is terminated with a male XLR connector. You don’t know anything about the other end. If you complete a circuit by mating that male XLR with another device, what will the RMS voltage across the connection be?

Millivolts? (Common microphones subjected to SPL levels in the 90 dB range – “mic” level.)

Volts? (“Line” level devices, like mixers and pro-audio signal processors.)

Tens of volts? (“Speaker” level. Twenty volts RMS across an 8-ohm load is 50 watts continuous power.)

Well? Which one is it?

You don’t know. That XLR connector doesn’t guarantee that some particular, overall voltage level can be expected. The other end of the cable might be joined up to a microphone. Or a signal processor. Or even a power amplifier. Yes, it’s not likely that the output of a power amp would be on a cable terminated with XLR, but it’s entirely possible. It has been done.

All you can really guess at is the upper-limit of the XLR connector’s functionality, and that’s not even all that useful in this context. Assuming that anything larger than 16 AWG would be too hard to stuff into the connector, the upper amperage limit of what’s practical on a common XLR connector is something like 3.7 amps. In theory, you could use a specially-built cable to successfully supply power to some models of 120 V lightbulb via an XLR connector. (DO NOT ATTEMPT THIS. You may electrocute yourself, burn yourself, or end up setting fire to something.)

The point is that the presence of XLR connectors does not mean mic-level audio. Not necessarily. You can have a similar range of voltages on TS and TRS-terminated cables. To make an educated guess, you need to know what’s connected to the send-end of the cable…and that’s at a bare minimum. To be 100% sure, you need a reliable meter.

The Unknown Balance

Let’s continue the thought experiment above. Is the signal on the cable balanced?

Again, you don’t know. Cables terminated with XLR and TRS connectors can support balanced signals, but they don’t guarantee balanced signals. It’s quite common to use TRS for unbalanced stereo. It’s also possible (although I’ve never run into it) to use XLR for unbalanced stereo. From an electrical connectivity standpoint, TRS and 3-pin XLR connectors are the same thing – three terminals. What’s done with those terminals is up to equipment manufacturers, not the connectors.

It’s entirely possible to connect an unbalanced output to a connector that supports balanced signals. The reason is because of what I said above. The connector only indicates the upper functionality limit. If one of the signal terminals is left unconnected, or just isn’t supplied with any voltage, the signal on the cable is unbalanced. The connector doesn’t care.

Because of the connector imposing an upper functionality limit, you CAN sometimes determine if the signal on a cable is unbalanced. If you’re handed a cable end that’s terminated with a connector that has only two “poles,” like a TS cable, then you can’t have balanced audio on that line. Balanced audio requires three poles: Two for actual signal, and one for ground. If a connector doesn’t have the required number of terminals, it can’t handle balanced signals.

But a connector can certainly be capable of handling a balanced line, and yet not be handling balanced audio at that particular moment.

Looking at the ends of a cable isn’t enough to know what’s going on. You have to dig a little deeper, because the cable termination isn’t the signal.


The Festival Patch

Hierarchies are handy, and if you’ve got the channels, use ’em.

Please Remember:

The opinions expressed are mine only. These opinions do not necessarily reflect anybody else’s opinions. I do not own, operate, manage, or represent any band, venue, or company that I talk about, unless explicitly noted.

cablesWant to use this image for something else? Great! Click it for the link to a high-res or resolution-independent version.

Last weekend, my regular gig hosted a Leonard Cohen tribute show. It was HUGE. The crowd was capacity, and a veritable gaggle of musicians stepped up to pay their respects to the songwriter. The guy in charge of it all (JT Draper) did a brilliant job of managing all the personnel logistics.

On my end, probably the most important piece of prep was getting the patch sorted out. If you’re new to this whole thing, the “patch” is what gets plugged into where. It’s synonymous with “input list,” when it all comes down to it.

For a festival-style show (where multiple acts perform shorter sets and switch out during the gig), getting the patch right is crucial. It’s a pillar of making festival-style reinforcement basically feasible and functionally manageable. A multi-act, fluidly-progressing show stands or falls based on several factors – and the patch is one of those supercritical, “load-bearing” parts that holds a massive quantity of weight.

If it fails to hold that weight, the wreck can be staggering.

But we got the patch right, which contributed greatly to the show being well-behaved.

Here’s the patch that actually got implemented, as far as I remember. The stage locations used are traditional stage directions, given from the perspective of someone on the deck and looking out at the audience:

  1. Vocal (Down-Right)
  2. Vocal (Down-Center)
  3. Vocal (Down Left)
  4. Vocal (Drums)
  5. Guitar Amp (Center-Left)
  6. Guitar Amp (Center-Center)
  7. Guitar DI 1
  8. Guitar DI 2
  9. Guitar Mic
  10. Bass DI (Unused)
  11. Bass Amp DI
  12. Keys DI (Unused)
  13. Percussion Mic
  14. Guitar Amp DI
  15. SM58 Special
  16. Empty
  17. Empty
  18. Empty
  19. Kick
  20. Snare
  21. Tom 1
  22. Tom 2
  23. Tom 3
  24. Tom 4 (Unused)

Why did it turn out that way?

You Have To Get Around Swiftly

Festival-style reinforcement demands that you can find the channels you need in a hurry. The biggest hurry is to get to the channels that are absolutely critical for the show to go forward. Thus, the vocals (with one exception) are all grouped together at the top of the patch. It’s very easy to find the channels on the “ends” of a console, whereas the middle is a little bit slower. If everything else went by the wayside – not that we would want that, or accept it without a fight, but if it happened – the show could still go on if we had decent vocals. Thus, they’re patched so they can be gotten to, grabbed, and controlled with the least amount of effort.

You’ll also notice that things are generally grouped into similar classes. The vocals are all mostly stuck together, followed by the inputs related to the guitars, then the basses, and so on. It’s easier to first find a group of channels and then a specific channel, as opposed to one specific channel in a sea of dissimilar sources. If you know that, say, all the guitars are in a general area, then it’s quite snappy to go to that general area of the console and then spot the specific thing you want.

A final factor in maintaining high-speed, low drag operation is making the internals of each patch group “look” like the stage. That is, for a console that’s numbered in ascending order from left to right, a lower-numbered patch point denotes an item that is closer to the left side of the stage…from the perspective of the tech. When I look up, the first vocal mic should be the farthest one to my left (which is STAGE right). The point of this is to remove as much conscious thought as possible from figuring out where each individual mic or input is within a logical group. Numbering left-to-right from the stage’s perspective might be academically satisfying, but it requires at least a small amount of abstract thought to reverse that left-to-right order on the fly. Skipping that abstraction gives one less thing to worry about, and that saves brainpower for other tasks.

Of course, now that I’ve said that, you’ll notice that the first guitar amp is actually on the wrong side of the stage. That leads into the next section:

Things Don’t Go Precisely To Plan

So…why are there some inputs that don’t seem to be numbered or grouped correctly? Why are there channels marked as unused? Didn’t we plan this thing out carefully?

Yes, the night was planned carefully. However, plans change, and things can be left unclear.

Let me explain.

Not everything in a small-venue festival-style show is necessarily nailed down. Getting a detailed stage plot from everybody is often overkill for a one-nighter, especially if the production style is “throw and go.” Further, circumstances that occur in the moment can overtake the desire to have a perfect patch. In the case of the guitar amps, I had thought that I was only going to have two on the deck, and I had also thought that the placement would be basically a traditional “left/ right” sort of affair. That’s not what happened, though, and so I had to react quickly. Because the console was already labeled and prepped for my original understanding, bumping the whole patch down by one would have been much harder than just patching into the empty channels at the end. Also, from a physical standpoint, it turned out to be more expedient to run the first guitar line over to the other side of the stage than to pull the center-center microphone from its place.

I clearly labeled the console to avoid confusion, and that was that.

The unused channels were a case of “leaving a channel unused is easy, patching in the middle of the show is hard.” During the planning for the night, it was unclear as to whether we’d have acoustic bass or not, and it was also unclear if we’d have keys or not. When the time came to actually plug-in the show, those unknowns remained. As such, the wise thing to do was to have those channels ready to go. If sources for those inputs materialized, I’d be ready with zero fuss required. If I wasn’t ready on those channels, and it turned out that they were needed, I would have to get them in place – potentially in the middle of the night. If those channels were never needed, all I had lost were a couple of inputs, and a few minutes of running cable at my leisure.

Look at all those “if” statements, and it’s pretty clear: The penalty for setting up the channels and not using them was very small compared to the advantage of having them in place.

Spend Channels, Get “Easy”

Now, what about that SM58? Why not just swap one of the other vocal mics, save time, and save space on the deck?

That seems like it would be easier, but it actually would have been harder. For starters, the other mics on the stage were VERY unlike the SM58 in terms of both output level and tonality. Yes – I could have set up a separate mix for the act that used the 58 (which would have fixed the tonality issue), but my console doesn’t currently have recallable preamp levels. I would have had to remember to roll the appropriate preamp back down when that act was finished. That might not seem like much to remember, and it isn’t really, but it’s very easy to forget if you get distracted by something else. Using one more channel to host the special mic basically removed the possibility of me making that mistake. It also removed the need for the act and me to execute a whole series of actions – on the fly – just to make the mic work. I set a preamp level for a channel that was ALWAYS going to belong to that microphone, and built EQ settings that would ALWAYS apply to that microphone, and we did the show without having to futz with swapping mics, changing mix presets, or rolling preamp gains around.

In a festival-style show, trading one spare input for a whole lot of “easy” is a no-brainer. (This is one reason why it’s good to have more channels available than you might think you actually need. You’ll probably end up with a surprise or two that becomes much easier to manage if you can just plug things into their very own channels.)

An orderly, quickly navigable festival patch is a must for getting through a multi-act gig. Even when something happens unexpectedly and partially upsets the order of that patch, starting with a good channel layout helps to contain the chaos. If you start with chaos and then add more entropy, well…


Crossover Confusion

Strictly speaking, a crossover separates “full-bandwidth” audio into two or more frequency ranges, and that’s it.

Please Remember:

The opinions expressed are mine only. These opinions do not necessarily reflect anybody else’s opinions. I do not own, operate, manage, or represent any band, venue, or company that I talk about, unless explicitly noted.

Want to use this image for something else? Great! Click it for the link to a high-res or resolution-independent version.

Every so often, I’ll get a question which indicates that we (the industry) is doing a poor job at explaining the tools we use. The question can take the form of “Is it okay to do this thing if this other thing isn’t a part of the system?” Other such questions may take the form of “Is there one right way to hook this up? Where does it go in the signal chain?”

What questions like these reveal is that there’s gear we talk about as being important – indispensable, even – yet we fail to discuss the fundamental aspects of what that gear does. The equipment in question becomes a kind of magical box or physical spellcasting component, that, if used improperly or neglected, could cause Very Bad Things to happen.

You know, like the “Klaatu, barata, nikto” incantation in “Army of Darkness.” Ash doesn’t know what it does (heck, NOBODY probably knows what it does), but getting it wrong causes Very Bad Things to occur.

“Did you say the words?”

“I said ’em…yeah.”

“Exactly?”

“Look, I might not have said every single little syllable…”

Cue the army of Deadites marching on the castle.

Anyway.

It seems to me that crossovers are a particularly prime candidate for getting the “black box” treatment. Unlike regular EQ, they aren’t really a device where you go hands-on, twist the knobs while audio is flowing, and hear the results. They’re also quite important for running a system in a sane way. They can indeed be vital to not trashing system components.

But if you don’t understand the whys and wherefores associated with crossovers, you might be unnecessarily anxious over what to do with one. Or without one.

The Basics

First things first: A crossover is a frequency dividing network. You may even see that terminology used in place of the word “crossover.” What that phrase means is that a crossover is a set of interconnected electronic devices (a network) that acts to separate a single input containing a wide range of audio frequencies into two or more outputs (a signal divider). Each output includes a subset of the original input frequency range (hence the “frequency dividing” designation), and, in standard practice, the frequency range of all the outputs put together should be the same as the input frequency range.

In other words, a crossover takes an input that can potentially contain signals spanning the full-bandwidth of human hearing (or more), and separates that signal into bandwidth-limited outputs. If you took all the outputs and summed them together, you should theoretically be able to recover the original input signal – plus any noise, distortion, phase artifacts, and whatever else that’s a product of the processing.

As an aside, a digital crossover is also – effectively – a frequency dividing network. The difference is that digital processing algorithms are used to simulate the filtering provided by a network of physical, electronic components. The specific methods are different, but the results are functionally the same.

Anyway.

If you want to be strict, a crossover has ONLY one job, and that’s to separate full-range audio into multiple, discrete passbands. (A passband being a filtered range of audio that we expect to be delivered at between unity and -3 dB gain.) Any functionality other than that is not actually part of the crossover domain…which is not to say that additional functionality is “wrong!” Input gain controls, passband output gain controls, special corrective equalization, and other such things are nifty features to have included in the package that contains the crossover. They are not, however, core to what a crossover is.

If you want to get right down to the nitty-gritty, a crossover is a set of well-engineered highpass and lowpass filters. The filters are ideally designed so that they combine with perfect phase and magnitude when adjacent to each other. In a certain sense, you can view a crossover as a highly specialized sort of EQ with a limited use-case.

What Is It Good For? Absolutely Something

Now then. Why would we want to separate full-range audio into multiple, discrete passbands?

There are purely creative reasons to do so, but the most overwhelmingly common reason is utilitarian: Loudspeaker drivers with differing characteristics have frequency ranges that they are best at reproducing. These frequency ranges are smaller than the complete frequency range audible to humans. A properly configured frequency-dividing network allows each loudspeaker driver in a “multi-way” system to receive only the frequency range that it works with optimally.

Beyond just “helping things sound good,” crossovers are very important to the care and feeding of high-frequency drivers. The reason for this is due to one of the classic failure modes of a driver receiving power: Too much power at too low a frequency.

Low frequencies require large driver displacements to reproduce. This is why you see videos of woofers “pumping” with the bass. More often than not, “large diameter” drivers are capable of very large displacements (front-to-back movement) when compared to “small diameter” drivers. If you try to get a high-frequency horn driver to reproduce 100 Hz at an audible level, you’re very likely to completely wreck the unit. The diaphragm will get smashed into something, or the voice coil will launch out of the gap and never return.

With that being the case, a crossover provides a highpass filter to the small driver which removes that potentially fatal material. If 100 Hz is what we’re talking about, a 24 dB/ octave highpass filter with a corner (-3 dB) frequency of 1500 Hz has a gain reduction of beyond 75 dB…if I did my math correctly. That’s an intensity that’s over 10,000,000 times LOWER than the material in the unity-gain area of the passband, and that’s pretty darn safe.

Where Do You Put This Thing?

With all that established, the implementation questions start to arise. One of the most basic queries is, “where in the signal-chain does the crossover go?”

Good question.

Crossover come in two basic varieties: Active and passive. Active crossovers require that their components be continually energized by stable voltage from a power supply. Passive crossovers energize their components by way of the fluctuating signal from a power amplifier.

Now, if you’re looking at a piece of rackmount gear that has to be plugged into mains power, you’re looking at an active crossover. However, I mention passive crossovers for the sake of completeness. Hidden inside most multi-way loudspeaker cabinets is a passive crossover that allows the box to be used “full range.” Frequency-dividing does still occur (remember what I said about those horn drivers and low frequency material), but it occurs in an electronic network that’s concealed from view – and sometimes drops out-of-mind as a consequence. Passive crossovers can include the ability to be bypassed, so you must take heed of them!

Anyway, back at the ranch…

The normative signal-chain position of an active crossover unit is to be just preceding the power amplifiers. Yes, the outputs of an active crossover are line-level, so you could theoretically connect other processing between each crossover output and its corresponding amp. Doing so manually, however, is a pretty advanced application. Most folks with physical pieces of outboard gear do all their “interactive” processing before the crossover unit. Doing much after the crossover gets expensive, confusing, and fills a lot of rackspace in a big hurry.

Again, remember that passive crossovers are run POST the power amplifiers (because they need that kind of voltage to operate), and may very well be “stacking” with any active crossover you have in the system. This is not a bad thing at all – it’s actually quite normal – but you should be aware of it. There are lots of PA systems that use an active crossover to get a passband for the subwoofers and a passband for everything else, with the assumption that there will be a passive crossover in the full-range loudspeaker box.

I’m going to refrain from talking about specific crossover settings, because those are so application specific that it’s not worth it.

Various Other Wrinkles

To wrap this up, I want to talk a bit about some of the wider issues that cause headscratching and crossovers to intersect.

One thing to realize is that crossover functionality is increasingly becoming wrapped up with lots of other things. Some folks benignly refer to devices like the Driverack PA+, or the DCX 2496 as “a crossover.” These units, and others, do indeed include frequency-dividing functions. However, they also include lots of other things, like pre AND post crossover EQ, dynamics, time-alignment, and other goodies. If you want to be picky, these “lots of things in one box” products are more accurately referred to as “loudspeaker management” or “system management” or “system controllers.” Because they encapsulate so many virtual processors, the concept of where the actual crossover function occurs can be obscured.

Another issue is that pro-audio is often presented in absolutes when what’s really meant is “normally.” For instance, I do recommend that a person wanting to add subs to a system use a crossover. However, the idea that you have to use a crossover or it just plain won’t work is false. Yes, you can y-split a set of outputs and send full-range signals to both the sub amps and the main amps. The subs will get (and output) a LOT more midrange than in a standard scenario, and so their acoustical output might interact with the mains’ output in a way that’s not all that great. Also, the mains will still be being asked to produce low-frequency content that chews up their headroom. Even so, if you can get it to sound good in your application, then who cares? You’d be better off with a crossover, it’s true, but the system will definitely produce sound, and not blow itself up as long as you’re not being stupid.

The point is that if you know what the crossover does, or should do, then you don’t have to be confused or intimidated by the thing.


A Vocal Group Can Be Very Helpful

Microsurgery is great, but sometimes you need a sledgehammer.

Please Remember:

The opinions expressed are mine only. These opinions do not necessarily reflect anybody else’s opinions. I do not own, operate, manage, or represent any band, venue, or company that I talk about, unless explicitly noted.

Folks tend to get set in their ways, and I’m no exception. For ages, I have resisted doing a lot of “grouping” or “busing” in a live context, leaving such things for the times when I’ve been putting together a studio mix. I think this stems from wanting maximum flexibility, disliking the idea of hacking at an EQ that affects lots of inputs, and just generally being in a small-venue context.

Stems. Ha! Funny, because that’s a term that’s used for submixes that feed a larger mix. Submixes that are derived from grouping/ busing tracks together. SEE WHAT I DID THERE?

I’m in an odd mood today.

Anyway…

See, in a small-venue context, you don’t often get to mix in the same way as you would for a recording. It’s often not much help to, say, bus the guitars and bass together into a “tonal backline” group. It’s not usually useful because getting a proper mix solution so commonly comes down to pushing individual channels – or just bits of those channels – into cohesion with the acoustic contribution that’s already in the room with you. That is, I rarely need to create a bed for the vocals to sit in that I can carefully and subtly re-blend on a moment’s notice. No…what I usually need to do is work on the filling in of individual pieces of a mix in an individual way. One guitar might have its fader down just far enough that the contribution from the PA is inaudible (but not so far down that I can’t quickly push a solo over the top), while the other guitar is very much a part of the FOH mix at all times.

The bass might be another issue entirely.

Anyway, I don’t need to bus things together for that. There’s no point. What I need to do for each channel is so individualized that a subgroup is redundant. Just push ’em all through the main mix, one at a time, and there you go. I don’t have to babysit the overall guitar/ bass backline level – I probably have plenty already, and my main problem is getting the vocals over the whole thing anyway.

The same overall reasoning works if you’ve only got one vocal mic. There’s no reason to chew up a submix bus with one vocal channel – I mean, there’s nothing there to “group.” It’s one channel. However, there are some very good reasons to bus multiple vocal inputs into one signal line, especially if you’re working in a small venue. It’s a little embarrassing that it’s taken me so long to embrace this thinking, but hey…here we are NOW, so let’s go!

The Efficient Killing Of Feedback Monsters

I’m convinced that a big part of the small venue life is the running of vocal mics at relatively high “loop gain.” That is, by virtue of being physically nearby to the FOH PA (not to mention being in an enclosed and often reflective space) your vocal mics “hear” a lot more of themselves than they might otherwise. As such, you very quickly can find yourself in a situation where the vocal sound is getting “ringy,” “weird,” “squirrely,” or even into full-on sustained feedback.

A great way to fight back is a vocal group with a flexible EQ across the group signal.

As I said, I’ve resisted this for years. Part of the resistance came from not having a console that could readily insert an EQ across a group. (I can’t figure out why the manufacturer didn’t allow for it. It seems like an incredibly bizarre limitation to put on a digital mixer.) Another bit of my resistance came from not wanting to do the whole “hack up the house graph” routine. I’ve prided myself on having a workflow where the channel with the problem gets a surgical fix, and everything else is left untouched. I think it’s actually a pretty good mentality overall, but there’s a point where a guy finally recognizes that he’s sacrificing results on the altar of ideology.

Anwyay, the point is that a vocals-only subgroup with an EQ is a pretty good (if not really good) compromise. When you’ve got a bunch of open vocal mics on deck, the ringing in the resonant acoustical circuit that I like to call “real music in a real room” is often a composite problem. If all the mics are relatively close in overall gain, then hunting around for the one vocal channel that’s the biggest problem is just busywork. All of them together are the problem, so you may as well work on a fix that’s all of them together. Ultra-granular control over individual sources is a great thing, and I applaud it, but pulling 4 kHz (or whatever) down a couple of dB on five individual channels is a waste of time.

You might as well just put all those potential problem-children into one signal pipe, pull your offending frequency out of the whole shebang, and be done with the problem in a snap. (Yup, I’m preaching to myself with this one.)

The Efficient Addition Of FX Seasoning

Now, you don’t always want every single vocal channel to have the same amount of reverb, or delay, or whatever else you might end up using. I definitely get that.

But sometimes you do.

So, instead of setting multiple aux sends to the same level, why not just bus all the vocals together, set a pleasing wet/ dry mix level on the FX processor, and be done? Yes, there are a number of situations where you should NOT do this: If you need FX in FOH and monitor world, then you definitely need a separate, 100% “wet” FX channel. (Even better is having separate FX for monitor world, but that’s a whole other topic.) Also, if you can’t easily bypass the FX chain between songs, you’ll want to go the traditional route of “aux to FX to mutable return channel.”

Even so, if the fast and easy way will work appropriately, you might as well go the fast and easy way.

Compress To Impress

Yet another reason to bus a bunch of vocals together is to deal with the whole issue of “when one guy sings, it’s in the right place, but when they all do a chorus it’s overwhelming.” You can handle the issue manually, of course, but you can also use compression on the vocal group to free your attention for other things. Just set the compressor to hold the big, loud choruses down to a comfortable level, and you’ll be most of the way (if not all the way) there.

In my own case, I have a super-variable brickwall limiter on my full-range output, a limiter that I use as an overall “keep the PA at a sane level” control. A strategy that’s worked very well for me over the last while is to set that limiter’s threshold as low as I can possibly get away with…and then HAMMER the limiter with my vocal channels. The overall level of the PA stays in the smallest box possible, while vocal intelligibility remains pretty decent.

Even if you don’t have the processing flexibility that my mix rig does, you can still achieve essentially the same thing by using compression on your vocal group. Just be aware that setting the threshold too low can cause you to push into feedback territory as you “fight” the compressor. You have to find the happy medium between letting too little and too much level through.

Busing your vocals into a subgroup can be a very handy thing for live-audio humans to do. It’s surprising that it’s taken me so long to truly embrace it as a technique, but hey – we’re all learning as we go, right?


Holistic Headroom

If you have zero headroom anywhere, you have zero headroom everywhere.

Please Remember:

The opinions expressed are mine only. These opinions do not necessarily reflect anybody else’s opinions. I do not own, operate, manage, or represent any band, venue, or company that I talk about, unless explicitly noted.

“Headroom” is a beloved buzzword for audio craftspersons. Part of the reason it’s beloved is because you can blame your problems on the lack of it:

“I hate those mic pres. They don’t have enough headroom.”

“I’m always running out of headroom on that console’s mix buses.”

“I need to buy a more powerful amplifier for my subs, because I this one doesn’t have enough headroom.”

(I’m kinda tipping my hand a bit with that last one, in terms of this post being sort of a “follow on” to my article about clipping.)

Headroom is sometimes treated as a nebulous sort of concept – a hazy property that really good gear has enough of, and not-so-good gear doesn’t possess in the required quantity. In my opinion, though, headroom is pretty easy to define, and its seeming mysteriousness is due to it being used as a “blamecatcher” for things that didn’t go as planned.

Headroom, as I was taught, is “the difference between the maximum attainable level and the nominal level.” In other words, if a device can pass a signal of greater intensity than is required for a certain situation, then the device has some non-zero amount of headroom. For example, if your application requires a console’s main bus to pass 0 dBu (decibels referenced to 0.775 volts, RMS), and the console can pass +24 dBu, then you have 24 dB of headroom in the console.

(If it’s available, and ya ain’t usin’ it, it’s headroom.)

The overall concept is pretty easy to understand, but what a good number of folks aren’t taught, and often fail to realize for a good long while (this includes me), is that headroom is holistic, and “lowest common denominator.” That is to say:

Two or more audio components – whether electrical or acoustical – connected together all have the SAME effective headroom, and that effective headroom is equal to the LOWEST amount of headroom available at any point in the signal chain.

So…what the heck does that mean?

Everything Has A Maximum Level – Everything

To start with, it’s important to point out that hyphenated bit in the above definition. Especially because this is a site about live-performance, what you have to realize is that absolutely everything connected to that live performance has a maximum amount of appropriate signal intensity. Even acoustical sources and your audience qualify for this. Think about it:

A singer can’t sing any louder than they can sing.

A mic can only handle so much SPL.

A preamp can only swing a limited amount of voltage at its outputs.

Different parts of a console’s internal signal path have limits on how much signal they can handle.

A power amplifier can’t deliver an infinite amount of voltage.

Speakers handle a limited amount of power.

The people listening to the show have a finite tolerance for sound pressure.

…and every single one of these “components” is connected to the others. Sure, the connection may not be a direct, electrical hookup, but the influences of other parts of the system are still felt. If your system can create a “full tilt boogie” sound pressure level of 125 dB SPL C, but your audience will only tolerate about 105, then that lower level becomes your “don’t exceed” point. Go beyond it, and you effectively “clip” the audience…which makes your 20 dB of unused PA capability partially irrelevant. That leads to my next point.

Your Minimum Actual Headroom Is All You Effectively Have

Sometimes, a singer will “run out of gas.” They may have strained themselves, or they might not be feeling well, or they might just be tired. As a result, their maximum acoustical output drops by some amount.

Here’s the thing.

The entire system’s EFFECTIVE headroom has just dropped by that amount. If the singer is 10 dB quieter than they used to be, you’ve just lost 10 dB of effective headroom.

Now – before you start getting bent out of shape, complaining that your console’s mix bus headroom hasn’t magically changed, look at that paragraph again. The key is the word “effective.”

Of course your console can still pass its maximum signal. Of course your loudspeakers still handle the same power as they did a moment ago. As isolated components, their absolute headroom has not changed in any way.

But components working in a complete electro-acoustical system are not isolated, and are therefore limited by each other in various ways.

In the case of a singer getting worn out, their vocal “signal” drops closer to the noisefloor of the band playing around them. Now, if we were talking about an electrical device, the noisefloor staying the same with a decrease in maximum level above that noisefloor would be – what? Yes: A loss of headroom.

The way this affects everything else is that you now have to drive the vocal harder to get a similar mix. (It’s not the same mix, because there’s less acoustical separation between the singer and the band at the point of the mic capsule, but that’s a different discussion.) Because the singer’s overall level has dropped, your gain change might not be pushing you any closer to clipping an electrical device…but you are definitely closer to the point where your system will “ring” with feedback. A system in feedback, effectively, has reached its maximum available output.

Your effective headroom has dropped.

A Bigger Power Amp Isn’t Enough

Okay – here’s the bit that’s directly related to my “clipping” article.

The concept of holistic headroom is one of the larger and fiercer bugaboos to be found in the piecing together of live-audio rigs. As many bugaboos do, it grows to a fearsome size by feeding on misconceptions and mythology. There is a particular sub-species of this creature that’s both common and venomous: The idea that a system headroom problem can be fixed by purchasing more powerful amplifiers.

Now, if you’re constantly clipping your amps because the system won’t get loud enough for your application, then yes, you need to do something about the problem. However, what you need to do has to be effective on the whole, and not just for one isolated part of the signal chain. Buying a bigger amplifier will probably get you some headroom at the amplifier, but it might not actually get you any more effective headroom (which is what actually matters). If your old amplifier’s maximum level was equal to your speakers’ power handling, and the new amplifier is more powerful than the old one, then you’ve done nothing in terms of effective headroom.

The loudspeakers were already hitting their maximum level. As such, they had zero headroom, and your new amp is thus effectively limited to zero additional headroom. Your enormously powerful amp is doing virtually nothing for you, except for letting you hit your unchanged maximum level without seeing clip lights.

To be fair, the system will get somewhat louder because loudspeakers don’t “brickwall” at their maximum input levels. Also, the nature of most music is that the peaks are significantly higher than the continuous level, which lets you get away with a too-big amp for a while. You will get some more level for a while, but your speakers will die much sooner than they should – and when they do, your system will become rather quieter…

Anyway.

The point is that, if you want a system headroom increase of “x” decibels, then you have to be sure that every part of your system – not just one piece – has “x” more decibels to give you. If you’re going to get more power, you have to make sure that you also have that much more “speaker” to receive that power. (And this gets into all kinds of funny business, like whether or not you can buy speakers that are just as efficient as what you’ve had while handling more power, or whether you need to buy more of the same speakers, and if that’s a good idea because of arrayability, or…)

There’s also the question of whether or not a more powerful system is what your audience even wants. It all ties together, because headroom is holistic.


Mixing For The Stream

The sound for a stream and the sound for an in-room audience have competing priorities.

Please Remember:

The opinions expressed are mine only. These opinions do not necessarily reflect anybody else’s opinions. I do not own, operate, manage, or represent any band, venue, or company that I talk about, unless explicitly noted.

Over the last several weeks, I’ve had the pretty-darn-neat job of mixing for livestreamed shows. AMR.fm is doing these live broadcasts on Monday nights, broadcasts that include Q&A with bands as well as live music.

It’s pretty nifty, both as an event and as a technical exercise. Putting your best foot forward on a live stream isn’t a trivial thing, but a big part of having fun is rising to a challenge, right?

Right?

Oh, come on. Don’t look at me like that. You know that challenges are where the serious enjoyment is. (Unless the challenge is insurmountable. Then it’s not so fun.)

Anyway.

The real bugaboo of doing an actual, honest-to-Pete live gig that’s also being streamed is that you have at least two different audiences, each with different priorities. To keep them all happy, you need to be able to address each separate need independently (or quasi-independently, at least). I use the word “need” because of one particular reality:

In a small-venue, the needs of the show in the room are often contrary to the needs of the show on the stream.

One way that is manifests in practical terms is that…

You Probably Don’t Want A Board Feed

“Board Feeds” can be wondrous things. In a large venue, with reasonable stage-volume, there’s a real chance that everything is in the PA, and at “full range.” That is to say, the mix includes all the instruments (even the loud ones), and the tonal shaping applied to each input is only minimally influenced by the acoustic contribution from the stage. The PA is being used to get the ENTIRE band out to the audience, and not just to fill in the spaces where a particular input isn’t at the right volume.

In the above scenario, taking a split from the main mix (before loudspeaker processing) could be a great and easy option for getting audio to stream out.

In a small venue, though, things can be rather more tricky.

I’ve written about this before. In a small room, putting everything in the PA is often unnecessary…and also a bad idea. It’s very possible to chase everybody out with that kind of volume. Rather, it’s desirable to only use the PA for what’s absolutely necessary, and ignore everything else. The “natural” acoustical contribution from the band, plus a selective contribution from the PA come together into a total acoustic solution that works for the folks in the room.

The key word there is “acoustic.”

A small-venue board feed to a live stream is often the wrong idea, because that feed is likely to sound VERY different than what’s actually in the room. The vocals might be aggressively high-passed. The guitar amps might not be present at all. The drums might sound very odd, and be very low in the mix.

And it’s all because the content of that feed is meant to combine with acoustic events to form a pleasant whole. Unfortunately, in this situation, a board-feed plus nothing is lacking those acoustical events, and so the stream sounds terrible.

The Right Mix For The Right Context

Obviously, you don’t want the stream to sound bad, or even just “off.” So – what can you do? There are two major options:

1) Capture the total acoustical event in the room, and stream that.

2) Have a way to create an independent mix for the stream that includes everything, and in a natural tonality.

The first option is easy, and often inexpensive, but it rarely sounds all that great. Micing a room, even in stereo, can be pretty “hit or miss.” Sure, a nice stereo pair in a symphony hall is likely to sound pretty good, but most folks aren’t playing symphonies in a concert hall to a quiet crowd. As likely as not, you’re streaming some kind of popular music style that’s taking place in a club, and the crowd is NOT being quiet.

Now, even with all that, there’s nothing wrong with taking the first option if it’s all you’ve got. I’ve personally enjoyed my fair share of concert videos that are nothing more complex than “micing the room.” Still, why not reach higher if you can?

Trying for something better requires some kind of “broadcast split.” There are different ways to make it happen, but the most generally feasible way is likely the route that I’ve chosen: Connect each input to two separate mix rigs. A simple splitter snake and a separate “stream mix” console are pretty much what you need to get started.

The great thing about using a separate console for the broadcast is that you have the freedom to engage in all kinds of weirdness on either console (live or stream), without directly affecting the other mix. Need a “thin” vocal in the room, but a rich and full tone for the stream? No problem! Do the guitar amps need no help from the PA, but do need to be strongly present for the broadcast audience? No sweat! Having separate consoles means that the “in-studio” audience and the stream listeners can both be catered to, without having to completely sacrifice one group on the other’s altar.

Having a totally separate mix for the broadcast is not without its own challenges, though. It would be irresponsible for me to forget to point out that mixing for two, totally separate audiences can be a real workout. If you’re new to audio, you might want to have a different person handle one mix or the other. (I’m not new to being a sound human, but I still have to cope by giving neither the live nor the broadcast mixes my full attention. I take every shortcut I can on “broadcast day,” and I let plenty of things just roll along without correction for much longer than I usually would.) Even with separate mix rigs, the broadcast mix is still partially (though indirectly) affected by the acoustical events in the room – like “ringy” monitors on deck. That being so, any “live” problem you have is likely to be VERY audible to the broadcast audience. If you’re the only one around to manage it all, that’s fine…but be ready.

I should also mention that having some way to do “broadcast levelling” on the stream feed is a good idea. Especially in my case, where we transition from Q&A to music, the dynamic range difference involved can be pretty startling. To the folks in the room, the dynamic swing is expected to some degree. To the stream listeners, though, having to lunge for the volume control isn’t too pleasant. One way to create a broadcast leveller is to insert a brickwall (infinity:1, zero attack) limiter with a long (say, five seconds) release time across the entire broadcast mix. You then set the threshold and output gain so as to minimize the difference between the loud and soft portions of the program. Using automatic levelling does sound a bit odd versus doing it manually, but it can free up your attention for other things at times.

Then again, automatic levelling does require you to do more to manage your broadcast-mix channel mutes, because a side effect of making everything “the same amount of loud at all times” means that your noise floor gets CRANKED.

…but hey, if this gig wasn’t interesting, we wouldn’t want it, right?